Introduction:
Drag-and-drop functionality is a powerful feature that allows users to intuitively interact with elements in a mobile app. Flutter provides built-in widgets and gesture recognizers to implement drag-and-drop functionality easily. This tutorial will guide you through the process of implementing a drag-and-drop feature in Flutter.

Content:
1. Create a new Flutter project:
Before we begin, make sure you have Flutter installed and set up on your machine. Create a new Flutter project by running the following command in your terminal:
flutter create drag_and_drop_example
2. Open the main.dart file:
Once the project is created, navigate to the lib folder and open the main.dart file.
3. Import the necessary packages:
To work with drag-and-drop functionality, import the following packages at the top of the main.dart file:
import 'package:flutter/material.dart';
4. Implement the drag-and-drop feature:
Inside the main.dart file, implement the drag-and-drop feature by following these steps:
a. Define the main function: Inside the main.dart file, locate the main() function and modify it as follows:
void main() {
  runApp(MyApp());
}
b. Create the MyApp class: Define the MyApp class, which extends StatelessWidget:
class MyApp extends StatelessWidget {
  @override
  Widget build(BuildContext context) {
    return MaterialApp(
      title: 'Drag-and-Drop Example',
      home: DragAndDropScreen(),
    );
  }
}
c. Create the DragAndDropScreen class: Define the DragAndDropScreen class, which extends StatefulWidget:
class DragAndDropScreen extends StatefulWidget {
  @override
  _DragAndDropScreenState createState() => _DragAndDropScreenState();
}

class _DragAndDropScreenState extends State<DragAndDropScreen> {
  List<String> items = ['Item 1', 'Item 2', 'Item 3'];

  @override
  Widget build(BuildContext context) {
    return Scaffold(
      appBar: AppBar(
        title: Text('Drag-and-Drop Example'),
      ),
      body: ListView.builder(
        itemCount: items.length,
        itemBuilder: (BuildContext context, int index) {
          return Draggable<String>(
            data: items[index],
            child: ListTile(
              title: Text(items[index]),
            ),
            feedback: ListTile(
              title: Text(items[index]),
              tileColor: Colors.grey[200],
            ),
            childWhenDragging: Container(),
          );
        },
      ),
    );
  }
}
5. Run the app:
Save the changes and run the app using the following command in your terminal:
flutter run
6. Observe the drag-and-drop functionality:
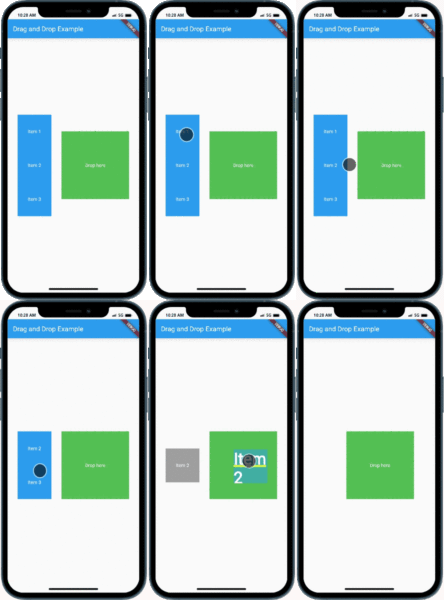
You will see a list of draggable items in the app’s UI. Long-press an item to start dragging it, and then you can drag and drop the item within the list or onto other droppable areas. Customize the appearance and behavior of the draggable and droppable widgets according to your app’s requirements.
Sample Code:
import 'package:flutter/material.dart';

void main() {
  runApp(MyApp());
}

class MyApp extends StatelessWidget {
  @override
  Widget build(BuildContext context) {
    return MaterialApp(
      title: 'Drag and Drop Example',
      theme: ThemeData(
        primarySwatch: Colors.blue,
      ),
      home: DragAndDropExample(),
    );
  }
}

class DragAndDropExample extends StatefulWidget {
  @override
  _DragAndDropExampleState createState() => _DragAndDropExampleState();
}

class _DragAndDropExampleState extends State<DragAndDropExample> {
  List<String> items = ['Item 1', 'Item 2', 'Item 3'];

  @override
  Widget build(BuildContext context) {
    return Scaffold(
      appBar: AppBar(
        title: Text('Drag and Drop Example'),
      ),
      body: Row(
        mainAxisAlignment: MainAxisAlignment.spaceEvenly,
        children: <Widget>[
          Column(
            mainAxisAlignment: MainAxisAlignment.center,
            children: items
                .map((item) => Draggable<String>(
                      data: item,
                      child: Container(
                        width: 100,
                        height: 100,
                        color: Colors.blue,
                        child: Center(
                          child: Text(
                            item,
                            style: TextStyle(color: Colors.white),
                          ),
                        ),
                      ),
                      feedback: Container(
                        width: 100,
                        height: 100,
                        color: Colors.blue.withOpacity(0.5),
                        child: Center(
                          child: Text(
                            item,
                            style: TextStyle(color: Colors.white),
                          ),
                        ),
                      ),
                      childWhenDragging: Container(
                        width: 100,
                        height: 100,
                        color: Colors.grey,
                        child: Center(
                          child: Text(
                            item,
                            style: TextStyle(color: Colors.white),
                          ),
                        ),
                      ),
                    ))
                .toList(),
          ),
        DragTarget<String>(
  onAccept: (value) {
    setState(() {
      items.remove(value);
    });
  },
  builder: (BuildContext context, List<String?> candidateData,
      List<dynamic> rejectedData) {
    return Container(
      width: 200,
      height: 200,
      color: Colors.green,
      child: Center(
        child: Text(
          'Drop here',
          style: TextStyle(color: Colors.white),
        ),
      ),
    );
  },
),


        ],
      ),
    );
  }
}
Output:

Conclusion:
In this tutorial, you have learned how to implement a drag-and-drop feature in Flutter. By following the steps outlined in this tutorial, you can create a dynamic and intuitive user interface in your Flutter app, allowing users to interact with elements by dragging and dropping them. Experiment with different draggable and droppable widgets, and implement custom logic to handle the drag-and-drop actions. Enhance the user experience and make your app more interactive by incorporating a drag-and-drop feature.


