Introduction:
Flutter, with its rich set of widgets and powerful animation framework, allows developers to create stunning and interactive user interfaces. Among the various animation options available, the AnimatedContainer widget stands out as a simple yet versatile tool for creating fluid animations with minimal effort. In this comprehensive guide, we’ll explore the AnimatedContainer widget in Flutter and learn how to use it to create eye-catching animations.
What is AnimatedContainer?
The AnimatedContainer widget is a built-in Flutter widget that automatically transitions between different property values over a specified duration. It simplifies the process of animating properties such as size, color, padding, and more, without the need for manually managing animation controllers or tweens. By simply updating the properties of the AnimatedContainer, Flutter handles the animation for you.
Advantages of AnimatedContainer:
- Effortless Animations: With AnimatedContainer, you can achieve smooth and visually appealing animations with minimal code. It eliminates the need for managing animation controllers and tweens manually.
- Dynamic Updates: AnimatedContainer seamlessly transitions between different property values, allowing you to update properties dynamically in response to user interactions, state changes, or other triggers.
- Implicit Animations: By leveraging AnimatedContainer, you can easily create implicit animations that automatically animate changes in properties, reducing the complexity of explicit animation setup.
Using AnimatedContainer:
To get started with AnimatedContainer, follow these steps:
Step 1: Import the necessary packages
import 'package:flutter/material.dart';
Step 2: Define the AnimatedContainer
AnimatedContainer(
  duration: Duration(milliseconds: 500),
  curve: Curves.easeInOut,
  width: _width,
  height: _height,
  color: _color,
  margin: _margin,
  padding: _padding,
  child: _child,
)
Step 3: Update the AnimatedContainer properties
setState(() {
  _width = 200.0;
  _height = 200.0;
  _color = Colors.blue;
  _margin = EdgeInsets.all(20.0);
  _padding = EdgeInsets.symmetric(horizontal: 10.0, vertical: 20.0);
  _child = Text('Animated Container');
});
Code Explanation:
- In Step 2, we define the AnimatedContainer widget and specify its duration, curve, and initial properties such as width, height, color, margin, padding, and child. These properties define the starting state of the container.
- In Step 3, we use
setStateto update the properties of the AnimatedContainer. Upon callingsetState, Flutter automatically animates the transition from the previous property values to the new ones specified in thesetStatecallback.
Example: Creating a Simple Animation
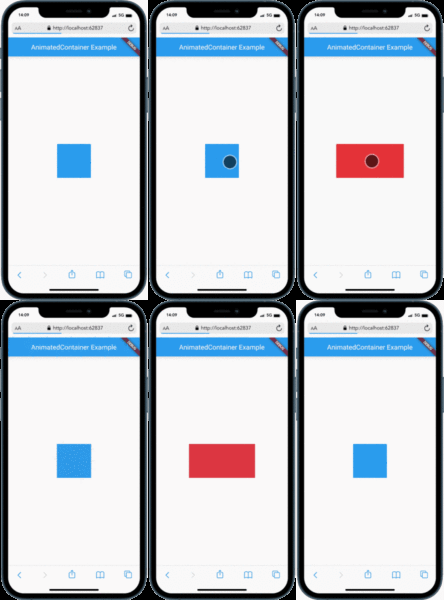
Let’s create a simple animation using AnimatedContainer. In this example, we’ll animate the width and color of a container with a button tap.
class AnimatedContainerExample extends StatefulWidget {
  @override
  _AnimatedContainerExampleState createState() => _AnimatedContainerExampleState();
}

class _AnimatedContainerExampleState extends State<AnimatedContainerExample> {
  double _width = 100.0;
  Color _color = Colors.blue;

  void _animateContainer() {
    setState(() {
      _width = _width == 100.0 ? 200.0 : 100.0;
      _color = _color == Colors.blue ? Colors.red : Colors.blue;
    });
  }

  @override
  Widget build(BuildContext context) {
    return Scaffold(
      appBar: AppBar(
        title: Text('AnimatedContainer Example'),
      ),
      body: Center(
        child: GestureDetector(
          onTap: _animateContainer,
          child: AnimatedContainer(
            duration: Duration(milliseconds: 500),
            curve: Curves.easeInOut,
            width: _width,
            height: 100.0,
            color: _color,
          ),
        ),
      ),
    );
  }
}

In this example, we have a _width variable that controls the width of the container, and a _color variable that determines the color. On tapping the container, the _animateContainer method is triggered, which updates the values of _width and _color using setState. The AnimatedContainer automatically animates the transition between the previous and new property values, resulting in a smooth animation.
Conclusion:
AnimatedContainer is a powerful widget in Flutter that simplifies the process of creating simple and engaging animations. With its ability to automatically transition between different property values, you can easily bring life and interactivity to your Flutter applications. By following the step-by-step guide and exploring the provided code examples, beginners can quickly grasp the concepts of AnimatedContainer and start incorporating animations into their Flutter projects.
Experiment with different properties, durations, and curves to create your own unique animations. With Flutter’s rich animation capabilities and the simplicity of AnimatedContainer, you have the tools to build delightful user experiences that captivate your audience.
Start leveraging AnimatedContainer today and take your Flutter apps to the next level with stunning animations!


