Introduction
Typography plays a crucial role in the visual design of an app, and using custom fonts can greatly enhance its appearance. Google Fonts offers a wide selection of high-quality fonts that can be easily integrated into Flutter apps. In this tutorial, we will learn how to add Google Fonts to a Flutter app using the google_fonts package and use them in our text elements.
Content: To add Google Fonts to a Flutter app using the google_fonts package, follow these steps:
Step 1.Import the google_fonts Package:
- Open your Flutter project in your preferred code editor.
- Open the
pubspec.yamlfile. - In the
dependenciessection, add the following line:google_fonts: ^4.0.4. - Save the
pubspec.yamlfile. The code editor should automatically detect the changes and prompt you to runflutter pub get. Run this command to fetch the package.
Step 2.Import and Use Google Fonts:
- Open the Dart file where you want to use the Google Fonts.
- Import the
package:google_fonts/google_fonts.dartpackage. - Use the
GoogleFontsclass to specify the font family and style for your text elements. For example:
import 'package:flutter/material.dart';
import 'package:google_fonts/google_fonts.dart';

void main() {
  runApp(MyApp());
}

class MyApp extends StatelessWidget {
  @override
  Widget build(BuildContext context) {
    return MaterialApp(
      title: 'Google Fonts App',
      theme: ThemeData(
        textTheme: GoogleFonts.latoTextTheme(),
      ),
      home: Scaffold(
        appBar: AppBar(
          title: Text('Google Fonts App'),
        ),
        body: Center(
          child: Text(
            'Hello, Flutter!',
            style: GoogleFonts.lato(
              fontSize: 24,
              fontWeight: FontWeight.bold,
            ),
          ),
        ),
      ),
    );
  }
}
In this code snippet, we import the GoogleFonts class from the google_fonts package. We then use the latoTextTheme() method to apply the Lato font to the app’s default text theme. Finally, we use the GoogleFonts.lato() constructor to specify the Lato font family and style for the ‘Hello, Flutter!’ text.
Step 3.Run the App:
Save the changes made to your Dart file. Execute the following command in your terminal to run the app:
flutter run
Sample Code:
import 'package:flutter/material.dart';
import 'package:google_fonts/google_fonts.dart';

void main() {
  runApp(MyApp());
}

class MyApp extends StatelessWidget {
  @override
  Widget build(BuildContext context) {
    return MaterialApp(
      title: 'Google Fonts Example',
      theme: ThemeData(
        primarySwatch: Colors.blue,
        textTheme: GoogleFonts.poppinsTextTheme(),
      ),
      home: MyHomePage(),
    );
  }
}

class MyHomePage extends StatelessWidget {
  @override
  Widget build(BuildContext context) {
    return Scaffold(
      appBar: AppBar(
        title: Text('Google Fonts Example'),
      ),
      body: Center(
        child: Column(
          crossAxisAlignment: CrossAxisAlignment.center,
          mainAxisAlignment: MainAxisAlignment.center,
          children: [
            Text(
              'Custom roboto Font Example',
              style: GoogleFonts.roboto(
                textStyle: TextStyle(
                  fontSize: 24,
                  fontWeight: FontWeight.bold,
                  letterSpacing: 1.5,
                ),
              ),
            ),
            SizedBox(
              height: 10,
            ),
            Text(
              'Custom lato Font Example',
              style: GoogleFonts.lato(
                textStyle: TextStyle(
                  fontSize: 24,
                  fontWeight: FontWeight.bold,
                  letterSpacing: 1.5,
                ),
              ),
            ),
            SizedBox(
              height: 10,
            ),
            Text(
              'Custom oswald Font Example',
              style: GoogleFonts.oswald(
                textStyle: TextStyle(
                  fontSize: 24,
                  fontWeight: FontWeight.bold,
                  letterSpacing: 1.5,
                ),
              ),
            ),
            SizedBox(
              height: 10,
            ),
            Text(
              'Custom mulish Font Example',
              style: GoogleFonts.mulish(
                textStyle: TextStyle(
                  fontSize: 24,
                  fontWeight: FontWeight.bold,
                  letterSpacing: 1.5,
                ),
              ),
            ),
            SizedBox(
              height: 10,
            ),
            Text(
              'Custom Nunito Font Example',
              style: GoogleFonts.nunito(
                textStyle: TextStyle(
                  fontSize: 24,
                  fontWeight: FontWeight.bold,
                  letterSpacing: 1.5,
                ),
              ),
            ),
          ],
        ),
      ),
    );
  }
}
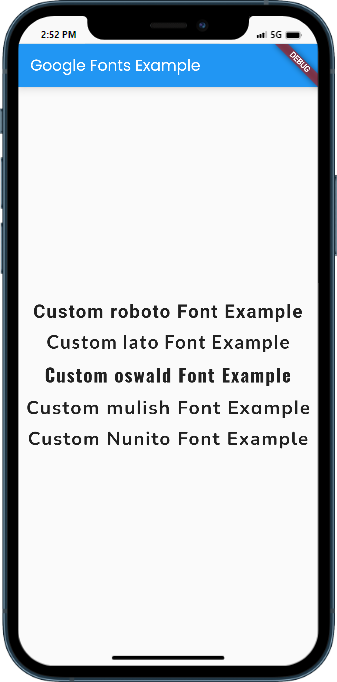
Output:

Conclusion:
You have successfully added Google Fonts to your Flutter app using the google_fonts package. By following this tutorial, you learned how to import the package, use the GoogleFonts class to specify font styles, and apply them to your app’s text elements. Experiment with different fonts and styles to create a visually appealing typography in your Flutter app.


