Introduction
The custom_date_range_picker package allows you to create a custom date range picker in Flutter, providing flexibility in selecting date ranges for your app.
Content
1.Add the custom_date_range_picker dependency:
Open your pubspec.yaml file and add the custom_date_range_picker dependency.
dependencies:
custom_date_range_picker: ^latest_version
Run flutter pub get to install the package.
2.Import the package:
Import the custom_date_range_picker package in your Dart file.
import 'package:custom_date_range_picker/custom_date_range_picker.dart' as cdrp;
3.Create a Custom Date Range Picker:
Use the showCustomDateRangePicker function to create a custom date range picker.
Future<void> _selectDateRange(BuildContext context) async {
  final DateTimeRange? picked = await cdrp.showCustomDateRangePicker(
    context: context,
    initialFirstDate: DateTime.now(),
    initialLastDate: DateTime.now().add(Duration(days: 7)),
    firstDate: DateTime(2010),
    lastDate: DateTime(2030),
    selectableDayPredicate: (DateTime date) {
      // Add any custom logic here to enable/disable specific dates
      return true;
    },
  );

  if (picked != null) {
    // Handle the selected date range
    print('Selected date range: ${picked.start} - ${picked.end}');
  }
}
Customize the initialFirstDate, initialLastDate, firstDate, and lastDate parameters to set the initial and allowable date ranges.
Use the selectableDayPredicate parameter to enable/disable specific dates based on custom logic.
4.Show the Date Range Picker:
Call the _selectDateRange function to show the custom date range picker.
ElevatedButton(
  onPressed: () => _selectDateRange(context),
  child: Text('Select Date Range'),
),
5.Run the app:
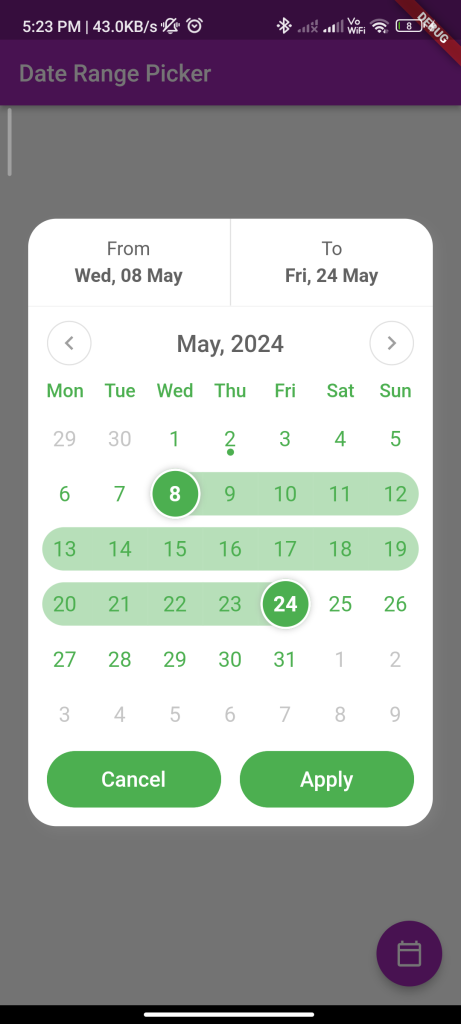
Run your Flutter app to see the custom date range picker in action.
flutter run
Sample Code
import 'package:custom_date_range_picker/custom_date_range_picker.dart';
import 'package:flutter/material.dart';
import 'package:intl/intl.dart';

void main() {
  runApp(const MyApp());
}

class MyApp extends StatelessWidget {
  const MyApp({Key? key}) : super(key: key);

  @override
  Widget build(BuildContext context) {
    return MaterialApp(
      title: 'Flutter Demo',
      theme: ThemeData(
        brightness: Brightness.light,
        primarySwatch: Colors.purple,
      ),
      home: const MyHomePage(),
    );
  }
}

class MyHomePage extends StatefulWidget {
  const MyHomePage({Key? key}) : super(key: key);

  @override
  State<MyHomePage> createState() => _MyHomePageState();
}

class _MyHomePageState extends State<MyHomePage> {
  DateTime? startDate;
  DateTime? endDate;

  @override
  Widget build(BuildContext context) {
    return Scaffold(
      appBar: AppBar(
        title: const Text(
          "Date Range Picker",
          style: TextStyle(color: Colors.white),
        ),
      ),
      body: Padding(
        padding: const EdgeInsets.only(left: 18, bottom: 16),
        child: Material(
          color: Colors.transparent,
          child: Padding(
            padding: const EdgeInsets.only(left: 8, right: 8, top: 4, bottom: 4),
            child: Center(
              child: Column(
                mainAxisAlignment: MainAxisAlignment.center,
                crossAxisAlignment: CrossAxisAlignment.center,
                children: <Widget>[
                  const Text(
                    'Choose a date Range',
                    style: TextStyle(fontWeight: FontWeight.w500, fontSize: 20, color: Colors.black),
                  ),
                  const SizedBox(height: 20),
                  Text(
                    '${startDate != null ? DateFormat("dd, MMM").format(startDate!) : '-'} / ${endDate != null ? DateFormat("dd, MMM").format(endDate!) : '-'}',
                    style: const TextStyle(
                      fontWeight: FontWeight.w400,
                      fontSize: 18,
                      color: Colors.black,
                    ),
                  ),
                ],
              ),
            ),
          ),
        ),
      ),
      floatingActionButton: FloatingActionButton(
        onPressed: () {
          showCustomDateRangePicker(
            context,
            dismissible: true,
            minimumDate: DateTime.now().subtract(const Duration(days: 30)),
            maximumDate: DateTime.now().add(const Duration(days: 30)),
            endDate: endDate,
            startDate: startDate,
            backgroundColor: Colors.white,
            primaryColor: Colors.green,
            onApplyClick: (start, end) {
              setState(() {
                endDate = end;
                startDate = start;
              });
            },
            onCancelClick: () {
              setState(() {
                endDate = null;
                startDate = null;
              });
            },
          );
        },
        tooltip: 'choose date Range',
        child: const Icon(Icons.calendar_today_outlined, color: Colors.white),
      ),
    );
  }
}
Output


