Introduction:
Sticky headers are UI components commonly used in mobile apps to group and organize content while allowing users to navigate through large datasets more efficiently. In Flutter, the sticky_headers package provides a convenient way to implement sticky headers that remain visible as users scroll through a list or grid.
Content:
Step 1: Add Dependency
- Begin by adding the
sticky_headerspackage to yourpubspec.yamlfile. This ensures that your Flutter project can access the functionalities provided by the package. - Run the following command in your terminal to fetch the package:
flutter pub get
Step 2: Import Package
- Import the
sticky_headerspackage in the Dart file where you want to implement sticky headers. This allows you to utilize the StickyHeader widget provided by the package.
import 'package:flutter/material.dart';
import 'package:sticky_headers/sticky_headers.dart';
Step 3: Implement Sticky Headers
- Wrap your list or grid of content with the StickyHeader widget to make the headers sticky. Specify the header and content widgets within the builder method of the StickyHeader widget.
@override
Widget build(BuildContext context) {
  return ListView.builder(
    itemCount: itemCount,
    itemBuilder: (BuildContext context, int index) {
      return StickyHeader(
        header: headerWidget,
        content: contentWidget,
      );
    },
  );
}
Step 4: Customize Sticky Headers
- Customize the appearance and behavior of the sticky headers by adjusting parameters such as header height, header decoration, content padding, etc., according to your app’s design requirements.
Step 5: Handle Header Interaction (Optional)
- Implement any desired interactions or behaviors for the sticky headers, such as tapping on the headers to navigate to specific sections of the content, expanding/collapsing headers, etc.
Step 6: Test the Implementation
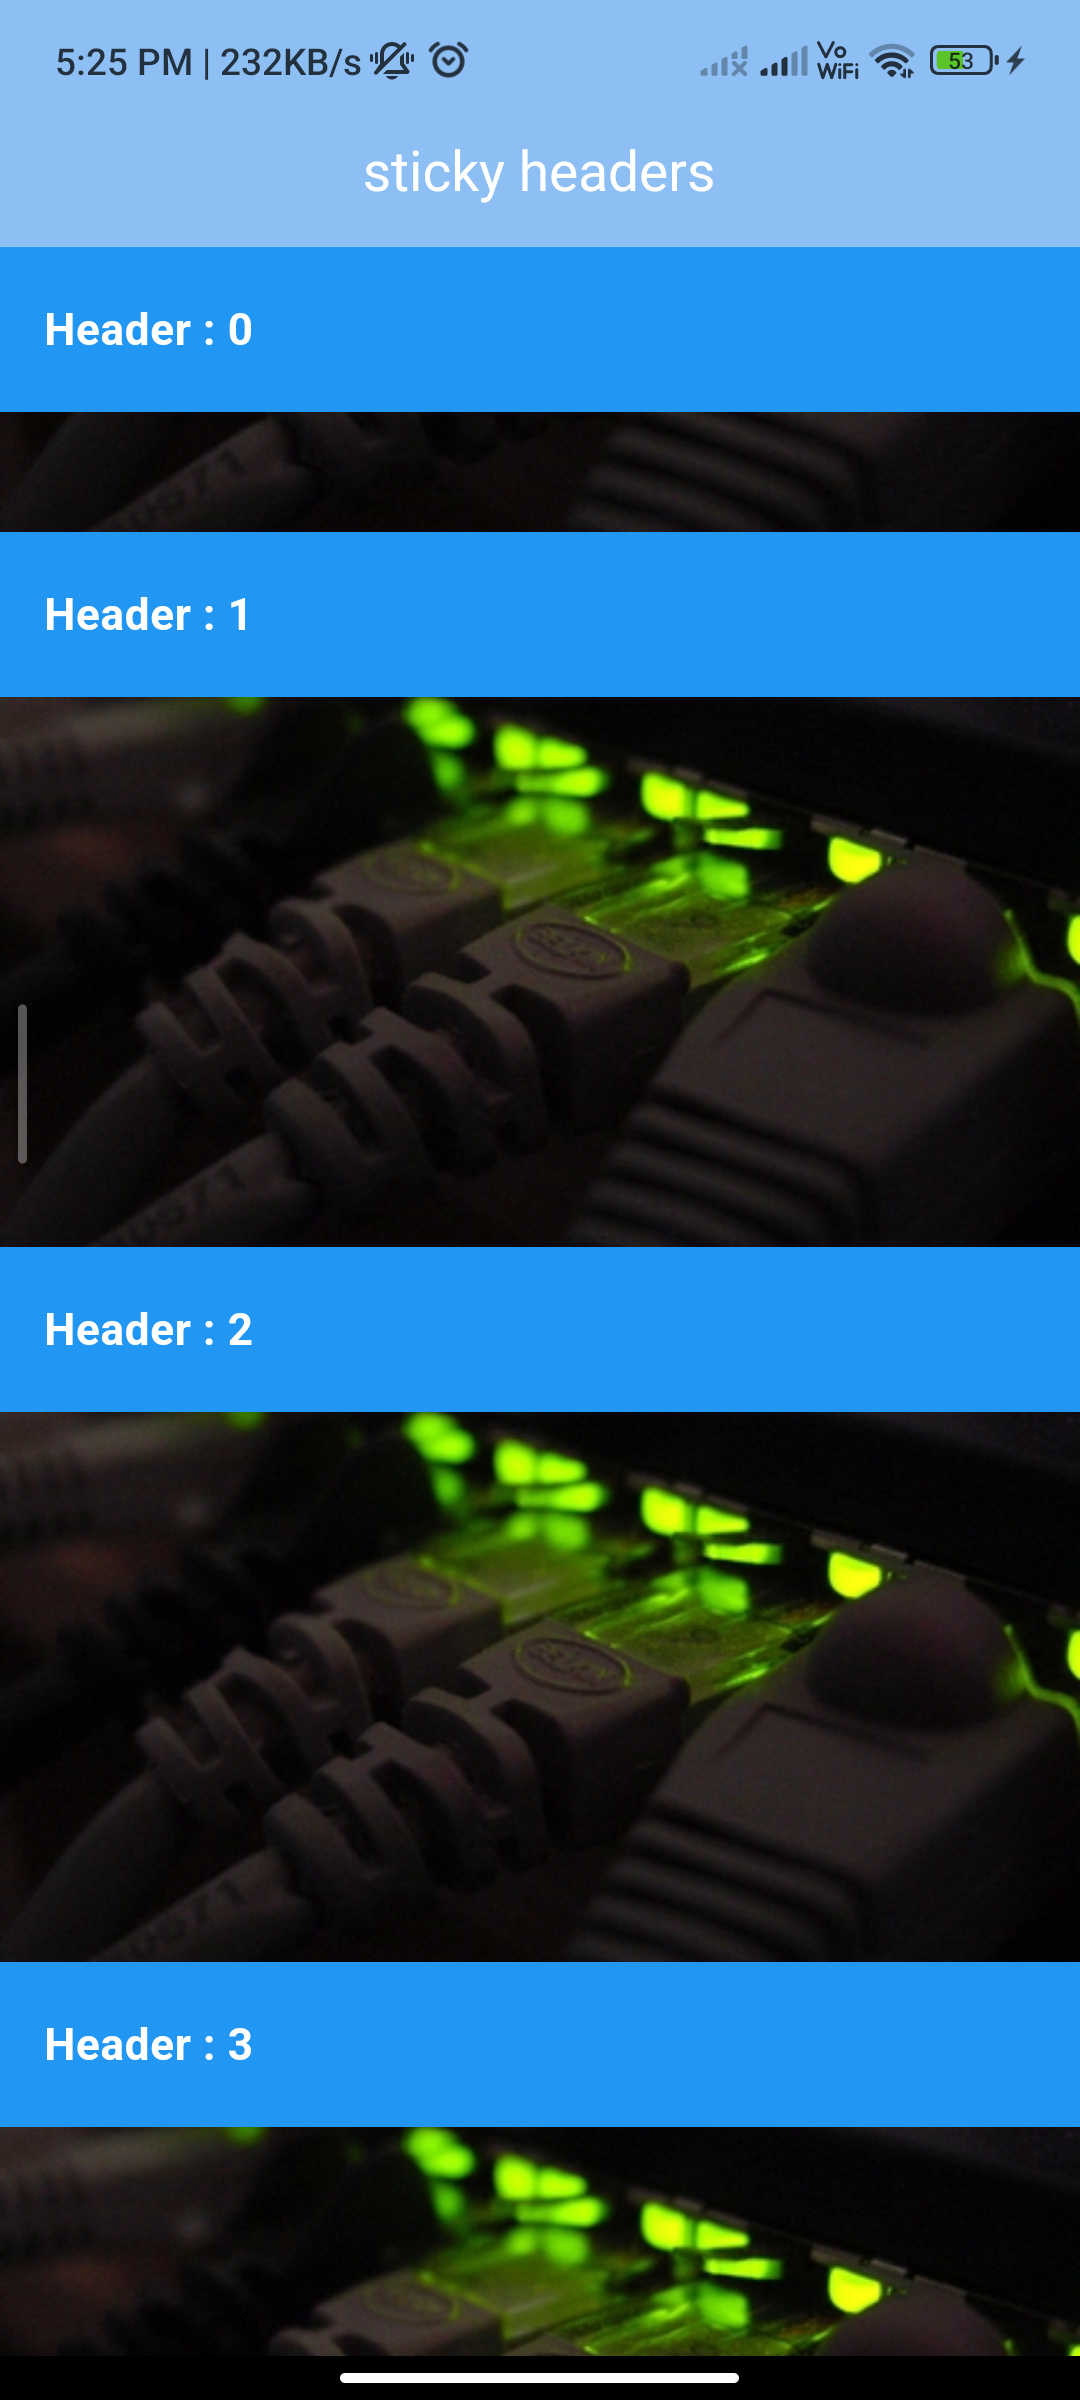
- After implementing sticky headers, run your Flutter application on a device or emulator to test the functionality. Scroll through the list or grid to observe how the headers remain visible as users scroll.
Step 7: Run the Application
- Run the Flutter application using the following command in your terminal:
flutter run
Sample Code:
import 'package:flutter/material.dart';
import 'package:sticky_headers/sticky_headers.dart';

@immutable
class MainScreen extends StatelessWidget {
  const MainScreen({Key? key}) : super(key: key);

  @override
  Widget build(BuildContext context) {
    return ScaffoldWrapper(
      title: 'Sticky Headers ',
      child: ListView(
        children: ListTile.divideTiles(
          context: context,
          tiles: <Widget>[
            ListTile(
              title: const Text('Example 1 - Headers and Content'),
              onTap: () => navigateTo(context, (context) => const Example1()),
            ),
            ListTile(
              title: const Text('Example 3 - Headers overlapping the Content'),
              onTap: () => navigateTo(context, (context) => const Example3()),
            ),
          ],
        ).toList(growable: false),
      ),
    );
  }

  void navigateTo(BuildContext context, WidgetBuilder builder) {
    Navigator.of(context).push(MaterialPageRoute(builder: builder));
  }
}

@immutable
class Example1 extends StatelessWidget {
  const Example1({
    Key? key,
    this.controller,
  }) : super(key: key);

  final ScrollController? controller;

  @override
  Widget build(BuildContext context) {
    return ScaffoldWrapper(
      wrap: controller == null,
      title: 'sticky headers',
      child: ListView.builder(
        primary: controller == null,
        controller: controller,
        itemBuilder: (context, index) {
          return StickyHeader(
            overlapHeaders: false,
            controller: controller, // Optional
            header: Container(
              decoration: BoxDecoration(
                color: Colors.blue,
              ),
              height: 60.0,
              padding: EdgeInsets.symmetric(horizontal: 16.0),
              alignment: Alignment.centerLeft,
              child: Text(
                'Header : $index',
                style: const TextStyle(color: Colors.white, fontSize: 16, fontWeight: FontWeight.bold),
              ),
            ),
            content: Container(
              decoration: BoxDecoration(
                color: Colors.blue,
              ),
              child: Image.network(
                "https://images.freeimages.com/images/large-previews/c09/network-gear-1256739.jpg?fmt=webp&h=350",
                fit: BoxFit.cover,
                width: double.infinity,
                height: 200.0,
              ),
            ),
          );
        },
      ),
    );
  }
}

@immutable
class Example3 extends StatelessWidget {
  const Example3({
    Key? key,
    this.controller,
  }) : super(key: key);

  final ScrollController? controller;

  @override
  Widget build(BuildContext context) {
    return ScaffoldWrapper(
      wrap: controller == null,
      title: 'Example 3',
      child: ListView.builder(
        primary: controller == null,
        controller: controller,
        itemBuilder: (context, index) {
          return StickyHeaderBuilder(
            overlapHeaders: true,
            controller: controller, // Optional
            builder: (BuildContext context, double stuckAmount) {
              stuckAmount = 1.0 - stuckAmount.clamp(0.0, 1.0);
              return Container(
                height: 50.0,
                color: Colors.grey.shade900.withOpacity(0.6 + stuckAmount * 0.4),
                padding: const EdgeInsets.symmetric(horizontal: 16.0),
                alignment: Alignment.centerLeft,
                child: Text(
                  'Headrfdfder #$index',
                  style: const TextStyle(color: Colors.white),
                ),
              );
            },
            content: Container(
              color: Colors.grey[300],
              child: Image.network(
                "https://encrypted-tbn0.gstatic.com/images?q=tbn:ANd9GcTfbfhRKtfpTJi956bGolKzoMyRjNbJ032mjNfp9ilgMUy6M2UJb_IcOP-2nOatWRKbYto&usqp=CAU",
                fit: BoxFit.cover,
                width: double.infinity,
                height: 200.0,
              ),
            ),
          );
        },
      ),
    );
  }

  // String imageForIndex(int index) {
  //   return Images.imageThumbUrls[index % Images.imageThumbUrls.length];
  // }
}

@immutable
class ScaffoldWrapper extends StatelessWidget {
  const ScaffoldWrapper({
    Key? key,
    required this.title,
    required this.child,
    this.wrap = true,
  }) : super(key: key);

  final Widget child;
  final String title;
  final bool wrap;

  @override
  Widget build(BuildContext context) {
    if (wrap) {
      return Scaffold(
        appBar: PreferredSize(
          preferredSize: const Size.fromHeight(kToolbarHeight),
          child: AppBar(
            automaticallyImplyLeading: false,
            centerTitle: true,
            elevation: 1,
            title: Text(
              title,
              style: TextStyle(fontSize: 20, color: Colors.white),
            ),
            backgroundColor: Colors.blue[200],
          ),
        ),
        body: child,
      );
    } else {
      return Material(
        child: child,
      );
    }
  }
}
Output:

Conclusion:
Integrating sticky headers into your Flutter app using the sticky_headers package is a straightforward process that enhances the organization and navigation of content within lists or grids. By following the steps outlined in this guide and customizing the appearance and behavior of the sticky headers as needed, you can create a more intuitive and user-friendly interface for your app’s users. Experiment with different configurations and interactions to optimize the user experience and improve content accessibility.


