Introduction
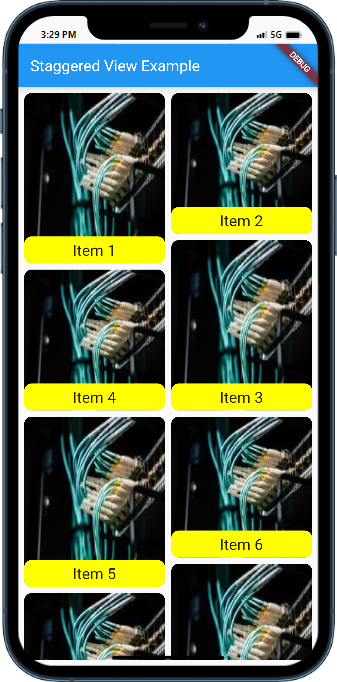
A staggered view is a layout pattern that displays items with varying sizes and positions, creating an interesting and dynamic visual layout. In Flutter, you can implement a staggered view using the flutter_staggered_grid_view package. This tutorial will guide you through the process of implementing a staggered view in your Flutter app.
Content
To implement a staggered view in Flutter, follow these steps:
Step 1. Add Dependency:
Start by adding the flutter_staggered_grid_view package to your pubspec.yaml file. Open the file and add the following dependency:
dependencies:
flutter_staggered_grid_view: ^0.4.0
Save the file and run flutter pub get to fetch the package.
Step 2.Import Packages:
Import the necessary packages in your Dart file:
import 'package:flutter/material.dart';
import 'package:flutter_staggered_grid_view/flutter_staggered_grid_view.dart';
Step 3.Build Staggered View:
Create a StaggeredGridView widget to display the staggered view. Specify the crossAxisCount property to determine the number of columns in the grid. Additionally, you can customize the item count, item builder, and other properties based on your specific requirements.
Widget build(BuildContext context) {
  return StaggeredGridView.countBuilder(
    crossAxisCount: 2,
    itemCount: 10, // Replace with your item count
    itemBuilder: (BuildContext context, int index) {
      // Replace with your item builder logic
      return Container(
        // Replace with your item UI
        child: Text('Item $index'),
      );
    },
    staggeredTileBuilder: (int index) {
      // Replace with your tile builder logic
      return StaggeredTile.count(1, index.isEven ? 2 : 1);
    },
    mainAxisSpacing: 8.0,
    crossAxisSpacing: 8.0,
  );
}
Customize the item builder to define the UI for each item in the staggered view. You can also adjust the staggeredTileBuilder to set the size and position of each item.
Step 4.Add Desired UI Elements::
Enhance your staggered view by adding any desired UI elements inside the item builder. You can include images, text, buttons, or any other widgets to create visually appealing layouts.
Sample Code:
import 'package:flutter/material.dart';
import 'package:flutter_staggered_grid_view/flutter_staggered_grid_view.dart';

void main() {
  runApp(MyApp());
}

class MyApp extends StatelessWidget {
  @override
  Widget build(BuildContext context) {
    return MaterialApp(
      title: 'Staggered View Example',
      theme: ThemeData(
        primarySwatch: Colors.blue,
        visualDensity: VisualDensity.adaptivePlatformDensity,
      ),
      home: StaggeredViewPage(),
    );
  }
}

class StaggeredViewPage extends StatelessWidget {
  final List<String> data = [
    'Item 1',
    'Item 2',
    'Item 3',
    'Item 4',
    'Item 5',
    'Item 6',
    'Item 7',
    'Item 8',
    'Item 9',
    'Item 10',
  ];

  @override
  Widget build(BuildContext context) {
    return Scaffold(
      appBar: AppBar(
        title: Text('Staggered View Example'),
      ),
      body: Padding(
        padding: EdgeInsets.all(8.0),
        child: StaggeredGridView.countBuilder(
          crossAxisCount: 2,
          itemCount: data.length,
          itemBuilder: (BuildContext context, int index) => Container(
            decoration: BoxDecoration(
                borderRadius: BorderRadiusDirectional.circular(10),
                image: DecorationImage(
                    image: NetworkImage(
                        "https://encrypted-tbn0.gstatic.com/images?q=tbn:ANd9GcTTqcmG1_E5PlLcAR6hm5T60P4sWIG8ve_Ed-vqwHQm&s"),
                    fit: BoxFit.fill)),
            child: Align(
              alignment: Alignment.bottomCenter,
              child: Container(
                width: double.infinity,
                height: 35,
                decoration: BoxDecoration(
                    borderRadius: BorderRadiusDirectional.circular(10),
                    color: Colors.yellowAccent),
                child: Row(
                  crossAxisAlignment: CrossAxisAlignment.center,
                  mainAxisAlignment: MainAxisAlignment.center,
                  children: [
                    Text(
                      data[index],
                      style: TextStyle(fontSize: 20),
                    ),
                  ],
                ),
              ),
            ),
          ),
          staggeredTileBuilder: (int index) =>
              StaggeredTile.count(1, index.isEven ? 1.2 : 1),
          mainAxisSpacing: 8.0,
          crossAxisSpacing: 8.0,
        ),
      ),
    );
  }
}
Output:

Conclusion:
By following these steps, you can easily implement a staggered view in Flutter using the flutter_staggered_grid_view package. Build dynamic and visually appealing layouts with varying item sizes and positions, providing an engaging user experience in your Flutter app.


