How to Implement Dotted Line in a Flutter App using dotted_line package?

Spread the love
dottedline in flutter'
dottedline in flutter’

Introduction:

Adding a dotted line in a Flutter app can be useful for visual separation or decorative purposes. In this guide, we’ll walk through the steps to implement a dotted line using the dotted_line package.

Content:

Step 1: Create a New Flutter Project

Ensure that you have Flutter installed and set up on your machine. Create a new Flutter project using the following command in your terminal:


flutter create dotted_line_app

Step 2: Add the dotted_line Dependency

Open the pubspec.yaml file in your Flutter project and add the dotted_line dependency:


dependencies:
  dotted_line: ^2.0.0

Save the file and run flutter pub get in your terminal.

Step 3: Display Dotted Line in Flutter

Open the lib/main.dart file and replace its content with the following code:


import 'package:flutter/material.dart';
import 'package:dotted_line/dotted_line.dart';

void main() {
  runApp(DottedLineApp());
}

class DottedLineApp extends StatelessWidget {
  @override
  Widget build(BuildContext context) {
    return MaterialApp(
      home: Scaffold(
        appBar: AppBar(
          title: Text("Dotted Line Example"),
        ),
        body: Center(
          child: DottedLine(
            lineLength: 200.0,
            lineThickness: 2.0,
            lineColor: Colors.black,
            dashLength: 4.0,
            dashColor: Colors.red,
            dashRadius: 0.0,
          ),
        ),
      ),
    );
  }
}

Step 4: Run the App

Save your changes and run the app using the following command in your terminal:

Sample Code:


// ignore_for_file: prefer_const_constructors

import 'package:dotted_line/dotted_line.dart';
import 'package:flutter/material.dart';

const String _TITLE = 'DottedLine Demo';

class Dottedlinepage extends StatefulWidget {
  @override
  _DottedlinepageState createState() => _DottedlinepageState();
}

class _DottedlinepageState extends State<Dottedlinepage> {
  @override
  Widget build(BuildContext context) {
    final space = SizedBox(height: 50);
    return Scaffold(
      appBar: AppBar(title: Text(_TITLE)),
      body: SingleChildScrollView(
        child: Column(
          children: <Widget>[
            SizedBox(
              height: 15,
            ),
            Text("Default"),
            DottedLine(),
            SizedBox(
              height: 15,
            ),
            Text("Dash length changed"),
            DottedLine(dashLength: 40),
            SizedBox(
              height: 15,
            ),
            Text("Dash gap length changed"),
            DottedLine(dashLength: 30, dashGapLength: 30),
            SizedBox(
              height: 15,
            ),
            Text("Line thickness changed"),
            DottedLine(
              dashLength: 30,
              dashGapLength: 30,
              lineThickness: 30,
            ),
            SizedBox(
              height: 15,
            ),
            Text("Dash radius changed"),
            DottedLine(
              dashLength: 30,
              dashGapLength: 30,
              lineThickness: 30,
              dashRadius: 16,
            ),
            SizedBox(
              height: 15,
            ),
            Text("Dash and dash gap color changed"),
            DottedLine(
              dashLength: 30,
              dashGapLength: 30,
              lineThickness: 30,
              dashColor: Colors.blue,
              dashGapColor: Colors.red,
            ),
            space,
            Text("Line direction and line length changed"),
            DottedLine(
              dashLength: 30,
              dashGapLength: 30,
              lineThickness: 30,
              dashColor: Colors.blue,
              dashGapColor: Colors.red,
              direction: Axis.vertical,
              lineLength: 150,
            ),
            space,
            Text("Dash gradient changed"),
            DottedLine(
              dashGradient: [
                Colors.red,
                Colors.blue,
              ],
              dashLength: 10,
              lineThickness: 30,
            ),
            space,
            Text("Dash gradient and dash gap gradient changed"),
            DottedLine(
              dashGradient: [
                Colors.red,
                Colors.red.withAlpha(0),
              ],
              dashGapGradient: [
                Colors.blue,
                Colors.blue.withAlpha(0),
              ],
              dashLength: 10,
              dashGapLength: 10,
              lineThickness: 30,
            ),
            space,
          ],
        ),
      ),
    );
  }
}

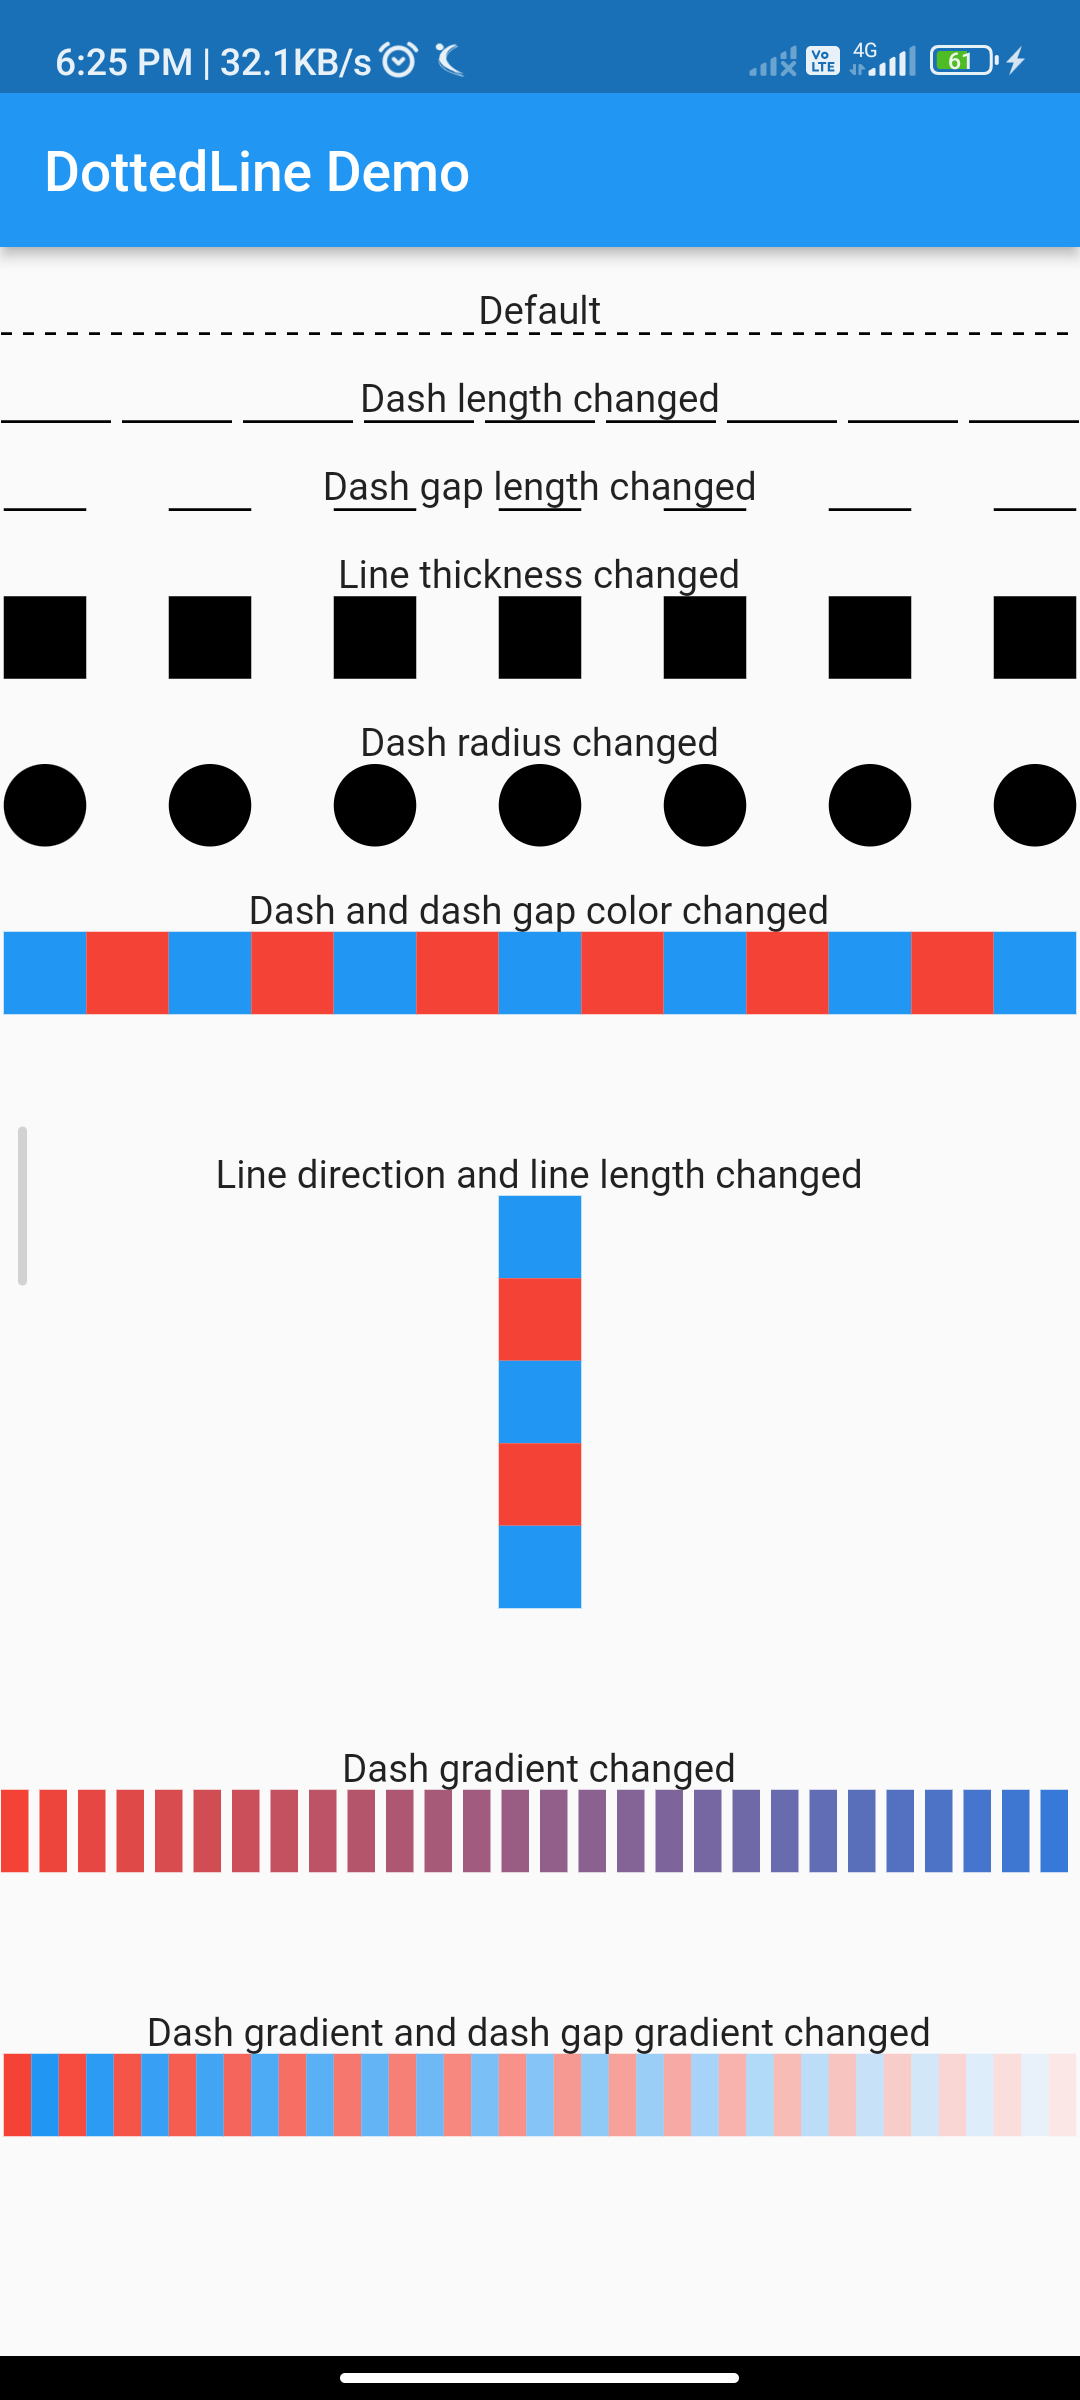
Output:

dottedline in flutter'
dottedline in flutter’

Conclusion:

In this guide, we’ve shown how to implement a dotted line in a Flutter app using the dotted_line package. The DottedLine widget from this package allows you to easily create a customizable dotted line. You can adjust parameters such as lineLength, lineThickness, lineColor, dashLength, dashColor, and dashRadius to customize the appearance of the dotted line according to your design preferences.


Related Posts

Leave a Reply

Your email address will not be published. Required fields are marked *