Introduction:
In Flutter, a SnackBar is a lightweight message that appears at the bottom of the screen to provide feedback to the user. The top_snackbar_flutter package allows you to easily implement a SnackBar that appears at the top of the screen instead of the bottom. This tutorial will guide you through implementing a SnackBar in Flutter using the top_snackbar_flutter package.
Content:
Step 1. Add Dependencies:
Include the top_snackbar_flutter package in your pubspec.yaml file. Open the file and add the following dependency:
dependencies:
top_snackbar_flutter: ^2.0.0
Save the file and run flutter pub get to fetch the package.
Step 2. Import Packages:
Import the required packages in your Dart file:
import 'package:flutter/material.dart';
import 'package:top_snackbar_flutter/top_snack_bar.dart';
import 'package:top_snackbar_flutter/custom_snack_bar.dart';
Step 3. Show a SnackBar:
Use the showTopSnackBar function to show a SnackBar at the top of the screen. You can customize the SnackBar’s content and duration.
showTopSnackBar(
  context,
  CustomSnackBar.success(
    message: "This is a success message",
    duration: Duration(seconds: 3),
  ),
);
Step 4. Customizing the SnackBar:
You can customize the appearance of the SnackBar by using different types of CustomSnackBar widgets provided by the package, such as CustomSnackBar.success, CustomSnackBar.error, and CustomSnackBar.info.
showTopSnackBar(
  context,
  CustomSnackBar.error(
    message: "An error occurred",
    duration: Duration(seconds: 3),
  ),
);
Step 5. Handling Action Tap:
You can also handle tap events on the SnackBar by providing an onTap callback.
showTopSnackBar(
  context,
  CustomSnackBar.info(
    message: "Tap to do something",
    duration: Duration(seconds: 3),
    onTap: () {
      // Handle tap event
    },
  ),
);
Sample Code:
import 'package:flutter/material.dart';
import 'package:top_snackbar_flutter/custom_snack_bar.dart';
import 'package:top_snackbar_flutter/tap_bounce_container.dart';
import 'package:top_snackbar_flutter/top_snack_bar.dart';

class SnakbarInFlutter extends StatefulWidget {
  const SnakbarInFlutter({Key? key}) : super(key: key);

  @override
  SnakbarInFlutterState createState() => SnakbarInFlutterState();
}

class SnakbarInFlutterState extends State<SnakbarInFlutter> {
  late AnimationController localAnimationController;

  @override
  Widget build(BuildContext context) {
    return MaterialApp(
      debugShowCheckedModeBanner: false,
      theme: ThemeData(primaryColor: Colors.orangeAccent),
      home: Builder(
        builder: (BuildContext context) {
          return Scaffold(
            appBar: AppBar(
              centerTitle: true,
              elevation: 2,
              title: Text(
                "Show SnackBar",
                style: TextStyle(color: Colors.black),
              ),
              backgroundColor: Colors.blue[200],
            ),
            body: Padding(
              padding: const EdgeInsets.symmetric(horizontal: 16),
              child: Column(
                mainAxisAlignment: MainAxisAlignment.center,
                children: [
                  TapBounceContainer(
                    onTap: () {
                      showTopSnackBar(
                        Overlay.of(context),
                        const CustomSnackBar.info(
                          message: 'There is some information. You need to do something with that',
                        ),
                      );
                    },
                    child: buildButton(context, 'Show info'),
                  ),
                  const SizedBox(height: 24),
                  TapBounceContainer(
                    onTap: () {
                      showTopSnackBar(
                        Overlay.of(context),
                        const CustomSnackBar.success(
                          message: 'Good job, your release is successful. Have a nice day',
                        ),
                      );
                    },
                    child: buildButton(context, 'Show success'),
                  ),
                  const SizedBox(height: 24),
                  TapBounceContainer(
                    onTap: () {
                      showTopSnackBar(
                        Overlay.of(context),
                        const CustomSnackBar.error(
                          message: 'Something went wrong. Please check your credentials and try again',
                        ),
                      );
                    },
                    child: buildButton(context, 'Show error'),
                  ),
                  const SizedBox(height: 48),
                  TapBounceContainer(
                    onTap: () {
                      showTopSnackBar(
                        Overlay.of(context),
                        const CustomSnackBar.info(
                          message: 'Persistent SnackBar',
                        ),
                        persistent: true,
                        onAnimationControllerInit: (controller) {
                          localAnimationController = controller;
                        },
                      );
                    },
                    child: buildButton(context, 'Show persistent SnackBar'),
                  ),
                  const SizedBox(height: 24),
                  TapBounceContainer(
                    onTap: () => localAnimationController.reverse(),
                    child: buildButton(context, 'Dismiss persistent SnackBar'),
                  ),
                  const SizedBox(height: 24),
                  TapBounceContainer(
                    onTap: () {
                      showTopSnackBar(
                        Overlay.of(context),
                        const CustomSnackBar.info(
                          message: 'Try to swipe me left',
                        ),
                        dismissType: DismissType.onSwipe,
                        dismissDirection: [DismissDirection.endToStart],
                      );
                    },
                    child: buildButton(
                      context,
                      'Show swiped dismissible SnackBar',
                    ),
                  ),
                ],
              ),
            ),
          );
        },
      ),
    );
  }

  Container buildButton(BuildContext context, String text) {
    return Container(
      decoration: BoxDecoration(
        color: Theme.of(context).indicatorColor,
        borderRadius: BorderRadius.circular(12),
        boxShadow: [
          BoxShadow(
            color: Colors.grey.withOpacity(0.4),
            spreadRadius: 6,
            blurRadius: 10,
            offset: const Offset(0, 3),
          ),
        ],
      ),
      child: Padding(
        padding: const EdgeInsets.symmetric(vertical: 16, horizontal: 24),
        child: Center(
          child: Text(
            text,
            style: const TextStyle(
              color: Colors.white,
              fontSize: 16,
              fontWeight: FontWeight.w600,
            ),
          ),
        ),
      ),
    );
  }
}
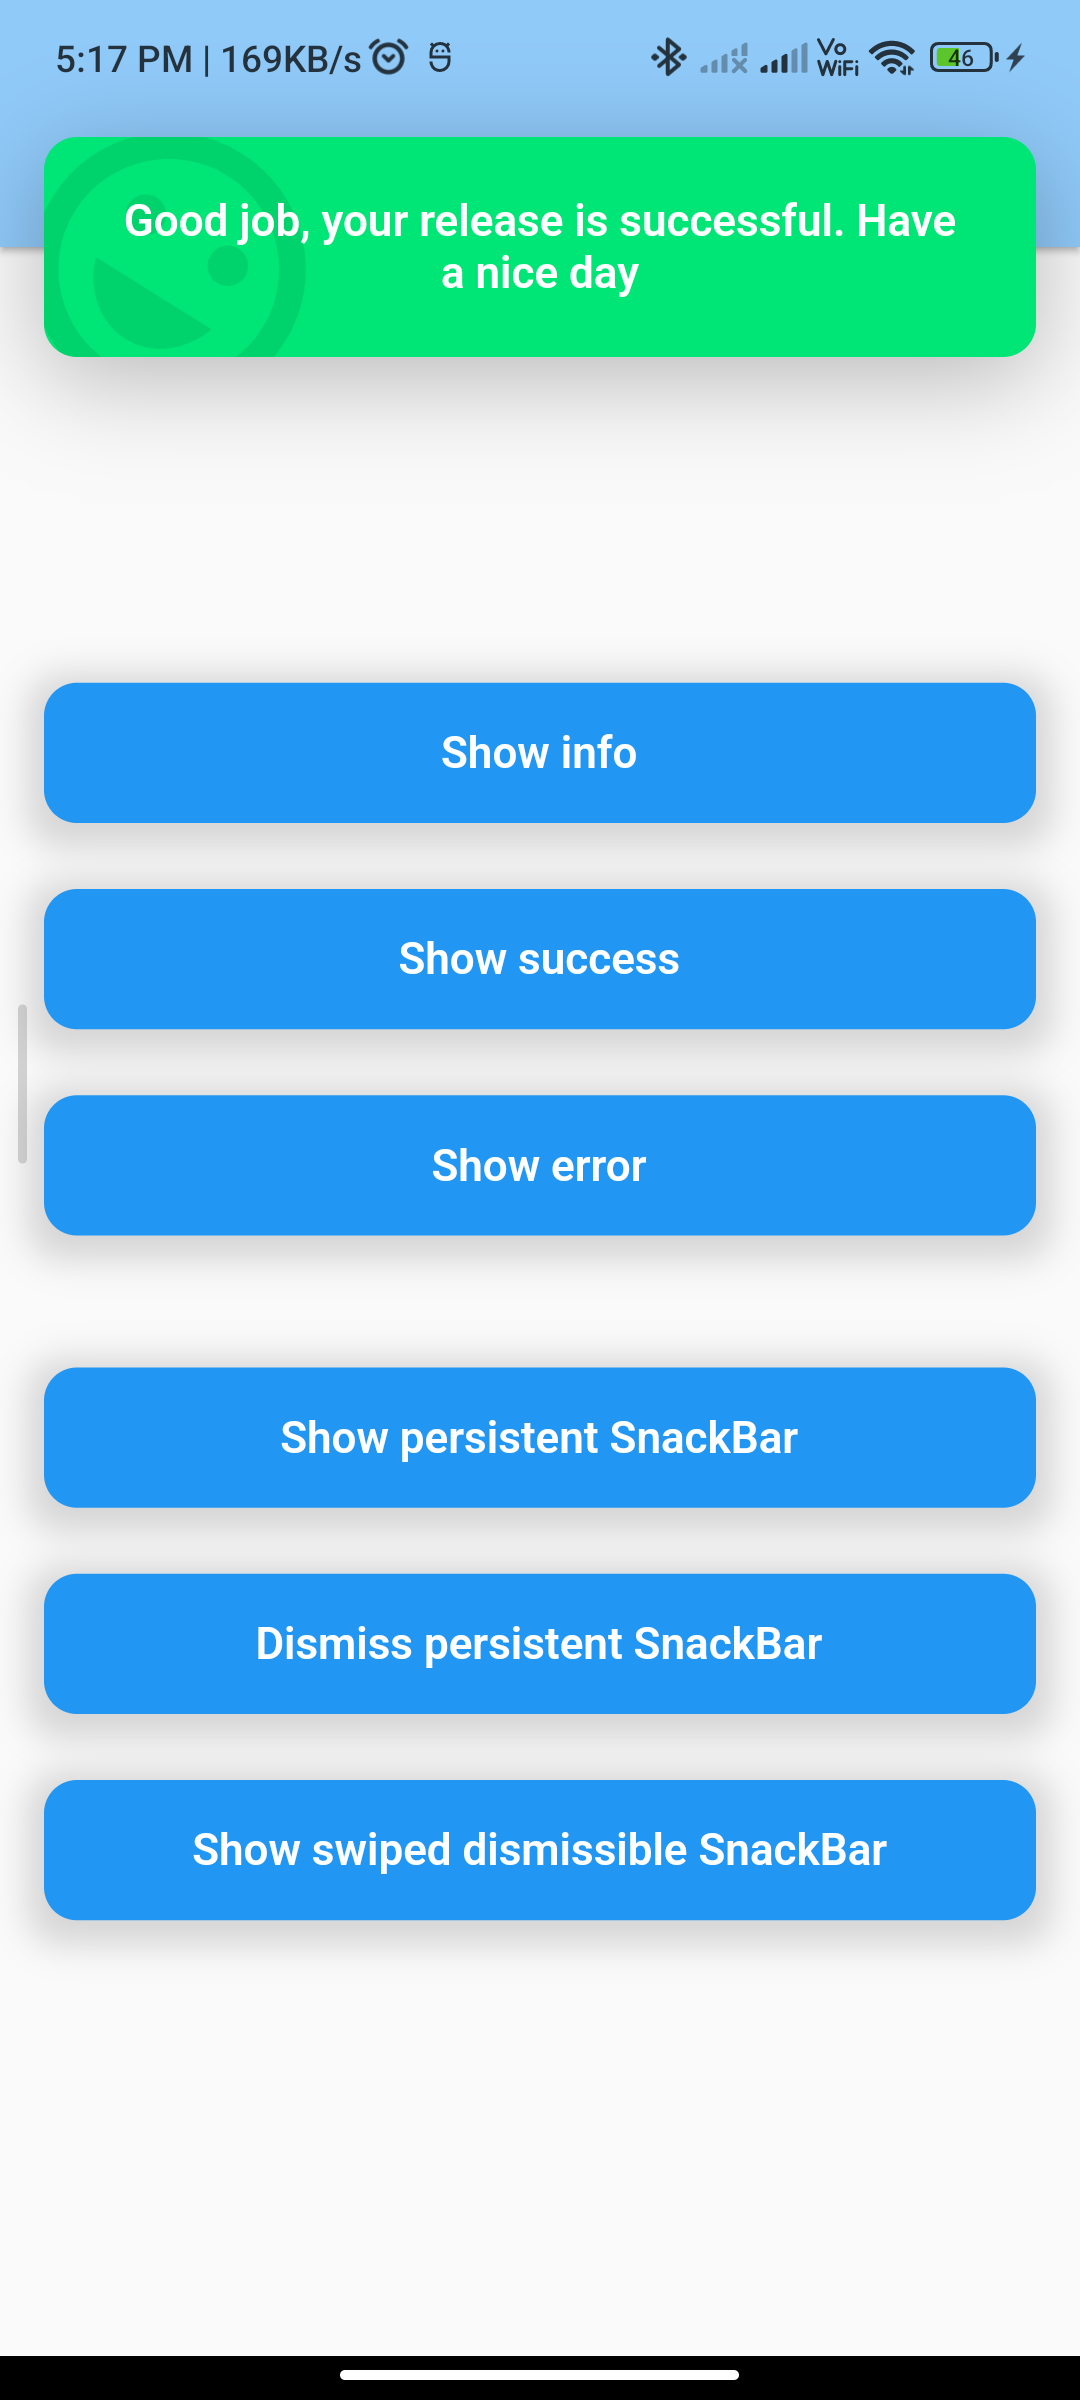
Output:

Conclusion:
By following these steps, you can implement a SnackBar in Flutter using the top_snackbar_flutter package. Use the SnackBar to provide feedback or display messages to the user in your Flutter app.


