Introduction:
Customizing the font style and size of text is essential for creating visually appealing and readable UIs in a Flutter app. Flutter provides various ways to change the font style and size of text, allowing you to achieve the desired look and feel for your app’s textual content. In this step-by-step guide, you will learn how to change the font style and size of text in a Flutter app. By following this tutorial, you will be able to apply different fonts and adjust the text size to create visually appealing and well-designed UIs.

Content:
1. Set up a new Flutter project:
Ensure that you have Flutter installed and set up on your machine. Create a new Flutter project using the following command in your terminal:
flutter create text_styling_app
2. Implement text styling:
In the Dart file where you want to implement text styling, import the necessary packages:
import 'package:flutter/material.dart';
Inside the build method of your widget, use the Text widget to display text and apply styling:
Text(
  'Hello, Flutter!',
  style: TextStyle(
    fontSize: 24, // Set the desired text size
    fontWeight: FontWeight.bold, // Apply the desired font weight
    fontStyle: FontStyle.italic, // Apply the desired font style
    fontFamily: 'Roboto', // Apply a custom font family (if desired)
    color: Colors.black, // Apply the desired text color
  ),
)
You can adjust the fontSize property to change the text size. Use the fontWeight property to apply different font weights, such as FontWeight.bold for bold text. Set the fontStyle property to FontStyle.italic for italicized text. If you have custom fonts, you can specify the fontFamily property to use them. Finally, use the color property to set the text color.
3. Apply text styling in your app:
In the Dart file where you want to use text styling, import the necessary packages and add the styled Text widget to your widget tree.
import 'package:flutter/material.dart';

class MyScreen extends StatelessWidget {
  @override
  Widget build(BuildContext context) {
    return Scaffold(
      body: Center(
        child: Text(
          'Hello, Flutter!',
          style: TextStyle(
            fontSize: 24,
            fontWeight: FontWeight.bold,
            fontStyle: FontStyle.italic,
            fontFamily: 'Roboto',
            color: Colors.black,
          ),
        ),
      ),
    );
  }
}
4. Test the text styling:
Save your changes and run the app using the following command in your terminal:
flutter run
5. Observe the text styling in action:
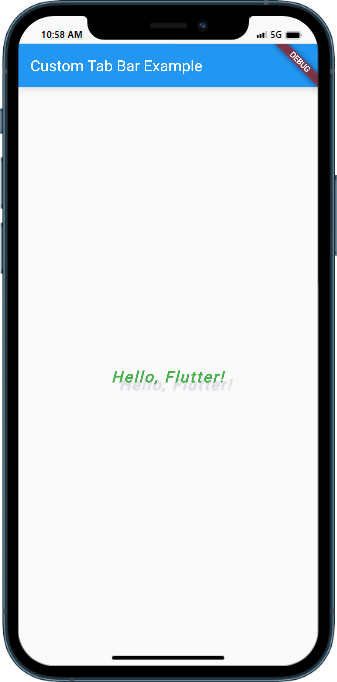
Upon running the app, you will see the text styled according to the specified font size, font weight, font style, font family, and text color. The text will be displayed with the desired appearance, enhancing the visual appeal of your Flutter app.
Sample Code:
 import 'package:flutter/material.dart';

void main() {
  runApp(MyApp());
}

class MyApp extends StatelessWidget {
  @override
  Widget build(BuildContext context) {
    return MaterialApp(
      title: 'Custom Tab Bar Example',
      theme: ThemeData(
        primarySwatch: Colors.blue,
      ),
      home: HomePage(),
    );
  }
}

class HomePage extends StatelessWidget {

  @override
  Widget build(BuildContext context) {
    return Scaffold(
      appBar: AppBar(
        title: Text('Custom Tab Bar Example'),
      ),
      body: Column(
        crossAxisAlignment: CrossAxisAlignment. center,
        mainAxisAlignment: MainAxisAlignment.center,
        children: const [
          Center(
            child: Text(
           'Hello, Flutter!',
         style: TextStyle(
                  fontFamily: 'Roboto', // Specify the desired font family
                        fontSize: 20, // Specify the desired font size
                         fontWeight: FontWeight.bold, // Specify the desired font weight
                           fontStyle: FontStyle.italic, // Specify the desired font style
                         color: Colors.green, // Specify the desired text color
                    // You can also specify other properties such as letterSpacing, wordSpacing, etc.
                  letterSpacing: 2 ,//Specify the desired letterSpacing
                  wordSpacing: 1,//Specify the desired wordSpacing,

                    shadows: <Shadow>[
      Shadow(
        offset: Offset(10.0, 10.0),
        blurRadius: 2.0,
        color: Color.fromARGB(35, 56, 53, 53),
      ),
      Shadow(
        offset: Offset(10.0, 10.0),
        blurRadius: 6.0,
        color: Color.fromARGB(19, 99, 99, 240),
      ),
    ],  //Specify the desired Shadow
  ),

  maxLines: 1,
  overflow: TextOverflow.clip,  //Specify the desired TextOverflow
  textAlign: TextAlign.center,   //Specify the desired TextAlign

),
          ),


        ],
      )  );
  }
}
Output:

Conclusion:
Congratulations! You have successfully learned how to change the font style and size of text in a Flutter app. By following this step-by-step guide, you now have the knowledge to customize the appearance of text by applying different fonts and adjusting the text size. Utilize these text styling techniques in your Flutter app to create visually appealing and well-designed UIs.


