Introduction
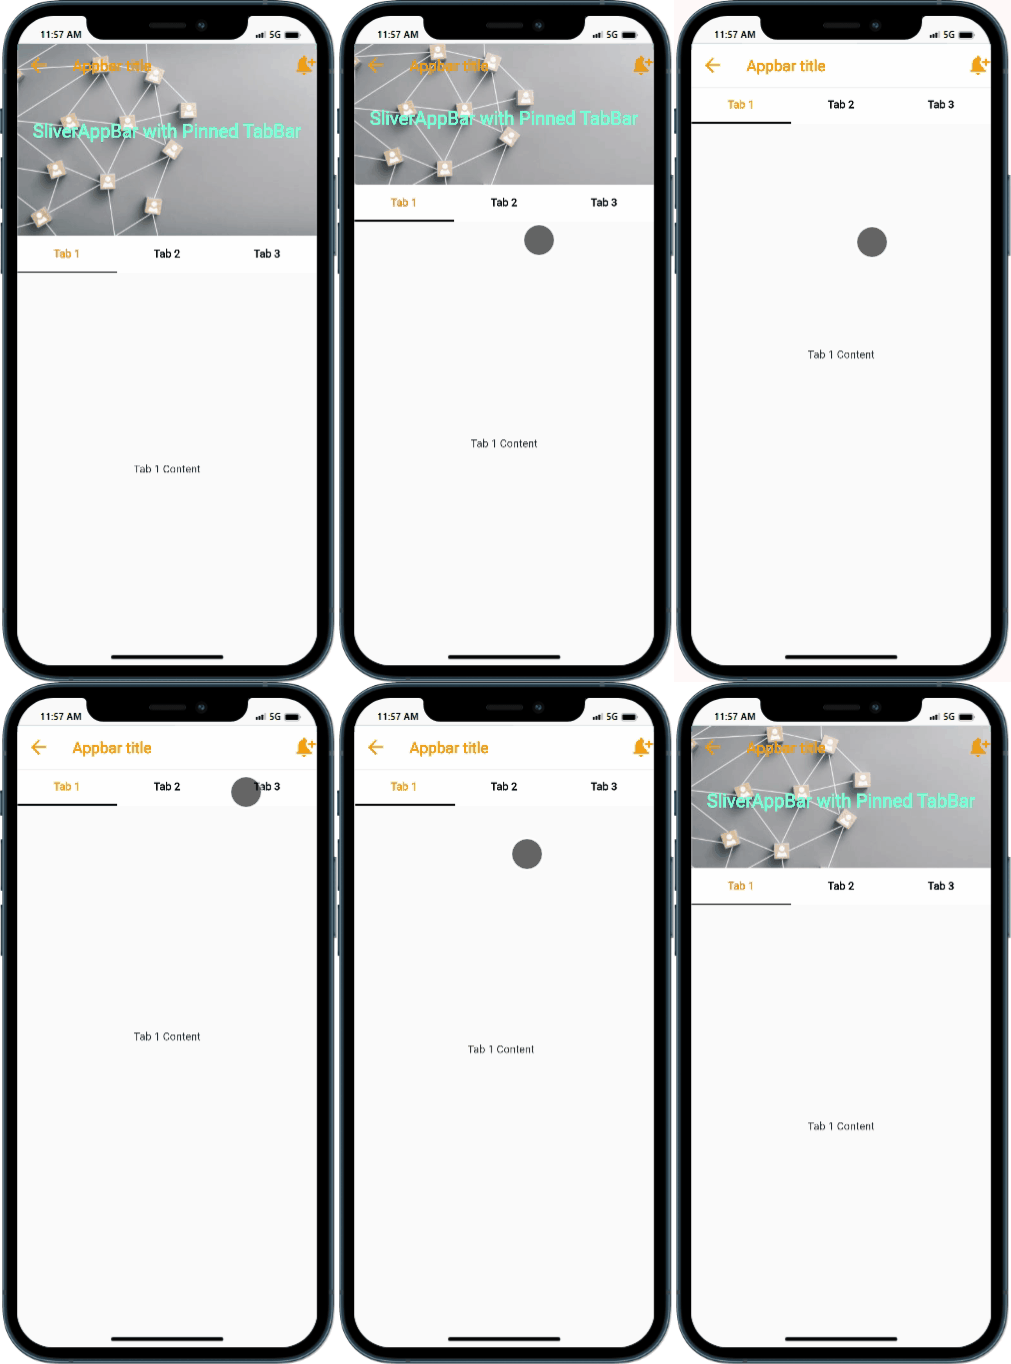
In Flutter, a SliverAppBar with a pinned TabBar is a powerful combination that allows you to create a flexible and interactive app header. The SliverAppBar provides a collapsible header that adjusts its size based on the scroll position, while the pinned TabBar offers a set of tabs that stay visible at the top. In this tutorial, you will learn how to add a SliverAppBar with a pinned TabBar in Flutter to enhance your app’s navigation and user experience.
Content: To add a SliverAppBar with a pinned TabBar in Flutter, follow these steps:
Content
Step 1. Create a new Flutter project:
Ensure that you have Flutter installed on your machine. Open your terminal and run the following command to create a new Flutter project:
flutter create sliver_appbar_tabbar
Step 2. Implement the SliverAppBar with Pinned TabBar:
Navigate to the lib folder of your Flutter project and open the main.dart file. Replace the existing code with the following implementation:
import 'package:flutter/material.dart';

class MyWidget extends StatefulWidget {
  @override
  _MyWidgetState createState() => _MyWidgetState();
}

class _MyWidgetState extends State<MyWidget>
    with SingleTickerProviderStateMixin {
  late TabController _tabController;

  @override
  void initState() {
    super.initState();
    _tabController = TabController(length: 3, vsync: this);
  }

  @override
  void dispose() {
    _tabController.dispose();
    super.dispose();
  }

  @override
  Widget build(BuildContext context) {
    return Scaffold(
      body: NestedScrollView(
        headerSliverBuilder: (BuildContext context, bool innerBoxIsScrolled) {
          return <Widget>[
            SliverAppBar(
              elevation: 1,
              backgroundColor: Color.fromARGB(255, 255, 255, 255),
              title: Text(
                "Appbar title",
                style: TextStyle(
                  fontWeight: FontWeight.w800,
                  color: Color.fromARGB(255, 255, 157, 0),
                ),
              ),
              leading: IconButton(
                onPressed: () {},
                icon: Icon(
                  Icons.arrow_back,
                  color: Color.fromARGB(255, 255, 157, 0),
                  size: 30.0,
                ),
              ),
              actions: [
                IconButton(
                  onPressed: () {},
                  icon: Icon(
                    Icons.notification_add,
                    color: Color.fromARGB(255, 255, 157, 0),
                    size: 30.0,
                  ),
                ),
              ],
              pinned: true,
              expandedHeight: 250.0,
              flexibleSpace: FlexibleSpaceBar(
                background: Container(
                  decoration: BoxDecoration(
                    image: DecorationImage(
                      image: NetworkImage(
                          "https://media.istockphoto.com/id/1290692464/photo/teamwork-network-and-community-concept.jpg?s=612x612&w=0&k=20&c=mfmO8j68TjNnoGki0UJe58SKfqyNgIp3lHDSJ0OkVo0="),
                      fit: BoxFit.cover,
                    ),
                  ),
                  child: Center(
                    child: Column(
                      children: [
                        SizedBox(
                          height: 100,
                        ),
                        Text(
                          'SliverAppBar with Pinned TabBar',
                          style: TextStyle(
                            fontSize: 24.0,
                            fontWeight: FontWeight.bold,
                          ),
                        ),
                      ],
                    ),
                  ),
                ),
              ),
            ),
            SliverPersistentHeader(
              pinned: true,
              delegate: _SliverAppBarDelegate(
                TabBar(
                  indicatorColor: Colors.black,
                  unselectedLabelColor: Colors.black,
                  controller: _tabController,
                  tabs: [
                    Tab(text: 'Tab 1'),
                    Tab(text: 'Tab 2'),
                    Tab(text: 'Tab 3'),
                  ],
                ),
              ),
            ),
          ];
        },
        body: TabBarView(
          controller: _tabController,
          children: [
            Center(child: Text('Tab 1 Content')),
            Center(child: Text('Tab 2 Content')),
            Center(child: Text('Tab 3 Content')),
          ],
        ),
      ),
    );
  }
}

class _SliverAppBarDelegate extends SliverPersistentHeaderDelegate {
  final TabBar _tabBar;

  _SliverAppBarDelegate(this._tabBar);

  @override
  double get minExtent => _tabBar.preferredSize.height;
  @override
  double get maxExtent => _tabBar.preferredSize.height;

  @override
  Widget build(
      BuildContext context, double shrinkOffset, bool overlapsContent) {
    return Container(
      color: Colors.white,
      child: _tabBar,
    );
  }

  @override
  bool shouldRebuild(_SliverAppBarDelegate oldDelegate) {
    return false;
  }
}

void main() {
  runApp(MaterialApp(
    debugShowCheckedModeBanner: false,
    home: MyWidget(),
  ));
}
In this code snippet, we define a Flutter app that utilizes a CustomScrollView with SliverAppBar and SliverFillRemaining. The pinned property of SliverAppBar ensures that it stays visible at the top while scrolling. The TabBar and TabBarView are wrapped inside a DefaultTabController to handle tab navigation
Step 3. Run the App:
Save the changes made to the main.dart file and execute the following command in your terminal to run the app:
flutter run
Sample Code:
import 'package:flutter/material.dart';

class MyWidget extends StatefulWidget {
  @override
  _MyWidgetState createState() => _MyWidgetState();
}

class _MyWidgetState extends State<MyWidget>
    with SingleTickerProviderStateMixin {
  late TabController _tabController;

  @override
  void initState() {
    super.initState();
    _tabController = TabController(length: 3, vsync: this);
  }

  @override
  void dispose() {
    _tabController.dispose();
    super.dispose();
  }

  @override
  Widget build(BuildContext context) {
    return Scaffold(
      body: NestedScrollView(
        headerSliverBuilder: (BuildContext context, bool innerBoxIsScrolled) {
          return <Widget>[
            SliverAppBar(
              elevation: 1,
              backgroundColor: Color.fromARGB(255, 255, 255, 255),
              title: Text(
                "Appbar title",
                style: TextStyle(
                  fontWeight: FontWeight.w800,
                  color: Color.fromARGB(255, 255, 157, 0),
                ),
              ),
              leading: IconButton(
                onPressed: () {},
                icon: Icon(
                  Icons.arrow_back,
                  color: Color.fromARGB(255, 255, 157, 0),
                  size: 30.0,
                ),
              ),
              actions: [
                IconButton(
                  onPressed: () {},
                  icon: Icon(
                    Icons.notification_add,
                    color: Color.fromARGB(255, 255, 157, 0),
                    size: 30.0,
                  ),
                ),
              ],
              pinned: true,
              expandedHeight: 250.0,
              flexibleSpace: FlexibleSpaceBar(
                background: Container(
                  decoration: BoxDecoration(
                    image: DecorationImage(
                      image: NetworkImage(
                          "https://media.istockphoto.com/id/1290692464/photo/teamwork-network-and-community-concept.jpg?s=612x612&w=0&k=20&c=mfmO8j68TjNnoGki0UJe58SKfqyNgIp3lHDSJ0OkVo0="),
                      fit: BoxFit.cover,
                    ),
                  ),
                  child: Center(
                    child: Column(
                      children: [
                        SizedBox(
                          height: 100,
                        ),
                        Text(
                          'SliverAppBar with Pinned TabBar',
                          style: TextStyle(
                            color: Colors.tealAccent,
                            fontSize: 24.0,
                            fontWeight: FontWeight.bold,
                          ),
                        ),
                      ],
                    ),
                  ),
                ),
              ),
            ),
            SliverPersistentHeader(
              pinned: true,
              delegate: _SliverAppBarDelegate(
                TabBar(
                  indicatorColor: Colors.black,
                  // indicatorWeight: 10,
                  labelStyle: TextStyle(fontWeight: FontWeight.w700),
                  // labelPadding: EdgeInsets.symmetric(vertical: 100),
                  labelColor: Color.fromARGB(255, 255, 157, 0),
                  unselectedLabelColor: Colors.black,
                  controller: _tabController,
                  tabs: [
                    Tab(text: 'Tab 1'),
                    Tab(text: 'Tab 2'),
                    Tab(text: 'Tab 3'),
                  ],
                ),
              ),
            ),
          ];
        },
        body: TabBarView(
          controller: _tabController,
          children: [
            Center(child: Text('Tab 1 Content')),
            Center(child: Text('Tab 2 Content')),
            Center(child: Text('Tab 3 Content')),
          ],
        ),
      ),
    );
  }
}

class _SliverAppBarDelegate extends SliverPersistentHeaderDelegate {
  final TabBar _tabBar;

  _SliverAppBarDelegate(this._tabBar);

  @override
  double get minExtent => _tabBar.preferredSize.height;
  @override
  double get maxExtent => _tabBar.preferredSize.height;

  @override
  Widget build(
      BuildContext context, double shrinkOffset, bool overlapsContent) {
    return Container(
      color: Colors.white,
      child: _tabBar,
    );
  }

  @override
  bool shouldRebuild(_SliverAppBarDelegate oldDelegate) {
    return false;
  }
}

void main() {
  runApp(MaterialApp(
    debugShowCheckedModeBanner: false,
    home: MyWidget(),
  ));
}
Output:

Conclusion:
Congratulations! You have successfully added a SliverAppBar with a pinned TabBar in your Flutter app. By following this tutorial, you learned how to create a flexible app header with scrollable tabs, enhancing the navigation and user experience. Experiment with different configurations to customize the appearance and behavior of your SliverAppBar and TabBar as per your app requirements.


