Introduction:
Dropdown menus are commonly used in mobile app interfaces to provide a list of options for users to choose from. In Flutter, you can easily add a dropdown menu widget to your app’s UI. This tutorial will guide you through the process of adding a dropdown menu in Flutter.
Content:
1. Create a new Flutter project:
Before we begin, make sure you have Flutter installed and set up on your machine. Create a new Flutter project by running the following command in your terminal:
flutter create dropdown_menu_example
2. Open the main.dart file:
Once the project is created, navigate to the lib folder and open the main.dart file.
3. Import the necessary packages:
To work with dropdown menus, import the following packages at the top of the main.dart file:
import 'package:flutter/material.dart';
4. Implement the dropdown menu:
Inside the main.dart file, implement the dropdown menu by following these steps:
a. Declare a list of dropdown options: Add a list of strings that represent the options for the dropdown menu at the top of the main.dart file:
List<String> dropdownOptions = ['Option 1', 'Option 2', 'Option 3'];
b. Create a variable to track the selected option: Declare a string variable called selectedOption to track the currently selected option:
String selectedOption = dropdownOptions[0]; // Initialize with the first option
c. Define the main function: Inside the main.dart file, locate the main() function and modify it as follows:
void main() {
  runApp(MyApp());
}
d. Create the MyApp class: Define the MyApp class, which extends StatelessWidget:
class MyApp extends StatelessWidget {
  @override
  Widget build(BuildContext context) {
    return MaterialApp(
      title: 'Dropdown Menu Example',
      home: HomeScreen(),
    );
  }
}
e. Create the HomeScreen class: Define the HomeScreen class, which extends StatefulWidget:
class HomeScreen extends StatefulWidget {
  @override
  _HomeScreenState createState() => _HomeScreenState();
}

class _HomeScreenState extends State<HomeScreen> {
  @override
  Widget build(BuildContext context) {
    return Scaffold(
      appBar: AppBar(
        title: Text('Dropdown Menu Example'),
      ),
      body: Center(
        child: DropdownButton<String>(
          value: selectedOption,
          onChanged: (String? newValue) {
            setState(() {
              selectedOption = newValue!;
            });
          },
          items: dropdownOptions.map((String option) {
            return DropdownMenuItem<String>(
              value: option,
              child: Text(option),
            );
          }).toList(),
        ),
      ),
    );
  }
}
5. Run the app:
Save the changes and run the app using the following command in your terminal:
flutter run
6. Observe the dropdown menu:
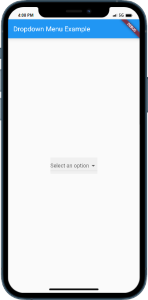
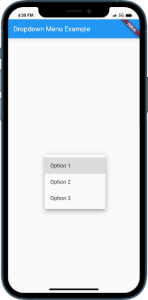
You will see a dropdown menu displayed in the app’s UI.
Sample Code:
import 'package:flutter/material.dart';

void main() {
  runApp(MyApp());
}

class MyApp extends StatelessWidget {
  final List<String> _dropdownItems = ['Option 1', 'Option 2', 'Option 3'];
  String _selectedItem = '';

  @override
  Widget build(BuildContext context) {
    return MaterialApp(
      title: 'Dropdown Menu Example',
      theme: ThemeData(
        primarySwatch: Colors.blue,
      ),
      home: Scaffold(
        appBar: AppBar(
          title: Text('Dropdown Menu Example'),
        ),
        body: Center(
          child: DropdownButton<String>(
            value: _selectedItem.isNotEmpty ? _selectedItem : null,
            hint: Text('Select an option'),
            onChanged: (String? newValue) {
              if (newValue != null) {
                _selectedItem = newValue;
              }
            },
            items: _dropdownItems.map<DropdownMenuItem<String>>((String value) {
              return DropdownMenuItem<String>(
                value: value,
                child: Text(value),
              );
            }).toList(),
          ),
        ),
      ),
    );
  }
}
Output:


