Introduction:
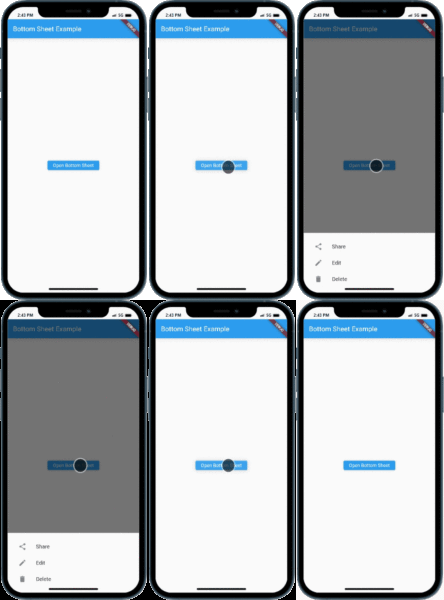
A bottom sheet is a popular UI component in mobile app development that provides additional content or actions in a sliding panel at the bottom of the screen. In Flutter, you can easily add a bottom sheet to your app to enhance its functionality and improve user experience. This tutorial will guide you through the process of adding a bottom sheet in Flutter.

Content:
1. Create a new Flutter project:
Before we begin, make sure you have Flutter installed and set up on your machine. Create a new Flutter project by running the following command in your terminal:
flutter create bottom_sheet_example
2. Open the main.dart file:
Once the project is created, navigate to the lib folder and open the main.dart file.
3. Import the necessary packages:
To work with bottom sheets, import the following packages at the top of the main.dart file:
import 'package:flutter/material.dart';
4. Implement the bottom sheet:
Inside the main.dart file, implement the bottom sheet by following these steps:
a. Define a scaffold key: Add a GlobalKey<ScaffoldState> variable at the top of the main.dart file:
final GlobalKey<ScaffoldState> _scaffoldKey = GlobalKey<ScaffoldState>();
FloatingActionButton(
  onPressed: () {
    _showBottomSheet();
  },
  child: Icon(Icons.add),
),
c. Implement the showBottomSheet method: Define a method called _showBottomSheet() that will show the bottom sheet:
void _showBottomSheet() {
  _scaffoldKey.currentState!.showBottomSheet<void>(
    (BuildContext context) {
      return Container(
        // Add your bottom sheet content here
        child: Column(
          children: [
            ListTile(
              leading: Icon(Icons.camera),
              title: Text('Camera'),
              onTap: () {
                // Handle camera option
              },
            ),
            ListTile(
              leading: Icon(Icons.photo_library),
              title: Text('Photo Library'),
              onTap: () {
                // Handle photo library option
              },
            ),
          ],
        ),
      );
    },
  );
}
5. Wrap your app with a Scaffold:
Wrap your app’s main widget with a Scaffold and pass the _scaffoldKey to its key parameter:
Scaffold(
  key: _scaffoldKey,
  // Rest of your app's UI
)
6. Run the app:
Save the changes and run the app using the following command in your terminal:
flutter run
import 'package:flutter/material.dart';

void main() {
  runApp(MyApp());
}

class MyApp extends StatelessWidget {
  @override
  Widget build(BuildContext context) {
    return MaterialApp(
      title: 'Bottom Sheet Example',
      theme: ThemeData(
        primarySwatch: Colors.blue,
      ),
      home: HomeScreen(),
    );
  }
}

class HomeScreen extends StatelessWidget {
  void _openBottomSheet(BuildContext context) {
    showModalBottomSheet(
      context: context,
      builder: (BuildContext context) {
        return Container(
          padding: EdgeInsets.all(16.0),
          child: Column(
            mainAxisSize: MainAxisSize.min,
            children: [
              ListTile(
                leading: Icon(Icons.share),
                title: Text('Share'),
                onTap: () {
                  Navigator.pop(context);
                  // Perform share action
                },
              ),
              ListTile(
                leading: Icon(Icons.edit),
                title: Text('Edit'),
                onTap: () {
                  Navigator.pop(context);
                  // Perform edit action
                },
              ),
              ListTile(
                leading: Icon(Icons.delete),
                title: Text('Delete'),
                onTap: () {
                  Navigator.pop(context);
                  // Perform delete action
                },
              ),
            ],
          ),
        );
      },
    );
  }

  @override
  Widget build(BuildContext context) {
    return Scaffold(
      appBar: AppBar(
        title: Text('Bottom Sheet Example'),
      ),
      body: Center(
        child: ElevatedButton(
          onPressed: () {
            _openBottomSheet(context);
          },
          child: Text('Open Bottom Sheet'),
        ),
      ),
    );
  }
}
Output:

Conclusion:
Congratulations! You have successfully added a bottom sheet to your Flutter app. By following the steps in this tutorial, you learned how to implement a bottom sheet that slides up from the bottom of the screen, allowing you to display additional content or actions. Utilize the bottom sheet component to enhance the functionality and user experience of your Flutter applications.


