Introduction
The blurrycontainer package allows you to easily add a blur effect to a container in Flutter. This guide will show you how to integrate and use this package to create a Blur Container in your Flutter app.
Content
1.Add the blurrycontainer dependency:
Open your pubspec.yaml file and add the blurrycontainer dependency
dependencies:
blurrycontainer: ^latest_version
Run flutter pub get to install the package.
2.Import the package:
Import the blurrycontainer package in your Dart file.
import 'package:blurrycontainer/blurrycontainer.dart';
3.Create a Blur Container:
Use the BlurryContainer widget to create a Blur Container.
BlurryContainer(
  bgColor: Colors.blue, // Background color of the container
  blur: 5, // Blur intensity
  child: Container(
    width: 200,
    height: 200,
    child: Center(
      child: Text(
        'Blurry Container',
        style: TextStyle(
          color: Colors.white,
          fontSize: 24,
        ),
      ),
    ),
  ),
)
Customize the bgColor, blur, and child parameters according to your requirements. The bgColor parameter defines the background color of the container, and the blur parameter specifies the intensity of the blur effect.
4.Run the app:
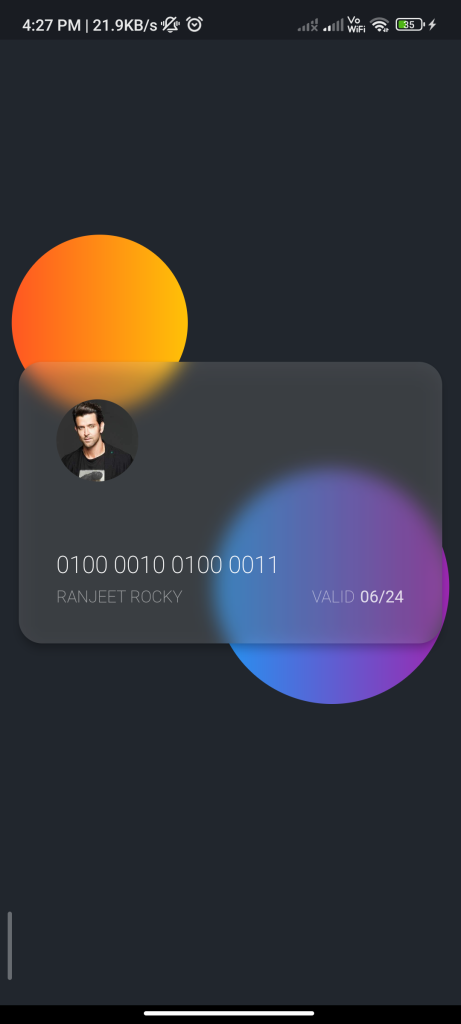
Run your Flutter app to see the Blur Container in action. The container will have a blur effect applied to it, giving it a visually appealing appearance.
Sample Code
import 'package:blurrycontainer/blurrycontainer.dart';
import 'package:flutter/material.dart';

void main() => runApp(const BlurContainerDemo());

class BlurContainerDemo extends StatelessWidget {
  const BlurContainerDemo({Key? key}) : super(key: key);

  @override
  Widget build(BuildContext context) {
    return MaterialApp(
      title: 'Blur Container Demo',
      debugShowCheckedModeBanner: false,
      home: Scaffold(
        backgroundColor: const Color(0xFF21262d),
        body: SizedBox.expand(
          child: Stack(
            alignment: Alignment.center,
            children: [
              const Positioned(
                top: 220,
                left: 10,
                child: GradientBall(
                  colors: [
                    Colors.deepOrange,
                    Colors.amber,
                  ],
                ),
              ),
              const Positioned(
                top: 460,
                left: 10,
                child: GradientBall(
                  colors: [
                    Colors.green,
                    Colors.amber,
                  ],
                ),
              ),
              const Positioned(
                top: 250,
                right: 10,
                child: GradientBall(
                  size: Size.square(200),
                  colors: [Colors.blue, Colors.purple],
                ),
              ),
              Padding(
                padding: const EdgeInsets.all(16.0),
                child: BlurryContainer(
                  color: Colors.white.withOpacity(0.15),
                  blur: 8,
                  elevation: 6,
                  height: 240,
                  padding: const EdgeInsets.all(32),
                  child: Column(
                    // mainAxisAlignment: MainAxisAlignment.start,
                    crossAxisAlignment: CrossAxisAlignment.start,
                    children: [
                      const CircleAvatar(
                        radius: 35,
                        backgroundColor: Colors.transparent,
                        backgroundImage: NetworkImage('https://img.indiaforums.com/person/480x360/0/0211-hrithik-roshan.jpg?c=4lP5F3'),
                      ),
                      const Spacer(),
                      const Text(
                        "0100 0010 0100 0011",
                        style: TextStyle(
                          color: Colors.white,
                          fontSize: 20,
                          fontWeight: FontWeight.w200,
                        ),
                      ),
                      const SizedBox(height: 8),
                      Row(
                        children: [
                          Text(
                            "SD..".toUpperCase(),
                            style: TextStyle(
                              color: Colors.white.withOpacity(0.5),
                              // fontSize: 16,
                              fontWeight: FontWeight.w200,
                            ),
                          ),
                          const Spacer(),
                          Text(
                            "VALID",
                            style: TextStyle(
                              color: Colors.white.withOpacity(0.5),
                              fontWeight: FontWeight.w200,
                            ),
                          ),
                          const SizedBox(width: 4),
                          Text(
                            "06/24",
                            style: TextStyle(
                              color: Colors.white.withOpacity(0.8),
                            ),
                          ),
                        ],
                      ),
                    ],
                  ),
                ),
              ),
            ],
          ),
        ),
      ),
    );
  }
}

class GradientBall extends StatelessWidget {
  final List<Color> colors;
  final Size size;
  const GradientBall({
    Key? key,
    required this.colors,
    this.size = const Size.square(150),
  }) : super(key: key);

  @override
  Widget build(BuildContext context) {
    return Container(
      height: size.height,
      width: size.width,
      decoration: BoxDecoration(
        shape: BoxShape.circle,
        gradient: LinearGradient(
          colors: colors,
        ),
      ),
    );
  }
}
Output

Conclusion
By following these steps, you can easily integrate the blurrycontainer package into your Flutter app and create a Blur Container with a blur effect. This allows you to add a stylish and visually appealing element to your app’s UI.


