Introduction:
A DataTable is a Flutter widget that displays data in a tabular format, allowing users to explore and interact with structured information. In this tutorial, you’ll learn how to implement a DataTable in your Flutter app to showcase and organize data effectively.
Content:
Step 1: Create a new Flutter project
flutter create datatable_example
Step 2: Add dependencies in pubspec.yaml
Open pubspec.yaml and add the following dependencies:
dependencies:
  flutter:
    sdk: flutter
  data_table_2: ^1.0.0
  # Add other dependencies as needed
Run the following command to fetch the new dependency:
flutter pub get
Step 3: Create a new Dart file for DataTable
Create a new Dart file, for example, data_table_widget.dart. In this file, import the necessary packages and create a stateful widget.
// data_table_widget.dart

import 'package:flutter/material.dart';
import 'package:data_table_2/data_table_2.dart';

class DataTableWidget extends StatefulWidget {
  @override
  _DataTableWidgetState createState() => _DataTableWidgetState();
}

class _DataTableWidgetState extends State<DataTableWidget> {
  // Your data goes here

  @override
  Widget build(BuildContext context) {
    return Scaffold(
      appBar: AppBar(
        title: Text("Data Table Example"),
      ),
      body: Padding(
        padding: EdgeInsets.all(8.0),
        child: SafeArea(
          child: DataTable2(
            // Customize your DataTable here
            columns: [
              DataColumn2(
                label: Text('ID'),
                size: ColumnSize.S,
              ),
              DataColumn2(
                label: Text('Name'),
                size: ColumnSize.L,
              ),
              DataColumn2(
                label: Text('Age'),
                size: ColumnSize.S,
              ),
              DataColumn2(
                label: Text('City'),
                size: ColumnSize.L,
              ),
              DataColumn2(
                label: Text('Actions'),
                size: ColumnSize.S,
              ),
            ],
            rows: [
              // Your data rows go here
            ],
          ),
        ),
      ),
    );
  }
}
Step 4: Implement DataTable Customization and Edit Functionality
Add the necessary customization for DataTable appearance and implement the edit row functionality.
// data_table_widget.dart (continued)

  // ... (Existing code)

  void _editRow(BuildContext context, int index) async {
    // Implement the edit row functionality here
    // ...
  }
}
Step 5: Run the App
Save your changes and run the app:
flutter run
Sample Code:
// ignore_for_file: prefer_const_constructors, prefer_const_literals_to_create_immutables, library_private_types_in_public_api, use_key_in_widget_constructors, avoid_print

import 'package:flutter/material.dart';
import 'package:data_table_2/data_table_2.dart';
import 'package:flutter_videos/constants/colors_constant.dart';

class DataTableWidget extends StatefulWidget {
  @override
  _DataTableWidgetState createState() => _DataTableWidgetState();
}

class _DataTableWidgetState extends State<DataTableWidget> {
  List<Map<String, dynamic>> data = [
    {'id': 1, 'name': 'John Doe', 'age': 28, 'city': 'New York'},
    {'id': 2, 'name': 'Jane Smith', 'age': 25, 'city': 'Los Angeles'},
    {'id': 4, 'name': 'Bob Johnson', 'age': 32, 'city': 'Chicago'},
    {'id': 5, 'name': 'Bob Johnson', 'age': 32, 'city': 'Chicago'},
    {'id': 6, 'name': 'ray Johnson', 'age': 32, 'city': 'morako'},
    {'id': 7, 'name': 'mona Johnson', 'age': 32, 'city': 'Chicago'},
    {'id': 8, 'name': 'bugiman Johnson', 'age': 32, 'city': 'Shikago'},
    {'id': 9, 'name': 'katara Johnson', 'age': 32, 'city': 'Dilhi'},
    {'id': 10, 'name': 'john Johnson', 'age': 32, 'city': 'Chicago'},
    // Add more data as needed
  ];

  @override
  Widget build(BuildContext context) {
    return Scaffold(
      appBar: AppBar(
        backgroundColor: Colors.blue[200],
        centerTitle: true,
        elevation: 2,
        title: Text(
          "Data Table",
          style: TextStyle(color: Colors.black),
        ),
      ),
      body: Padding(
        padding: EdgeInsets.all(8.0),
        child: SafeArea(
          child: DataTable2(
            columnSpacing: 12,
            horizontalMargin: 12,
            minWidth: 100,
            border: TableBorder.all(),
            dataTextStyle: TextStyle(fontSize: 14, color: tBlack),
            headingTextStyle: TextStyle(fontWeight: FontWeight.bold, color: tblackcolor),
            columns: [
              DataColumn2(
                label: Text('ID'),
                size: ColumnSize.S,
              ),
              DataColumn2(
                label: Text('Name'),
                size: ColumnSize.L,
              ),
              DataColumn2(
                label: Text('Age'),
                size: ColumnSize.S,
              ),
              DataColumn2(
                label: Text('City'),
                size: ColumnSize.L,
              ),
              DataColumn2(
                label: Text('Actions'),
                size: ColumnSize.S,
              ),
            ],
            rows: List.generate(
              data.length,
              (index) => DataRow(
                cells: [
                  DataCell(Text('${data[index]['id']}')),
                  DataCell(Text('${data[index]['name']}')),
                  DataCell(Text('${data[index]['age']}')),
                  DataCell(Text('${data[index]['city']}')),
                  DataCell(
                    Icon(Icons.edit),
                    onTap: () {
                      _editRow(context, index);
                    },
                  ),
                ],
              ),
            ),
          ),
        ),
      ),
    );
  }

  void _editRow(BuildContext context, int index) async {
    Map<String, dynamic> editedData = {};

    await showDialog(
      useSafeArea: true,
      context: context,
      builder: (BuildContext context) {
        return AlertDialog(
          title: Text('Edit Row'),
          content: Wrap(
            children: [
              TextFormField(
                initialValue: '${data[index]['name']}',
                decoration: InputDecoration(labelText: 'Name'),
                onChanged: (value) {
                  setState(() {
                    data[index]['name'] = value;
                  });
                },
              ),
              TextFormField(
                initialValue: '${data[index]['age']}',
                decoration: InputDecoration(labelText: 'Age'),
                onChanged: (value) {
                  setState(() {
                    data[index]['age'] = int.tryParse(value) ?? 0;
                  });
                },
              ),
              TextFormField(
                initialValue: '${data[index]['city']}',
                decoration: InputDecoration(labelText: 'City'),
                onChanged: (value) {
                  setState(() {
                    data[index]['city'] = value;
                  });
                },
              ),
            ],
          ),
          actions: [
            ElevatedButton(
              onPressed: () {
                Navigator.of(context).pop();
              },
              child: Text('Cancel'),
            ),
            ElevatedButton(
              onPressed: () {
                editedData = {
                  'name': data[index]['name'],
                  'age': data[index]['age'],
                  'city': data[index]['city'],
                };
                Navigator.of(context).pop(editedData);
              },
              child: Text('Save'),
            ),
          ],
        );
      },
    );

    if (editedData.isNotEmpty) {
      print('Edited Data: $editedData');
    }
  }
}
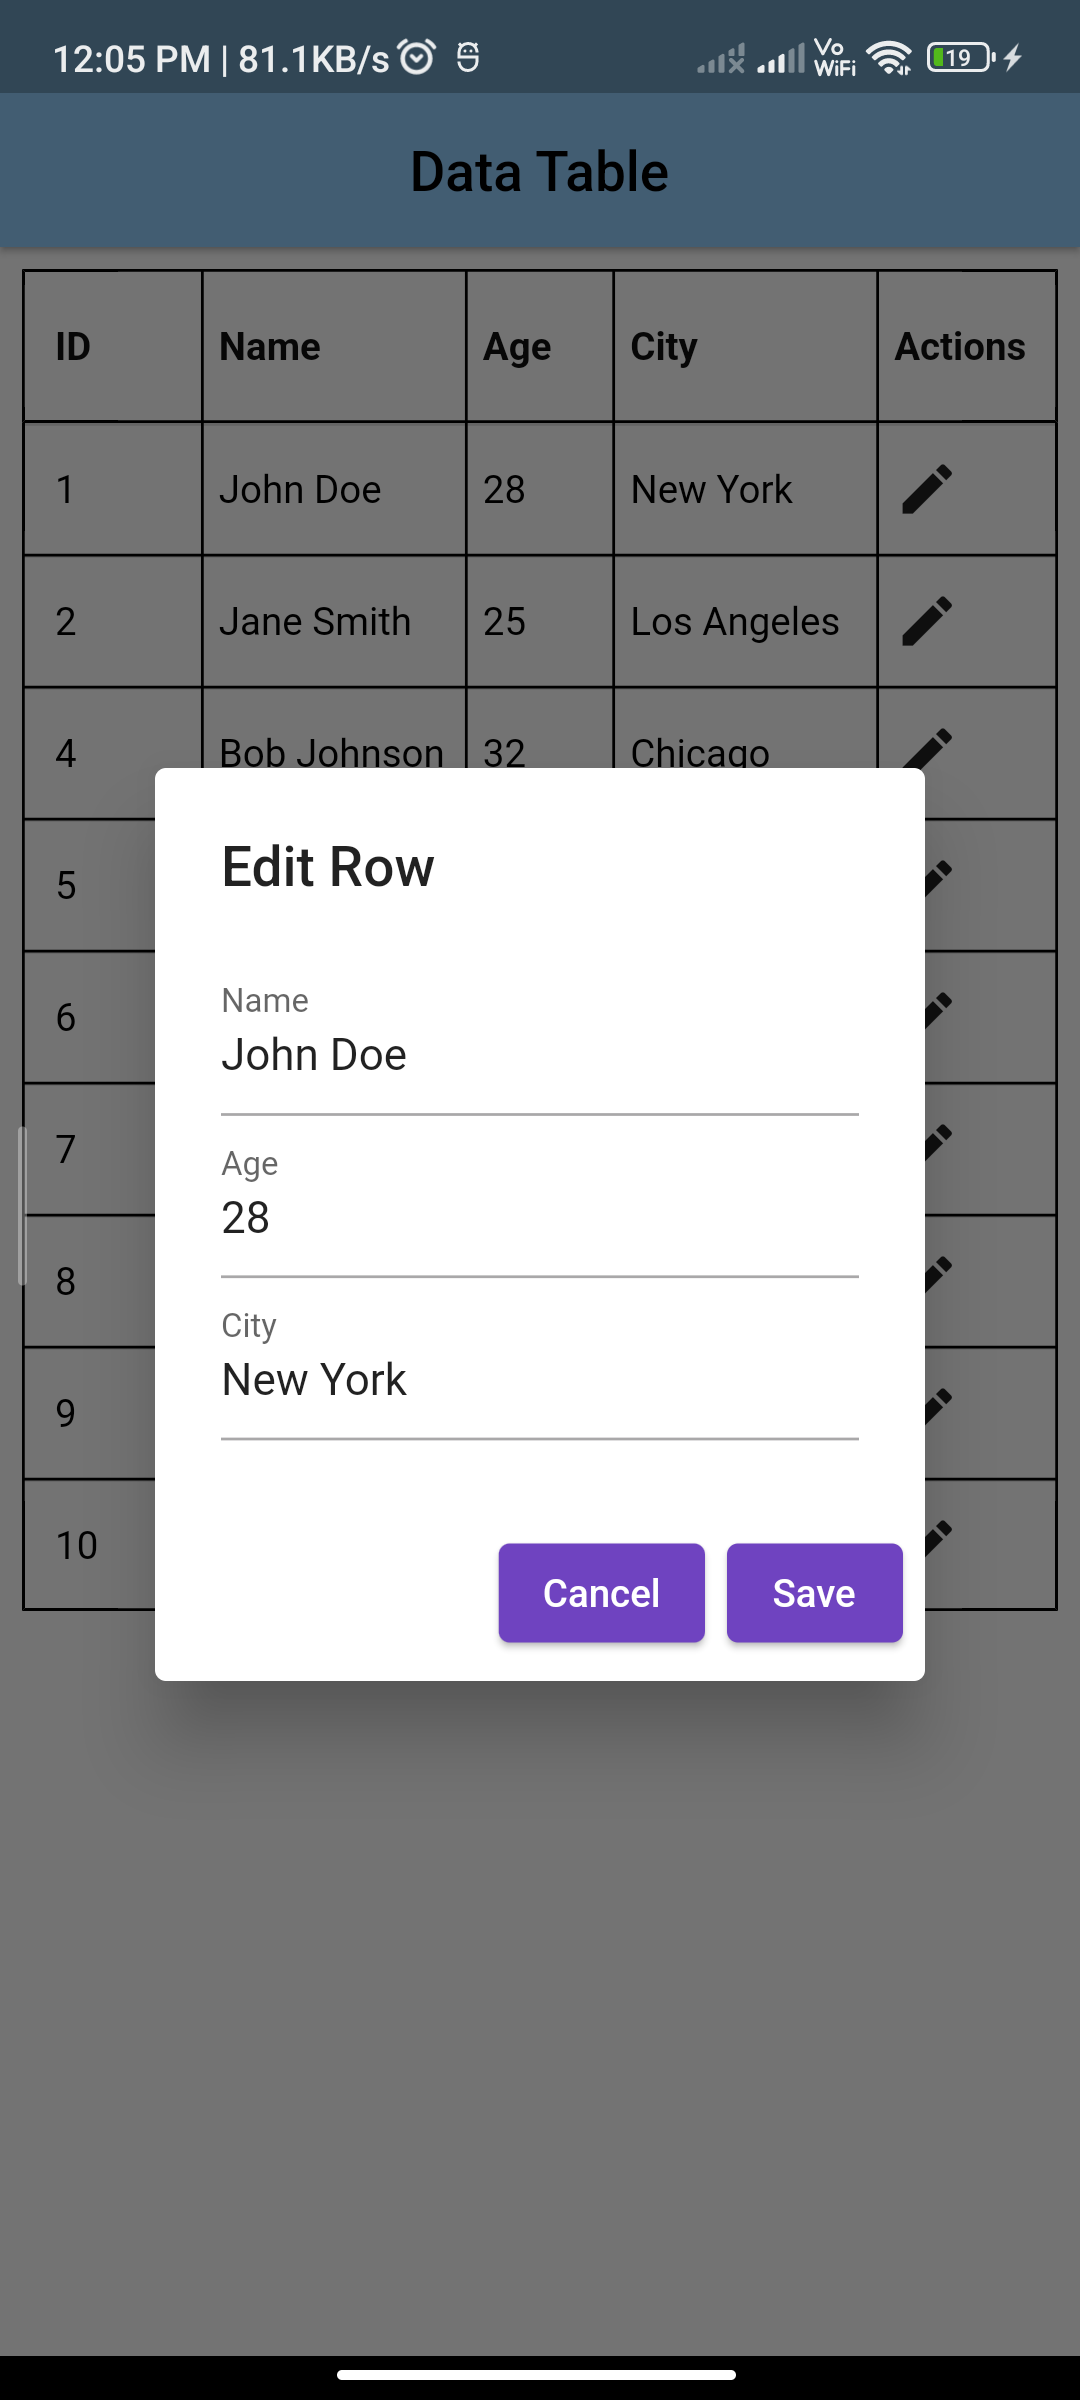
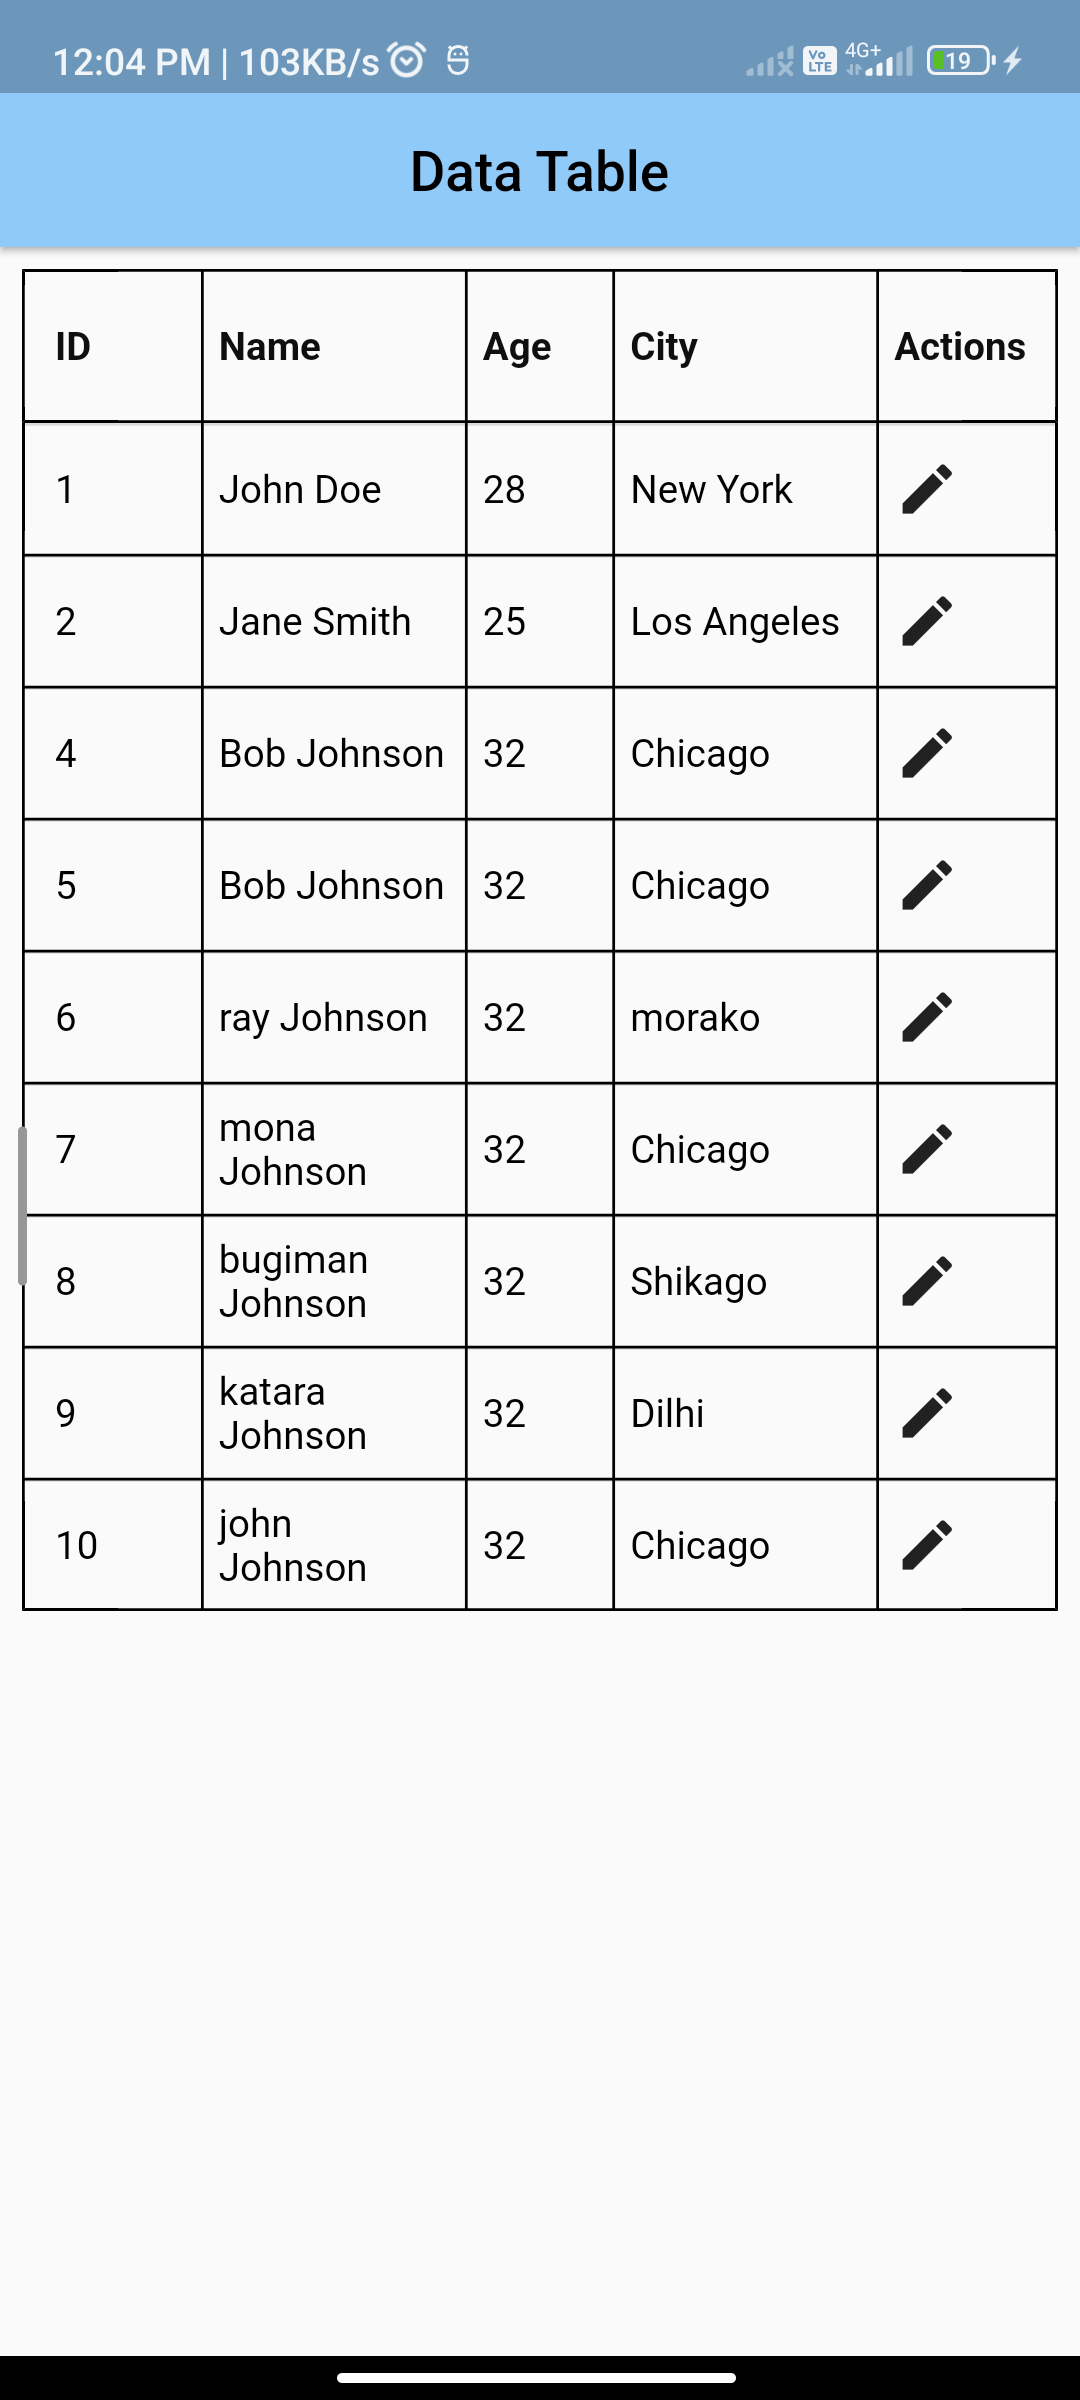
Output:


Conclusion:
Now you have a basic structure for a DataTable with the data_table_2 package in your Flutter project. Customize the DataTable appearance and functionality based on your specific requirements.


