Introduction:
A stepper is a user interface element that guides users through a sequence of steps in a predefined order. In this tutorial, you’ll learn how to implement a stepper in your Flutter app to create a structured and user-friendly flow.
Content:
1. Create a New Flutter Project
Ensure Flutter is installed on your machine. Create a new Flutter project using the following terminal command:
flutter create stepper_example
2. Design the Stepper
In the Dart file where you want to implement the stepper, import the necessary packages:
import 'package:flutter/material.dart';
Create a stateful widget with the main app structure:
class StepperExample extends StatefulWidget {
  @override
  _StepperExampleState createState() => _StepperExampleState();
}

class _StepperExampleState extends State<StepperExample> {
  int _currentStep = 0;

  List<Step> _stepperSteps = [
    Step(
      title: Text('Step 1'),
      content: Text('Content for Step 1'),
      isActive: true,
    ),
    Step(
      title: Text('Step 2'),
      content: Text('Content for Step 2'),
      isActive: false,
    ),
    Step(
      title: Text('Step 3'),
      content: Text('Content for Step 3'),
      isActive: false,
    ),
  ];

  @override
  Widget build(BuildContext context) {
    return Scaffold(
      appBar: AppBar(
        title: Text('Stepper Example'),
      ),
      body: Stepper(
        currentStep: _currentStep,
        steps: _stepperSteps,
        onStepTapped: (step) {
          setState(() {
            _currentStep = step;
          });
        },
        onStepContinue: () {
          setState(() {
            if (_currentStep < _stepperSteps.length - 1) {
              _currentStep += 1;
            } else {
              // Handle completion or next action
            }
          });
        },
        onStepCancel: () {
          setState(() {
            if (_currentStep > 0) {
              _currentStep -= 1;
            } else {
              // Handle cancellation or previous action
            }
          });
        },
      ),
    );
  }
}

void main() {
  runApp(MaterialApp(
    home: StepperExample(),
  ));
}
3. Customize and Test
Customize the stepper according to your app’s requirements. Add additional steps, content, and actions based on your specific use case.
Save your changes and run the app:
flutter run
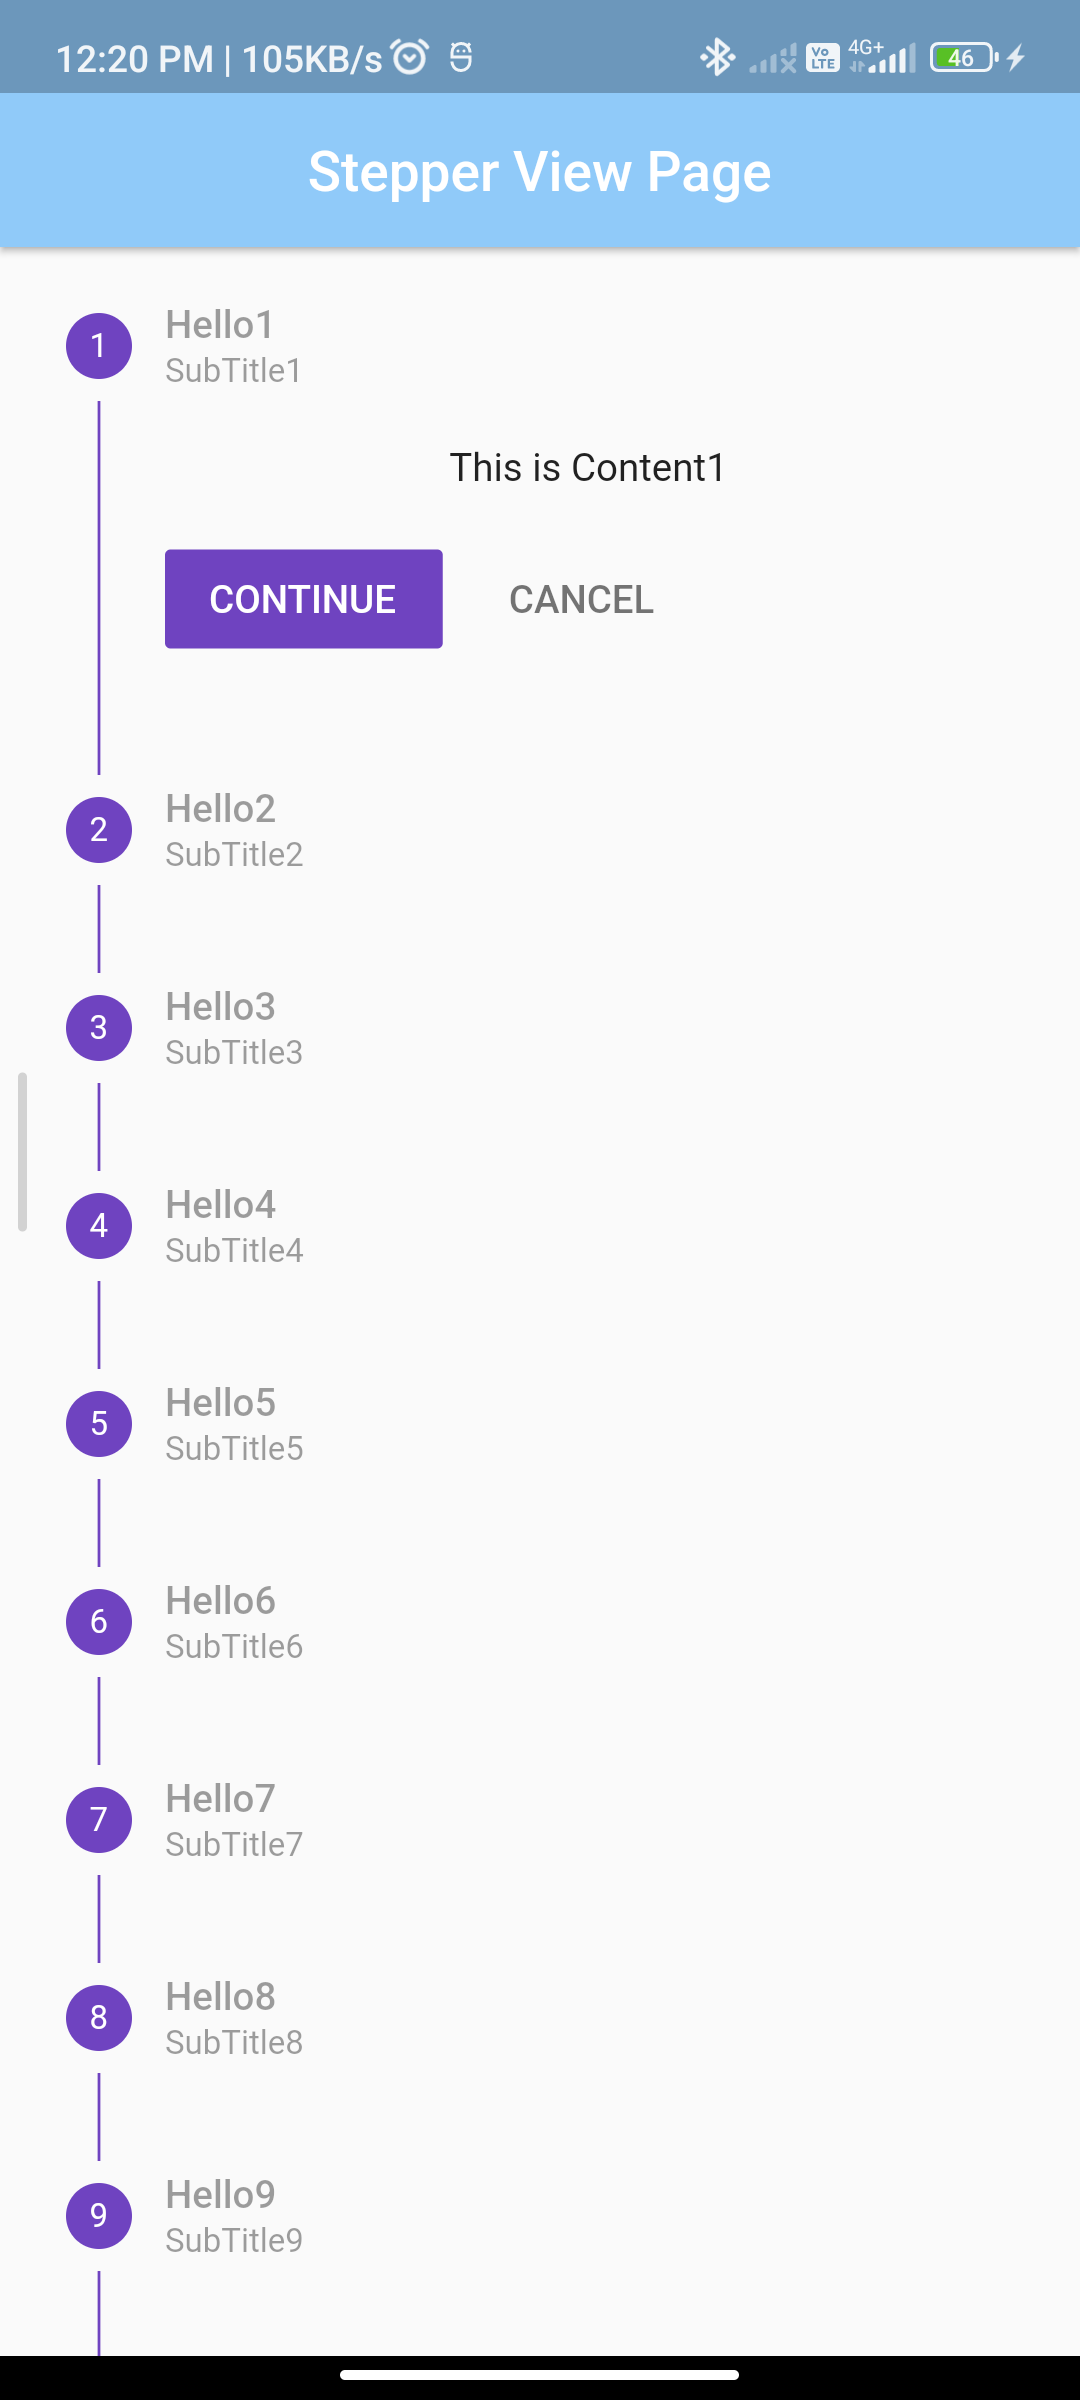
Upon running the app, you should see the stepper with the defined steps. Users can tap on steps, continue to the next step, or go back to the previous step based on the implemented functionality.
Sample code:
import 'package:flutter/material.dart';

class StepperPage extends StatefulWidget {
  StepperPage({
    Key? key,
  }) : super(key: key);

  @override
  _StepperPageState createState() => new _StepperPageState();
}

class _StepperPageState extends State<StepperPage> {
  int _currentstep = 0;

  void _movetonext() {
    setState(() {
      if (_currentstep < spr.length - 1) {
        _currentstep++;
      }
    });
  }

  void _movetostart() {
    setState(() {
      _currentstep = 0;
    });
  }

  void _showcontent(int s) {
    showDialog<Null>(
      context: context,
      barrierDismissible: false,
      builder: (BuildContext context) {
        return new AlertDialog(
          title: new Text('You clicked on'),
          content: new SingleChildScrollView(
            child: new ListBody(
              children: <Widget>[
                spr[s].title,
                // spr[s].subtitle,
              ],
            ),
          ),
          actions: <Widget>[
            TextButton(
              child: new Text('Ok'),
              onPressed: () {
                Navigator.of(context).pop();
              },
            ),
          ],
        );
      },
    );
  }

  @override
  Widget build(BuildContext context) {
    return new Scaffold(
      appBar: AppBar(
        centerTitle: true,
        elevation: 2,
        title: Text("Stepper View Page"),
        backgroundColor: Colors.blue[200],
      ),
      body: new Container(
        child: new Stepper(
          steps: _getSteps(context),
          type: StepperType.vertical,
          currentStep: _currentstep,
          onStepContinue: _movetonext,
          onStepCancel: _movetostart,
          onStepTapped: _showcontent,
        ),
      ),
    );
  }

  List<Step> spr = <Step>[];

  List<Step> _getSteps(BuildContext context) {
    spr = <Step>[
      Step(
        title: const Text('Hello1'),
        subtitle: Text('SubTitle1'),
        content: const Text('This is Content1'),
        state: _getState(1),
        isActive: true,
      ),
      Step(
        title: const Text('Hello2'),
        subtitle: Text('SubTitle2'),
        content: const Text('This is Content2'),
        state: _getState(2),
        isActive: true,
      ),
      Step(
        title: const Text('Hello3'),
        subtitle: Text('SubTitle3'),
        content: const Text('This is Content3'),
        state: _getState(3),
        isActive: true,
      ),
      Step(
        title: const Text('Hello4'),
        subtitle: Text('SubTitle4'),
        content: const Text('This is Content4'),
        state: _getState(4),
        isActive: true,
      ),
      Step(
        title: const Text('Hello5'),
        subtitle: Text('SubTitle5'),
        content: const Text('This is Content5'),
        state: _getState(5),
        isActive: true,
      ),
      Step(
        title: const Text('Hello6'),
        subtitle: Text('SubTitle6'),
        content: const Text('This is Content6'),
        state: _getState(6),
        isActive: true,
      ),
      Step(
        title: const Text('Hello7'),
        subtitle: Text('SubTitle7'),
        content: const Text('This is Content7'),
        state: _getState(7),
        isActive: true,
      ),
      Step(
        title: const Text('Hello8'),
        subtitle: Text('SubTitle8'),
        content: const Text('This is Content8'),
        state: _getState(8),
        isActive: true,
      ),
      Step(
        title: const Text('Hello9'),
        subtitle: Text('SubTitle9'),
        content: const Text('This is Content9'),
        state: _getState(9),
        isActive: true,
      ),
      Step(
        title: const Text('Hello10'),
        subtitle: Text('SubTitle10'),
        content: const Text('This is Content10'),
        state: _getState(10),
        isActive: _currentstep < 9, // Disable if current step is 9 (index 10)
      ),
    ];
    return spr;
  }

  StepState _getState(int i) {
    if (_currentstep >= i)
      return StepState.complete;
    else
      return StepState.disabled;
  }
}

void main() {
  runApp(MyApp());
}

class MyApp extends StatelessWidget {
  @override
  Widget build(BuildContext context) {
    return MaterialApp(
      title: 'Stepper Example',
      theme: ThemeData(
        primarySwatch: Colors.blue,
      ),
      home: StepperPage(),
    );
  }
}
output:

Conclusion:
Congratulations! You have successfully implemented a stepper in your Flutter app. Steppers are useful for guiding users through a sequence of steps, making complex processes more manageable and user-friendly.


