Introduction:
In a Flutter app, screen navigation allows users to move between different screens or pages to access different functionalities or view different information. Sometimes, you may need to pass data from one screen to another. This could be user input, app settings, or any other relevant data. In Flutter, you can navigate to a new screen and pass data using the Navigator class and route arguments. In this step-by-step guide, you will learn how to navigate to a new screen and pass data between screens in Flutter. By following this tutorial, you will be able to implement screen navigation and pass data efficiently in your Flutter app.

Content:
1. Set up a new Flutter project:
Ensure that you have Flutter installed and set up on your machine. Create a new Flutter project using the following command in your terminal:
flutter create navigation_app
2. Define the destination screen:
Create a new Dart file for the destination screen where you want to navigate. Define the necessary widgets, UI elements, and functionality for that screen.
3. Navigate to the destination screen:
In the source screen, import the necessary packages and define a function to handle the navigation to the destination screen. Use the Navigator.push() method to navigate to the destination screen. Pass the desired data as route arguments.
import 'package:flutter/material.dart';
import 'destination_screen.dart';

class SourceScreen extends StatelessWidget {
  final String dataToPass = 'Hello, Destination Screen!';

  void navigateToDestinationScreen(BuildContext context) {
    Navigator.push(
      context,
      MaterialPageRoute(
        builder: (context) => DestinationScreen(dataToPass),
      ),
    );
  }

  @override
  Widget build(BuildContext context) {
    return Scaffold(
      appBar: AppBar(
        title: Text('Source Screen'),
      ),
      body: Center(
        child: RaisedButton(
          onPressed: () {
            navigateToDestinationScreen(context);
          },
          child: Text('Go to Destination'),
        ),
      ),
    );
  }
}
4. Receive the data in the destination screen:
In the destination screen, retrieve the passed data from the route arguments.
import 'package:flutter/material.dart';

class DestinationScreen extends StatelessWidget {
  final String receivedData;

  DestinationScreen(this.receivedData);

  @override
  Widget build(BuildContext context) {
    return Scaffold(
      appBar: AppBar(
        title: Text('Destination Screen'),
      ),
      body: Center(
        child: Text(receivedData),
      ),
    );
  }
}
5. Test the screen navigation and data passing:
Save your changes and run the app using the following command in your terminal:
flutter run
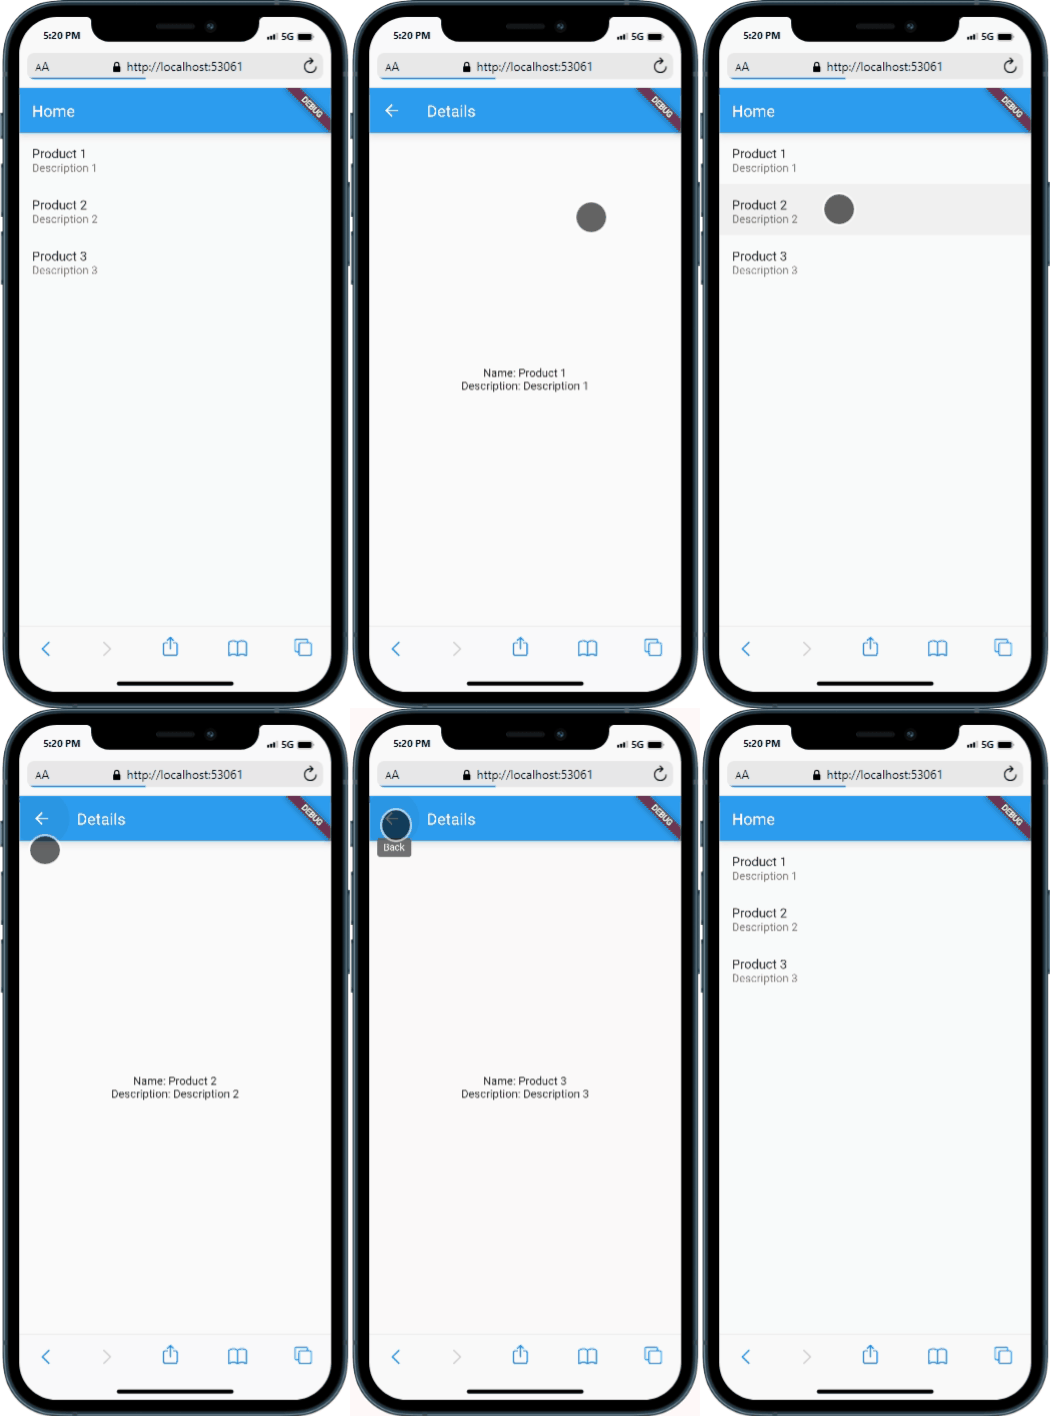
Upon running the app, you can navigate from the source screen to the destination screen by tapping the “Go to Destination” button. The destination screen will display the passed data, which can be utilized as per your app’s requirements.
Sample Code:
1. Add this main file to your project :
import 'package:flutter/material.dart';


import 'componants/DetailsScreen.dart';

void main() {
  runApp(MyApp());
}

class MyApp extends StatelessWidget {
  @override
  Widget build(BuildContext context) {
    return MaterialApp(
      title: 'Navigation Example',
      theme: ThemeData(
        primarySwatch: Colors.blue,
      ),
      initialRoute: '/',
      routes: {
        '/': (context) => HomeScreen(),
        '/details': (context) => DetailsScreen(),
      },
    );
  }
}
2. Create new file name as homepage.dart and add this code :
import 'package:flutter/material.dart';

class Product {
  final String name;
  final String description;

  Product(this.name, this.description);
}

class HomeScreen extends StatelessWidget {
  final List<Product> products = [
    Product('Product 1', 'Description 1'),
    Product('Product 2', 'Description 2'),
    Product('Product 3', 'Description 3'),
  ];

  @override
  Widget build(BuildContext context) {
    return Scaffold(
      appBar: AppBar(
        title: Text('Home'),
      ),
      body: ListView.builder(
        itemCount: products.length,
        itemBuilder: (context, index) {
          return ListTile(
            title: Text(products[index].name),
            subtitle: Text(products[index].description),
            onTap: () {
              Navigator.pushNamed(
                context,
                '/details',
                arguments: products[index],
              );
            },
          );
        },
      ),
    );
  }
}

class DetailsScreen extends StatelessWidget {
  @override
  Widget build(BuildContext context) {
    final Product product = ModalRoute.of(context)!.settings.arguments as Product;

    return Scaffold(
      appBar: AppBar(
        title: Text('Details'),
      ),
      body: Center(
        child: Column(
          mainAxisAlignment: MainAxisAlignment.center,
          children: [
            Text('Name: ${product.name}'),
            Text('Description: ${product.description}'),
          ],
        ),
      ),
    );
  }
}
3. Create new file name as details.dart and add this code :
import 'package:flutter/material.dart';

class Product {
  final String name;
  final String description;

  Product(this.name, this.description);
}

class HomeScreen extends StatelessWidget {
  final List<Product> products = [
    Product('Product 1', 'Description 1'),
    Product('Product 2', 'Description 2'),
    Product('Product 3', 'Description 3'),
  ];

  @override
  Widget build(BuildContext context) {
    return Scaffold(
      appBar: AppBar(
        title: Text('Home'),
      ),
      body: ListView.builder(
        itemCount: products.length,
        itemBuilder: (context, index) {
          return ListTile(
            title: Text(products[index].name),
            subtitle: Text(products[index].description),
            onTap: () {
              Navigator.pushNamed(
                context,
                '/details',
                arguments: products[index],
              );
            },
          );
        },
      ),
    );
  }
}

class DetailsScreen extends StatelessWidget {
  @override
  Widget build(BuildContext context) {
    final Product product = ModalRoute.of(context)!.settings.arguments as Product;

    return Scaffold(
      appBar: AppBar(
        title: Text('Details'),
      ),
      body: Center(
        child: Column(
          mainAxisAlignment: MainAxisAlignment.center,
          children: [
            Text('Name: ${product.name}'),
            Text('Description: ${product.description}'),
          ],
        ),
      ),
    );
  }
}
Output:

Conclusion:
Congratulations! You have successfully learned how to navigate to a new screen and pass data between screens in a Flutter app. By following this step-by-step guide, you can now implement screen navigation and efficiently pass data using the Navigator class and route arguments in Flutter. Utilize screen navigation and data passing to create a


