Introduction:
In a Flutter app, displaying a date picker allows users to easily select dates for various purposes. Whether it’s for scheduling events, setting reminders, or capturing birthdates, a date picker is a crucial component in many applications. In this step-by-step guide, you will learn how to display a date picker in your Flutter app. By following this tutorial, you will be able to implement a date picker widget and capture the selected date for further processing.


Content:
1. Set up a new Flutter project:
Ensure that you have Flutter installed and set up on your machine. Create a new Flutter project using the following command in your terminal:
flutter create date_picker_app
2. Implement a date picker:
In the Dart file where you want to implement the date picker, import the necessary packages:
import 'package:flutter/material.dart';
Inside the build method of your widget, define a variable to store the selected date:
DateTime selectedDate;
Create a function that displays the date picker dialog and captures the selected date:
Future<void> _selectDate(BuildContext context) async {
  final DateTime pickedDate = await showDatePicker(
    context: context,
    initialDate: DateTime.now(),
    firstDate: DateTime(2020),
    lastDate: DateTime(2025),
  );

  if (pickedDate != null && pickedDate != selectedDate) {
    setState(() {
      selectedDate = pickedDate;
    });
  }
}
3. Use the date picker in your app:
In the Dart file where you want to use the date picker, import the necessary packages and add a button that triggers the date picker dialog:
import 'package:flutter/material.dart';

class MyScreen extends StatefulWidget {
  @override
  _MyScreenState createState() => _MyScreenState();
}

class _MyScreenState extends State<MyScreen> {
  DateTime selectedDate;

  Future<void> _selectDate(BuildContext context) async {
    final DateTime pickedDate = await showDatePicker(
      context: context,
      initialDate: DateTime.now(),
      firstDate: DateTime(2020),
      lastDate: DateTime(2025),
    );

    if (pickedDate != null && pickedDate != selectedDate) {
      setState(() {
        selectedDate = pickedDate;
      });
    }
  }

  @override
  Widget build(BuildContext context) {
    return Scaffold(
      appBar: AppBar(
        title: Text('Date Picker'),
      ),
      body: Center(
        child: Column(
          mainAxisAlignment: MainAxisAlignment.center,
          children: [
            ElevatedButton(
              onPressed: () => _selectDate(context),
              child: Text('Select Date'),
            ),
            SizedBox(height: 16),
            Text(
              selectedDate != null
                  ? 'Selected Date: ${selectedDate.toString()}'
                  : 'No date selected',
            ),
          ],
        ),
      ),
    );
  }
}
4. Capture the selected date:
To capture the selected date, you can utilize the selectedDate variable in your Flutter app. You can use this value for further processing, such as storing it in a database, performing calculations, or updating UI elements based on the selected date.
5. Test the date picker:
Save your changes and run the app using the following command in your terminal:
flutter run
6. Select a date using the date picker:
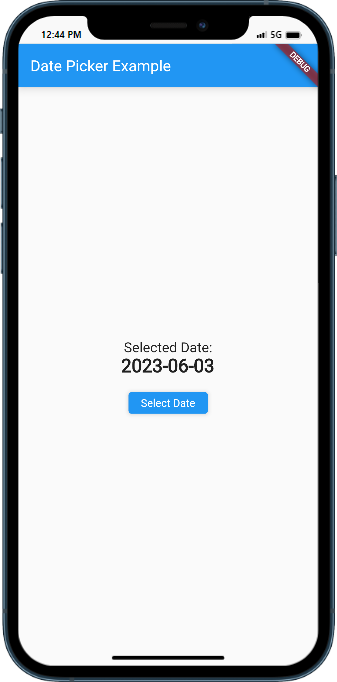
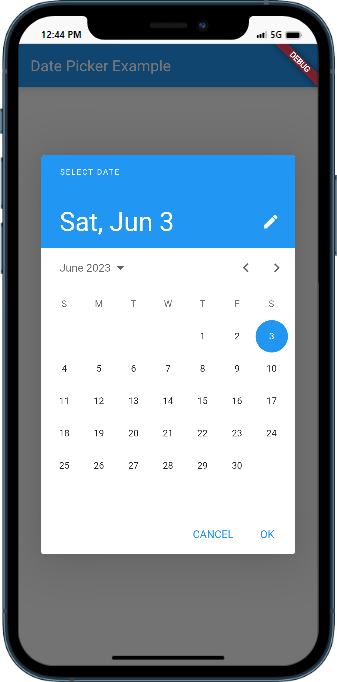
Upon running the app, you will see a button labeled “Select Date”. Pressing this button will open the date picker dialog, allowing you to choose a date within the specified range (2020-2025). After selecting a date, it will be displayed below the button. If no date is selected, a “No date selected” message will be shown.
Sample Code:
import 'package:flutter/material.dart';

class DatePickerExample extends StatefulWidget {
  @override
  _DatePickerExampleState createState() => _DatePickerExampleState();
}

class _DatePickerExampleState extends State<DatePickerExample> {
  late DateTime selectedDate;

  Future<void> _selectDate(BuildContext context) async {
    final DateTime? picked = await showDatePicker(
      context: context,
      initialDate: selectedDate,
      firstDate: DateTime(2020),
      lastDate: DateTime(2025),
    );

    if (picked != null && picked != selectedDate) {
      setState(() {
        selectedDate = picked;
      });
    }
  }

  @override
  void initState() {
    super.initState();
    selectedDate = DateTime.now();
  }

  @override
  Widget build(BuildContext context) {
    return Scaffold(
      appBar: AppBar(
        title: Text('Date Picker Example'),
      ),
      body: Center(
        child: Column(
          mainAxisAlignment: MainAxisAlignment.center,
          children: [
            Text(
              'Selected Date:',
              style: TextStyle(fontSize: 18),
            ),
            Text(
              '${selectedDate.toLocal()}'.split(' ')[0],
              style: TextStyle(fontSize: 24, fontWeight: FontWeight.bold),
            ),
            SizedBox(height: 20),
            ElevatedButton(
              onPressed: () => _selectDate(context),
              child: Text('Select Date'),
            ),
          ],
        ),
      ),
    );
  }
}

void main() {
  runApp(MaterialApp(
    home: DatePickerExample(),
  ));
}
Output:


Conclusion:
Congratulations! You have successfully learned how to display a date picker in a Flutter app for selecting dates. By following this step-by-step guide, you now have the knowledge to implement a date picker widget and capture the selected date for further processing. Utilize this technique in your Flutter app to enable users to easily select dates for various functionalities and enhance the user experience.


