Introduction:
A Date Picker Timeline is a useful component in Flutter apps that require date selection from a chronological timeline. By implementing a Date Picker Timeline, you can enhance the user experience by providing a visually appealing and intuitive way for users to select dates. In this step-by-step guide, you will learn how to implement a Date Picker Timeline in a Flutter app. By following this tutorial, you will be able to integrate the Date Picker Timeline functionality into your app and provide a seamless user experience.

Content:
1. Set up a new Flutter project:
Ensure that you have Flutter installed and set up on your machine. Create a new Flutter project using the following command in your terminal:
flutter create date_picker_timeline_app
2. Add dependencies:
Open the pubspec.yaml file in your Flutter project and add the following dependency:
dependencies:
  flutter:
    sdk: flutter
  date_picker_timeline: ^0.1.4
Save the changes and run the following command in your terminal to fetch the dependencies:
flutter pub get
3. Implement the Date Picker Timeline:
In the Dart file where you want to use the Date Picker Timeline, import the necessary packages:
import 'package:flutter/material.dart';
import 'package:date_picker_timeline/date_picker_timeline.dart';
Add a DatePickerTimeline widget to your widget tree:
DatePickerTimeline(
  initialDate: DateTime.now(),
  firstDate: DateTime(DateTime.now().year - 1),
  lastDate: DateTime(DateTime.now().year + 1),
  onDateChange: (date) {
    // Handle the selected date
  },
),
4. Customize the appearance of the Date Picker Timeline:
You can customize the appearance of the Date Picker Timeline by modifying the properties of the DatePickerTimeline widget. For example, you can change the selected date style, selectedTextColor, or inactiveDateColor. Refer to the date_picker_timeline package documentation for more customization options.
5. Test the Date Picker Timeline:
Save your changes and run the app using the following command in your terminal:
flutter run
6. Observe the Date Picker Timeline in action:
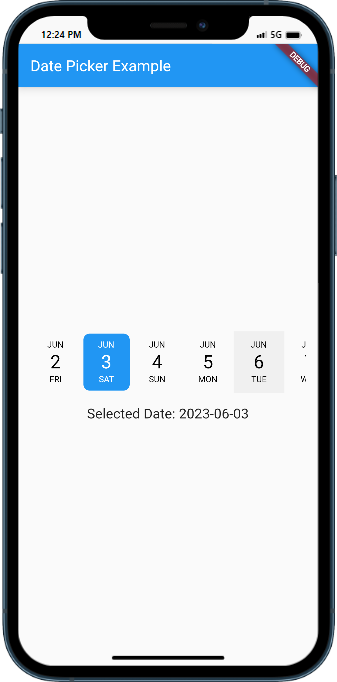
Upon running the app, you will see the Date Picker Timeline displayed in your app. Users can now select dates from the chronological timeline, depending on the functionality you have implemented.
Sample Code:
import 'package:flutter/material.dart';
import 'package:date_picker_timeline/date_picker_timeline.dart';

void main() {
  runApp(MyApp());
}

class MyApp extends StatelessWidget {
  @override
  Widget build(BuildContext context) {
    return MaterialApp(
      title: 'Date Picker Example',
      theme: ThemeData(
        primarySwatch: Colors.blue,
      ),
      home: DatePickerExample(),
    );
  }
}

class DatePickerExample extends StatefulWidget {
  @override
  _DatePickerExampleState createState() => _DatePickerExampleState();
}

class _DatePickerExampleState extends State<DatePickerExample> {
  DateTime selectedDate = DateTime.now();

  @override
  Widget build(BuildContext context) {
    return Scaffold(
      appBar: AppBar(
        title: Text('Date Picker Example'),
      ),
      body: Center(
        child: Column(
          mainAxisAlignment: MainAxisAlignment.center,
          children: [
            Container(
              margin: EdgeInsets.symmetric(horizontal: 16.0),
              child: DatePicker(
                DateTime.now(),
                height: 80.0,
                initialSelectedDate: DateTime.now(),
                selectionColor: Colors.blue,
                selectedTextColor: Colors.white,
                onDateChange: (date) {
                  setState(() {
                    selectedDate = date;
                  });
                },
              ),
            ),
            SizedBox(height: 16.0),
            Text(
              'Selected Date: ${selectedDate.toString().substring(0, 10)}',
              style: TextStyle(fontSize: 18.0),
            ),
          ],
        ),
      ),
    );
  }
}
Output:

Conclusion:
Congratulations! You have successfully implemented a Date Picker Timeline in your Flutter app. By following this step-by-step guide, you have learned how to integrate the Date Picker Timeline functionality into your app, enhancing the user experience and allowing users to select dates from a chronological timeline. Incorporate this feature into your Flutter app to provide a visually appealing and intuitive date selection experience.


