Introduction:
A rating and review system is a valuable component in many mobile apps, as it enables users to share their opinions and experiences. Flutter provides various widgets and tools to implement a rating and review system efficiently. This tutorial will guide you through the process of implementing a rating and review system in a Flutter app.

Content:
1. Create a new Flutter project:
Before we begin, ensure that you have Flutter installed and set up on your machine. Create a new Flutter project by running the following command in your terminal:
import 'package:flutter/material.dart';
2. Open the main.dart file:
Once the project is created, navigate to the lib folder and open the main.dart file.
3. Import the necessary packages:
To work with rating and review functionality, import the following packages at the top of the main.dart file:
import 'package:flutter/material.dart';
4. Implement the rating and review system:
Inside the main.dart file, implement the rating and review system by following these steps:
a. Define the main function: Inside the main.dart file, locate the main() function and modify it as follows:
void main() {
  runApp(MyApp());
}
b. Create the MyApp class: Define the MyApp class, which extends StatelessWidget:
class MyApp extends StatelessWidget {
  @override
  Widget build(BuildContext context) {
    return MaterialApp(
      title: 'Rating and Review System',
      home: RatingReviewScreen(),
    );
  }
}
c. Create the RatingReviewScreen class: Define the RatingReviewScreen class, which extends StatefulWidget:
class RatingReviewScreen extends StatefulWidget {
  @override
  _RatingReviewScreenState createState() => _RatingReviewScreenState();
}

class _RatingReviewScreenState extends State<RatingReviewScreen> {
  double rating = 0;

  @override
  Widget build(BuildContext context) {
    return Scaffold(
      appBar: AppBar(
        title: Text('Rating and Review System'),
      ),
      body: Column(
        children: [
          SizedBox(height: 20.0),
          Text(
            'Rate this app',
            style: TextStyle(fontSize: 20.0),
          ),
          SizedBox(height: 20.0),
          RatingBar(
            initialRating: rating,
            minRating: 0,
            maxRating: 5,
            onRatingUpdate: (newRating) {
              setState(() {
                rating = newRating;
              });
            },
            filledIcon: Icons.star,
            emptyIcon: Icons.star_border,
            halfFilledIcon: Icons.star_half,
            isHalfAllowed: true,
            filledColor: Colors.amber,
          ),
          SizedBox(height: 20.0),
          RaisedButton(
            child: Text('Submit Review'),
            onPressed: () {
              // Perform submission logic here
              // You can save the rating and review data to a database or perform any other required action
            },
          ),
        ],
      ),
    );
  }
}
5. Run the app:
Save the changes and run the app using the following command in your terminal:
flutter run
6. Use the rating and review system:
You will see a rating bar in the app’s UI. Users can slide or tap on the stars to rate the app. Implement the logic inside the onPressed callback of the submit button to handle the submission of the rating and review. You can save the rating and review data to a database or perform any other required action.
Sample Code:
import 'package:flutter/material.dart';
import 'package:rating_dialog/rating_dialog.dart';

void main() {
  runApp(MyApp());
}

class MyApp extends StatelessWidget {
  @override
  Widget build(BuildContext context) {
    return MaterialApp(
      title: 'Rating Demo',
      theme: ThemeData(
        primarySwatch: Colors.blue,
      ),
      home: RatingScreen(),
    );
  }
}

class RatingScreen extends StatelessWidget {
  void showRatingDialog(BuildContext context) {
    showDialog(
      context: context,
      builder: (BuildContext context) {
        return RatingDialog(
          image: Icon(
            Icons.star,
            size: 100,
            color: Colors.yellow,
          ),
          title:Text('Rate this app') ,
           commentHint: 'Please leave a rating and review.',

          onCancelled: () => print('Rating dialog cancelled'),
          onSubmitted: (response) {
            print('Rating: ${response.rating}, Review: ${response.comment}');
            // You can handle the rating and review submission here
          }, submitButtonText: 'SUBMIT',
        );
      },
    );
  }

  @override
  Widget build(BuildContext context) {
    return Scaffold(
      appBar: AppBar(
        title: Text('Rating Demo'),
      ),
      body: Center(
        child: ElevatedButton(
          onPressed: () {
            showRatingDialog(context);
          },
          child: Text('Show Rating Dialog'),
        ),
      ),
    );
  }
}
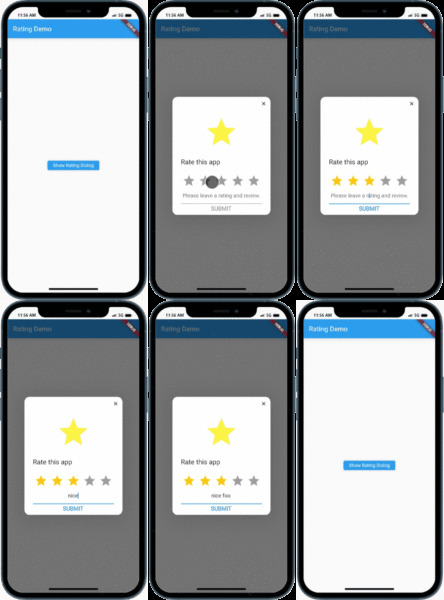
Output:

Conclusion:
In this tutorial, you have learned how to implement a rating and review system in a Flutter app. By following the steps outlined in this tutorial, you can create a user-friendly and interactive rating and review feature, allowing users to rate and provide feedback for products, services, or any other content. Customize the appearance and behavior of the rating bar to match your app’s design and requirements. Enhance the engagement and user experience of your Flutter app by incorporating a rating and review system.


