Introduction:
Dark mode has become a popular feature in modern app design, providing a visually appealing and comfortable user interface for low-light environments. In Flutter, you can easily implement dark mode to give your users the flexibility to switch between light and dark themes. This tutorial will guide you through the process of implementing dark mode in Flutter.

Content:
1. Create a new Flutter project:
Before we begin, make sure you have Flutter installed and set up on your machine. Create a new Flutter project by running the following command in your terminal:
flutter create dark_mode_example
2. Open the main.dart file:
Once the project is created, navigate to the lib folder and open the main.dart file.
3. Import the necessary packages:
To work with dark mode, import the following packages at the top of the main.dart file:
import 'package:flutter/material.dart';
import 'package:flutter/services.dart';
4. Implement dark mode:
Inside the main.dart file, implement dark mode by following these steps:
a. Declare a global boolean variable: Add a global boolean variable called isDarkMode at the top of the main.dart file:
bool isDarkMode = false;
b. Define the main function: Inside the main.dart file, locate the main() function and modify it as follows:
void main() {
  WidgetsFlutterBinding.ensureInitialized();
  SystemChrome.setPreferredOrientations([DeviceOrientation.portraitUp]);
  runApp(MyApp());
}
c. Create the MyApp class: Define the MyApp class, which extends StatelessWidget:
class MyApp extends StatelessWidget {
  @override
  Widget build(BuildContext context) {
    return MaterialApp(
      title: 'Dark Mode Example',
      theme: isDarkMode ? ThemeData.dark() : ThemeData.light(),
      home: HomeScreen(),
    );
  }
}
d. Create the HomeScreen class: Define the HomeScreen class, which extends StatefulWidget:
class HomeScreen extends StatefulWidget {
  @override
  _HomeScreenState createState() => _HomeScreenState();
}

class _HomeScreenState extends State<HomeScreen> {
  @override
  Widget build(BuildContext context) {
    return Scaffold(
      appBar: AppBar(
        title: Text('Dark Mode Example'),
      ),
      body: Center(
        child: Text(
          'Hello, Dark Mode!',
          style: TextStyle(fontSize: 20),
        ),
      ),
      floatingActionButton: FloatingActionButton(
        onPressed: () {
          setState(() {
            isDarkMode = !isDarkMode;
          });
        },
        child: Icon(Icons.lightbulb),
      ),
    );
  }
}
5. Run the app:
Save the changes and run the app using the following command in your terminal:
flutter run
6. Toggle dark mode:
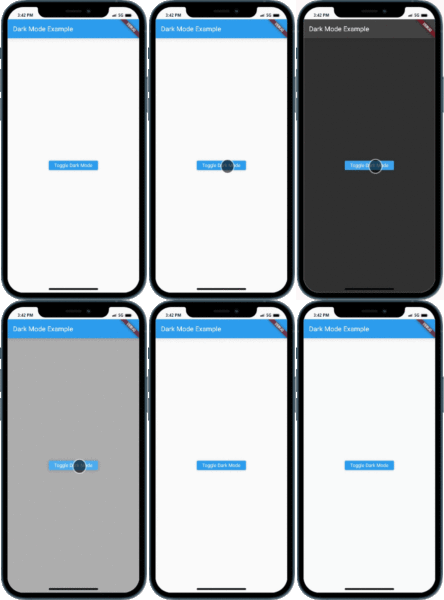
Observe the app’s user interface and the floating action button. By tapping the button, you can toggle between light and dark modes.
Sample Code:
import 'package:flutter/material.dart';

void main() {
  runApp(MyApp());
}

class MyApp extends StatefulWidget {
  @override
  _MyAppState createState() => _MyAppState();
}

class _MyAppState extends State<MyApp> {
  bool _isDarkMode = false;

  void _toggleDarkMode() {
    setState(() {
      _isDarkMode = !_isDarkMode;
    });
  }

  @override
  Widget build(BuildContext context) {
    return MaterialApp(
      title: 'Dark Mode Example',
      theme: _isDarkMode ? ThemeData.dark() : ThemeData.light(),
      home: HomeScreen(
        toggleDarkMode: _toggleDarkMode,
      ),
    );
  }
}

class HomeScreen extends StatelessWidget {
  final VoidCallback toggleDarkMode;

  HomeScreen({required this.toggleDarkMode});

  @override
  Widget build(BuildContext context) {
    return Scaffold(
      appBar: AppBar(
        title: Text('Dark Mode Example'),
      ),
      body: Center(
        child: ElevatedButton(
          onPressed: toggleDarkMode,
          child: Text('Toggle Dark Mode'),
        ),
      ),
    );
  }
}
Output:

Conclusion:
Congratulations! You have successfully implemented


