Introduction:
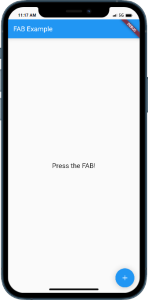
In Flutter, the Floating Action Button (FAB) is a prominent UI element that allows users to perform a primary action in the app. The FAB is typically placed in a fixed position above the content.
Content:
1. Create a new Flutter project:
Before we begin, make sure you have Flutter installed and set up on your machine. Create a new Flutter project by running the following command in your terminal:
flutter create fab_example
2. Open the main.dart file:
Once the project is created, navigate to the lib folder and open the main.dart file.
3. Import the necessary packages:
To work with the Floating Action Button, import the following packages at the top of the main.dart file:
import 'package:flutter/material.dart';
4. Define the main function:
Inside the main.dart file, locate the main() function and modify it as follows:
void main() => runApp(MyApp());
5. Create a StatefulWidget:
Within the lib folder, create a new file called fab_screen.dart and define a new StatefulWidget called FabScreen. This will serve as our screen for demonstrating the Floating Action Button.
6. Implement the FabScreen widget:
Inside the fab_screen.dart file, define the FabScreen class as follows:
class FabScreen extends StatefulWidget {
  @override
  _FabScreenState createState() => _FabScreenState();
}
7. Implement the state class:
Below the FabScreen class, define the _FabScreenState class, which extends State<FabScreen>. Inside this class, we will implement the layout and behavior of our screen, including the Floating Action Button.
a. Add the _selectedIndex variable: Declare a private variable _selectedIndex of type int to keep track of the selected index in our example:
int _selectedIndex = 0;
b. Implement the build() method: Inside the _FabScreenState class, implement the build() method, which will return the layout for our screen. The layout will consist of a Scaffold with a Floating Action Button at the bottom right corner.
@override
Widget build(BuildContext context) {
  return Scaffold(
    appBar: AppBar(
      title: Text('Floating Action Button Example'),
    ),
    body: Center(
      child: Text('Content goes here'),
    ),
    floatingActionButton: FloatingActionButton(
      onPressed: () {
        // Perform action on button press
        // Add your code here
      },
      child: Icon(Icons.add),
    ),
  );
}
8. Integrate FabScreen into the main.dart file:
Back in the main.dart file, modify the MyApp class to use FabScreen as the home screen:
class MyApp extends StatelessWidget {
  @override
  Widget build(BuildContext context) {
    return MaterialApp(
      title: 'FAB Example',
      home: FabScreen(),
    );
  }
}
Sample Code:
import 'package:flutter/material.dart';

void main() {
  runApp(MyApp());
}

class MyApp extends StatelessWidget {
  @override
  Widget build(BuildContext context) {
    return MaterialApp(
      title: 'FAB Example',
      theme: ThemeData(
        primarySwatch: Colors.blue,
      ),
      home: MyHomePage(),
    );
  }
}

class MyHomePage extends StatelessWidget {
  @override
  Widget build(BuildContext context) {
    return Scaffold(
      appBar: AppBar(
        title: Text('FAB Example'),
      ),
      body: Center(
        child: Text(
          'Press the FAB!',
          style: TextStyle(fontSize: 20),
        ),
      ),
      floatingActionButton: FloatingActionButton(
        onPressed: () {
          // FAB click logic goes here
          print('FAB clicked!');
        },
        child: Icon(Icons.add),
      ),
    );
  }
}
Output :

Conclusion:
Congratulations! You have successfully added a Floating Action Button (FAB) in Flutter. You learned how to create a new Flutter project, import necessary packages, define a StatefulWidget, implement the screen layout with a Scaffold, and integrate the FloatingActionButton.


