Introduction
A QR (Quick Response) code is a two-dimensional barcode that can store various types of data, such as text, URLs, contact information, and more. Integrating a QR code generator into your Flutter app allows users to generate QR codes dynamically and share information easily. In this tutorial, we will learn how to add a QR generator in Flutter and explore how to generate and display QR codes.
Content
Step 1: Create a new Flutter project
Ensure that you have Flutter installed and set up on your machine. Create a new Flutter project using the following command in your terminal:
flutter create qr_generator_example
Step 2: Import the necessary packages
Inside the lib folder, open the main.dart file. Import the following packages at the top of the file:
import 'package:flutter/material.dart';
import 'package:qr_flutter/qr_flutter.dart';
The qr_flutter package provides QR code generation functionality in Flutter.
Step 3: Implement the QR Generator widget
Replace the existing code in the MyApp class with the following:
class MyApp extends StatelessWidget {
  @override
  Widget build(BuildContext context) {
    return MaterialApp(
      title: 'QR Generator',
      theme: ThemeData(primarySwatch: Colors.blue),
      home: Scaffold(
        appBar: AppBar(
          title: Text('QR Generator'),
        ),
        body: Center(
          child: Column(
            mainAxisAlignment: MainAxisAlignment.center,
            children: [
              QrImage(
                data: 'https://www.example.com',
                version: QrVersions.auto,
                size: 200.0,
              ),
              SizedBox(height: 20.0),
              Text(
                'Scan QR Code to Visit Example Website',
                style: TextStyle(fontSize: 18.0, fontWeight: FontWeight.bold),
              ),
            ],
          ),
        ),
      ),
    );
  }
}
In the above code, we have implemented the QR generator widget. It consists of a QrImage widget from the qr_flutter package, which takes the data to encode as a QR code. We have also added a text widget below the QR code to provide instructions to the user.
Step 4: Run the app
Save the changes and run the app using the following command in the terminal:
flutter run
Sample Code:
import 'package:flutter/material.dart';
import 'package:qr_flutter/qr_flutter.dart';

void main() {
  runApp(MyApp());
}

class MyApp extends StatelessWidget {
  @override
  Widget build(BuildContext context) {
    return MaterialApp(
      title: 'QR Generator',
      theme: ThemeData(
        primarySwatch: Colors.blue,
      ),
      home: QRGeneratorScreen(),
    );
  }
}

class QRGeneratorScreen extends StatefulWidget {
  @override
  _QRGeneratorScreenState createState() => _QRGeneratorScreenState();
}

class _QRGeneratorScreenState extends State<QRGeneratorScreen> {
  TextEditingController _textEditingController = TextEditingController();
  String _qrData = '';

  @override
  Widget build(BuildContext context) {
    return Scaffold(
      appBar: AppBar(
        title: Text('QR Generator'),
      ),
      body: Padding(
        padding: EdgeInsets.all(20.0),
        child: Column(
          crossAxisAlignment: CrossAxisAlignment.stretch,
          children: [
            TextField(
              controller: _textEditingController,
              decoration: InputDecoration(
                hintText: 'Enter data for QR code',
              ),
              onChanged: (value) {
                setState(() {
                  _qrData = value;
                });
              },
            ),
            SizedBox(height: 20.0),
            Expanded(
              child: Center(
                child: _qrData.isNotEmpty
                    ? QrImage(
                        data: _qrData,
                        version: QrVersions.auto,
                        size: 200.0,
                      )
                    : Text('Enter data to generate QR code'),
              ),
            ),
          ],
        ),
      ),
    );
  }

  @override
  void dispose() {
    _textEditingController.dispose();
    super.dispose();
  }
}
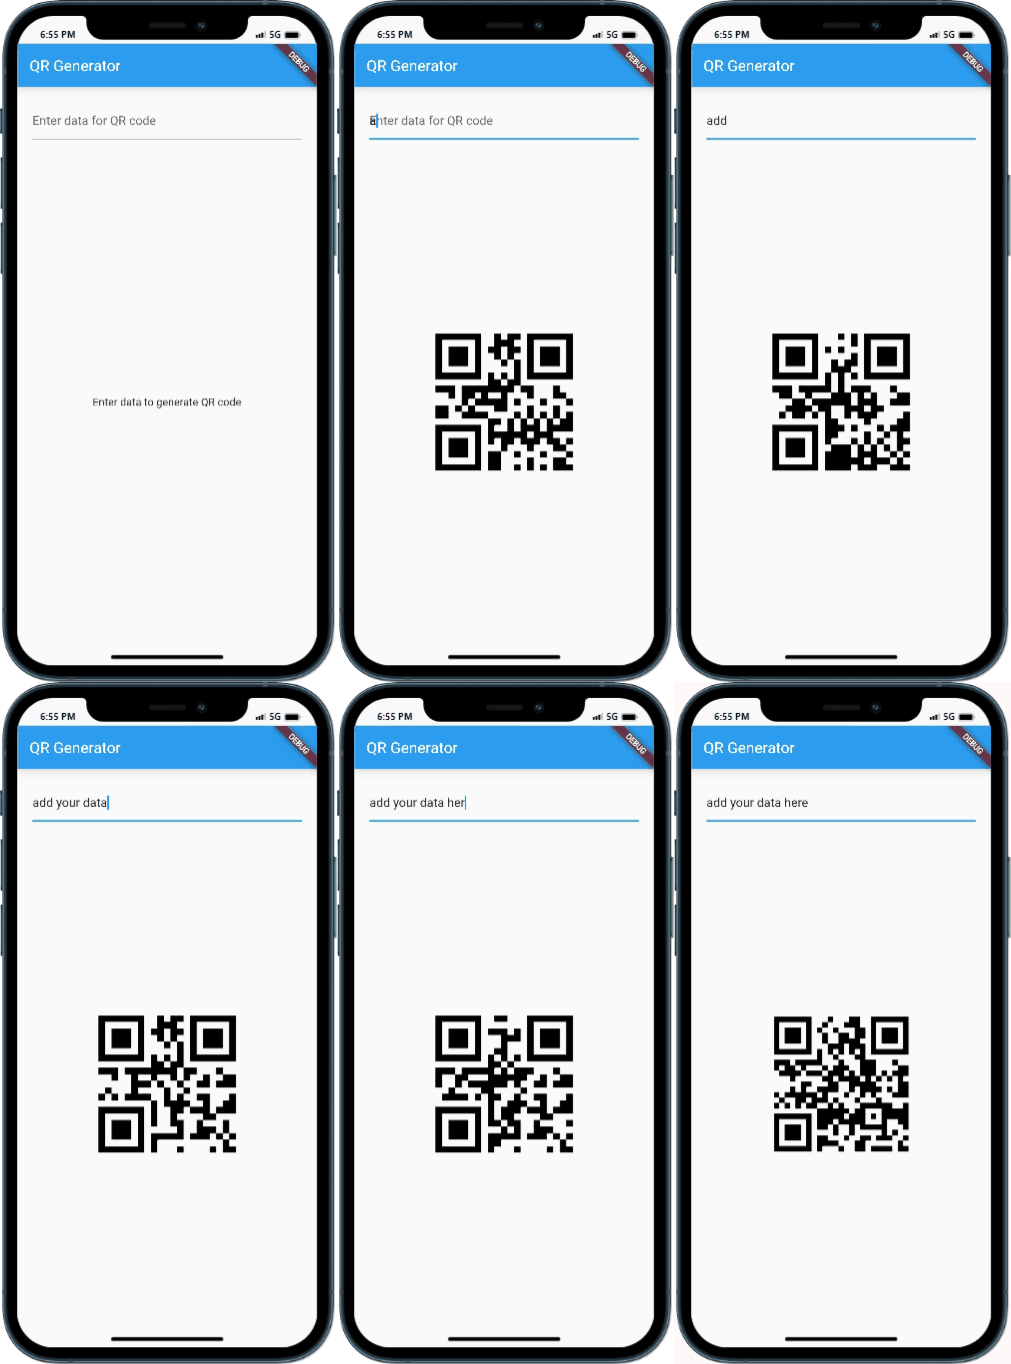
Output:

Conclusion:
Congratulations! You have successfully added a QR generator to your Flutter app. By following the steps outlined in this tutorial, you learned how to create a new Flutter project, import necessary packages, implement the QR generator widget using the qr_flutter package, and display the generated QR code along with text instructions. Now you can enhance the functionality of your app by generating QR codes dynamically and enable users to share information effortlessly.


