Introduction:
Popup menus in Flutter provide a way to display a list of options when a user performs a long press or tap on a specific widget. This allows you to offer context-specific actions within your app. In this tutorial, you’ll learn how to implement a Popup Menu in Flutter.
Content:
1.Create a New Flutter Project:
Ensure that you have Flutter installed and set up on your machine. Create a new Flutter project using the following command in your terminal:
flutter create popup_menu_example
2.Open the Dart File:
Open the main.dart file in the lib directory of your project.
3.Import the Necessary Packages:
Import the flutter/material.dart package to use Flutter’s material design widgets.
import 'package:flutter/material.dart';
4.Create a StatefulWidget:
Create a StatefulWidget to hold the state of your app. This state will include the selected menu option.
void main() {
  runApp(MyApp());
}

class MyApp extends StatelessWidget {
  @override
  Widget build(BuildContext context) {
    return MaterialApp(
      title: 'Popup Menu Example',
      home: MyHomePage(),
    );
  }
}

class MyHomePage extends StatefulWidget {
  @override
  _MyHomePageState createState() => _MyHomePageState();
}

class _MyHomePageState extends State<MyHomePage> {
  String _selectedOption = 'None';

  // Additional code goes here
}
5.Implement the Popup Menu:
Add a button or any other widget where you want the Popup Menu to appear. In this example, we’ll use an IconButton.
class _MyHomePageState extends State<MyHomePage> {
  String _selectedOption = 'None';

  @override
  Widget build(BuildContext context) {
    return Scaffold(
      appBar: AppBar(
        title: Text('Popup Menu Example'),
        actions: [
          IconButton(
            icon: Icon(Icons.more_vert),
            onPressed: () {
              _showPopupMenu(context);
            },
          ),
        ],
      ),
      body: Center(
        child: Text('Selected Option: $_selectedOption'),
      ),
    );
  }

  // Additional code goes here
}
6.Define the Popup Menu Items:
Create a method _showPopupMenu that displays the Popup Menu with a list of options.
class _MyHomePageState extends State<MyHomePage> {
  String _selectedOption = 'None';

  @override
  Widget build(BuildContext context) {
    return Scaffold(
      appBar: AppBar(
        title: Text('Popup Menu Example'),
        actions: [
          IconButton(
            icon: Icon(Icons.more_vert),
            onPressed: () {
              _showPopupMenu(context);
            },
          ),
        ],
      ),
      body: Center(
        child: Text('Selected Option: $_selectedOption'),
      ),
    );
  }

  void _showPopupMenu(BuildContext context) {
    final RenderBox overlay = Overlay.of(context).context.findRenderObject() as RenderBox;

    showMenu(
      context: context,
      position: RelativeRect.fromRect(
        Rect.fromPoints(
          overlay.localToGlobal(Offset.zero),
          overlay.localToGlobal(overlay.size.bottomRight(Offset.zero)),
        ),
        Offset.zero & overlay.size,
      ),
      items: [
        PopupMenuItem(
          value: 'Option 1',
          child: Text('Option 1'),
        ),
        PopupMenuItem(
          value: 'Option 2',
          child: Text('Option 2'),
        ),
        PopupMenuItem(
          value: 'Option 3',
          child: Text('Option 3'),
        ),
      ],
    ).then((value) {
      if (value != null) {
        setState(() {
          _selectedOption = value as String;
        });
      }
    });
  }
}
7.Run the App:
Save your changes and run the app using the following command in your terminal:
flutter run
Test the Popup Menu by tapping the icon in the app bar.
Sample Code:
// ignore_for_file: prefer_const_constructors

import 'package:flutter/material.dart';

enum Options { search, upload, copy, exit }

class POpupmenue extends StatefulWidget {
  const POpupmenue({super.key});

  @override
  State<POpupmenue> createState() => _POpupmenueState();
}

class _POpupmenueState extends State<POpupmenue> {
  TextEditingController _textEditingController = TextEditingController();
  var _popupMenuItemIndex = 0;
  Color _changeColorAccordingToMenuItem = Colors.red;
  var appBarHeight = AppBar().preferredSize.height;

  _buildAppBar() {
    return AppBar(
      title: const Text(
        'Popup menue',
        style: TextStyle(color: Colors.white, fontSize: 16.0),
      ),
      actions: [
        PopupMenuButton(
          onSelected: (value) {
            _onMenuItemSelected(value as int);
          },
          offset: Offset(0.3, appBarHeight),
          shape: RoundedRectangleBorder(
            borderRadius: BorderRadius.only(
              bottomLeft: Radius.circular(8.0),
              bottomRight: Radius.circular(8.0),
              topLeft: Radius.circular(8.0),
              topRight: Radius.circular(8.0),
            ),
          ),
          itemBuilder: (ctx) => [
            _buildPopupMenuItem('Search', Icons.search, Options.search.index),
            _buildPopupMenuItem('Upload', Icons.upload, Options.upload.index),
            _buildPopupMenuItem('Copy', Icons.copy, Options.copy.index),
            _buildPopupMenuItem('Exit', Icons.exit_to_app, Options.exit.index),
          ],
        )
      ],
    );
  }

  PopupMenuItem _buildPopupMenuItem(String title, IconData iconData, int position) {
    return PopupMenuItem(
      value: position,
      child: Row(
        mainAxisAlignment: MainAxisAlignment.spaceAround,
        children: [
          Icon(
            iconData,
            color: Colors.black,
          ),
          Text(title),
        ],
      ),
    );
  }

  _onMenuItemSelected(int value) {
    setState(() {
      _popupMenuItemIndex = value;
    });

    if (value == Options.search.index) {
      _changeColorAccordingToMenuItem = Colors.red;
    } else if (value == Options.upload.index) {
      _changeColorAccordingToMenuItem = Colors.green;
    } else if (value == Options.copy.index) {
      _changeColorAccordingToMenuItem = Colors.blue;
    } else {
      _changeColorAccordingToMenuItem = Colors.purple;
    }
  }

  @override
  Widget build(BuildContext context) {
    return MaterialApp(
      title: 'Flutter Demo',
      debugShowCheckedModeBanner: false,
      theme: ThemeData(
        primarySwatch: Colors.blue,
      ),
      home: Scaffold(
        appBar: _buildAppBar(),
        body: Center(
          child: Container(
            child: Text("Your Content Goes Here"),
          ),
        ),
      ),
    );
  }
}
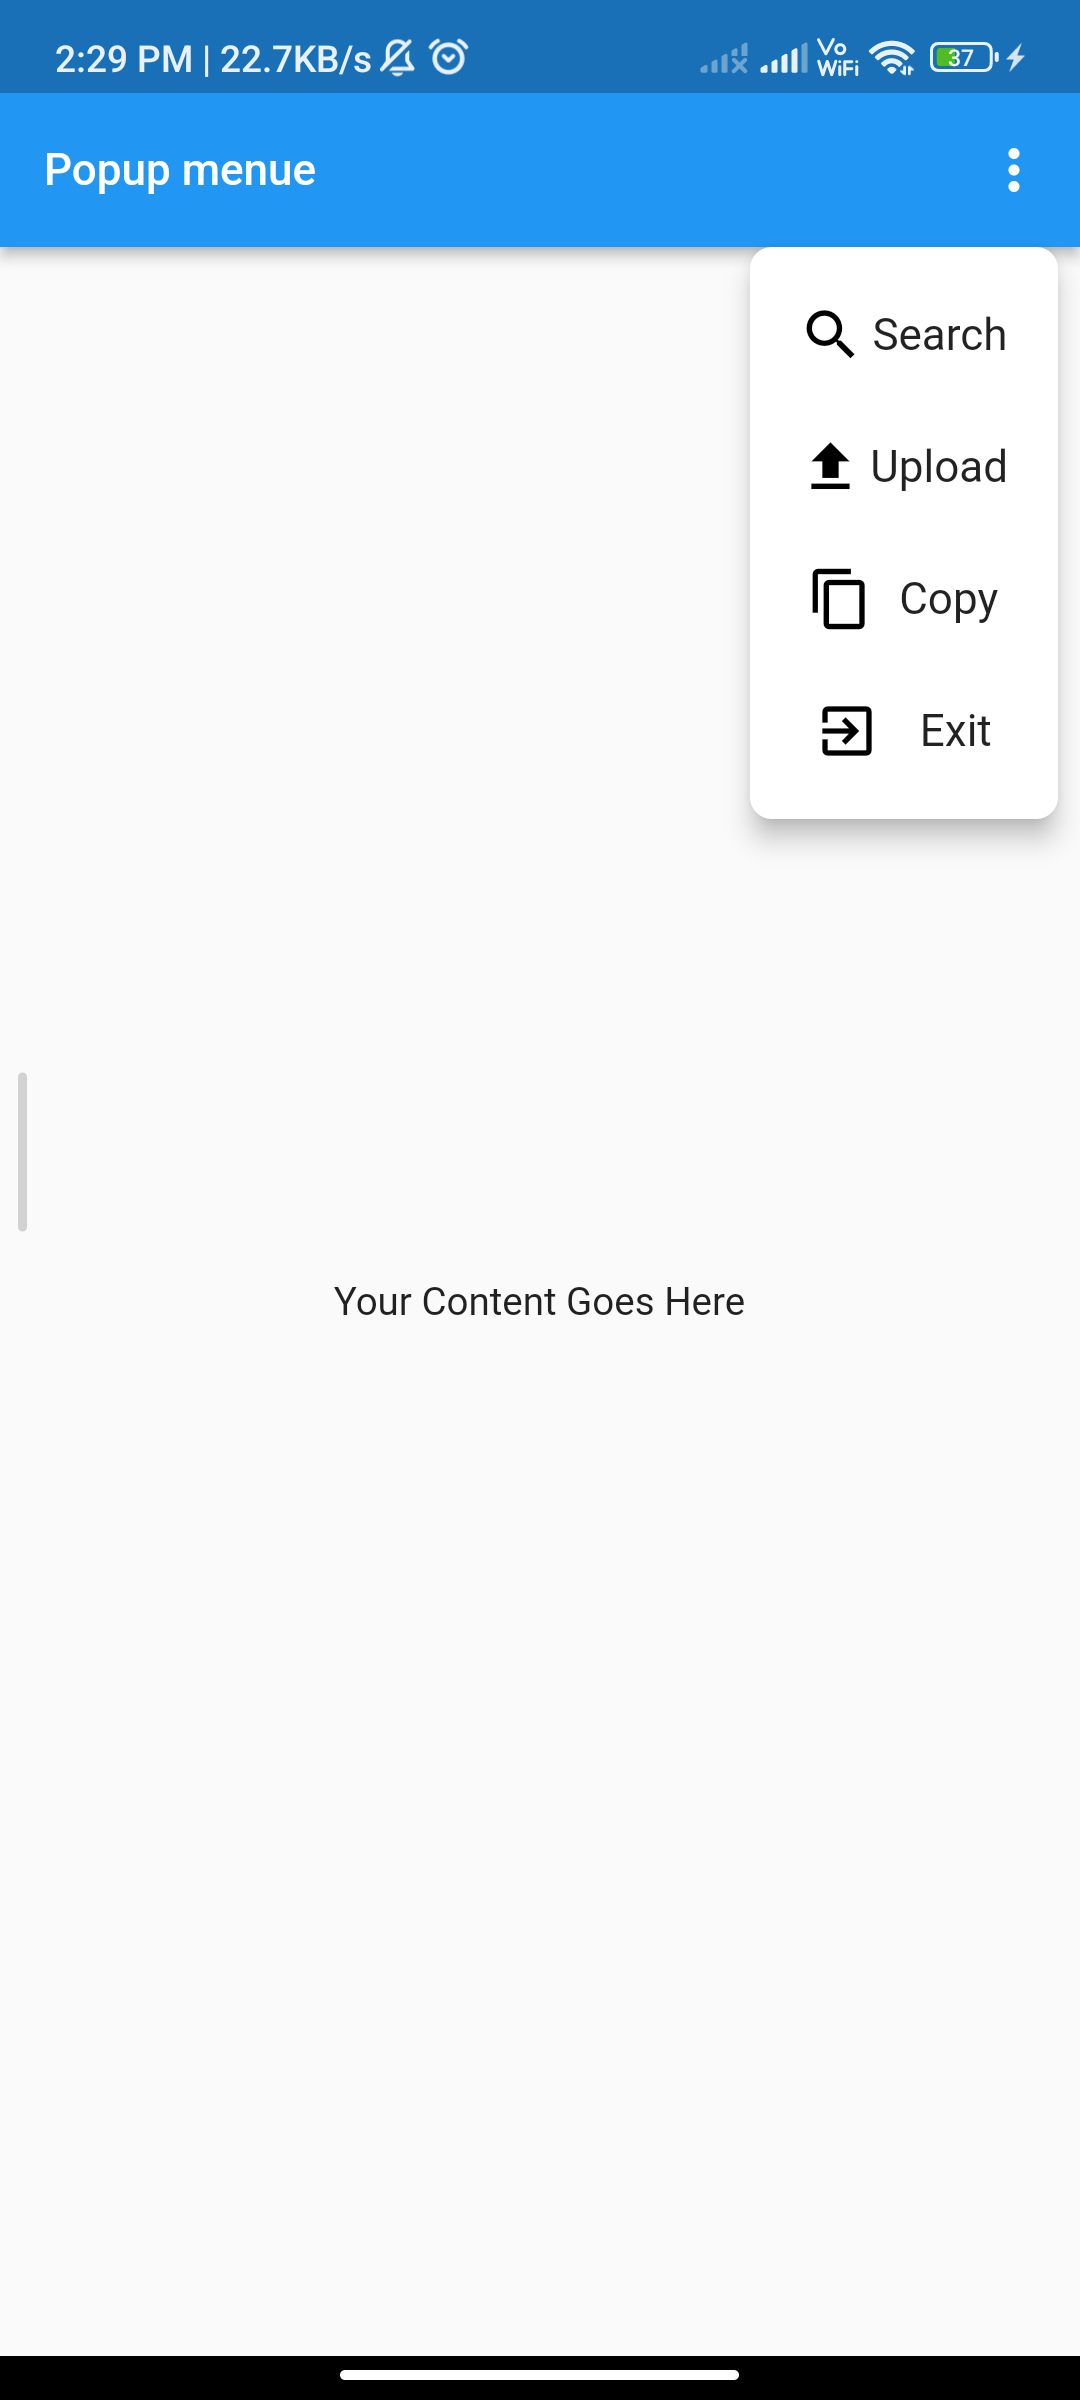
Output:

Conclusion:
Congratulations! You have successfully implemented a Popup Menu in your Flutter app. Customize the options and appearance according to your app’s requirements. Popup Menus are a convenient way to provide additional actions and functionalities within your app’s user interface.


