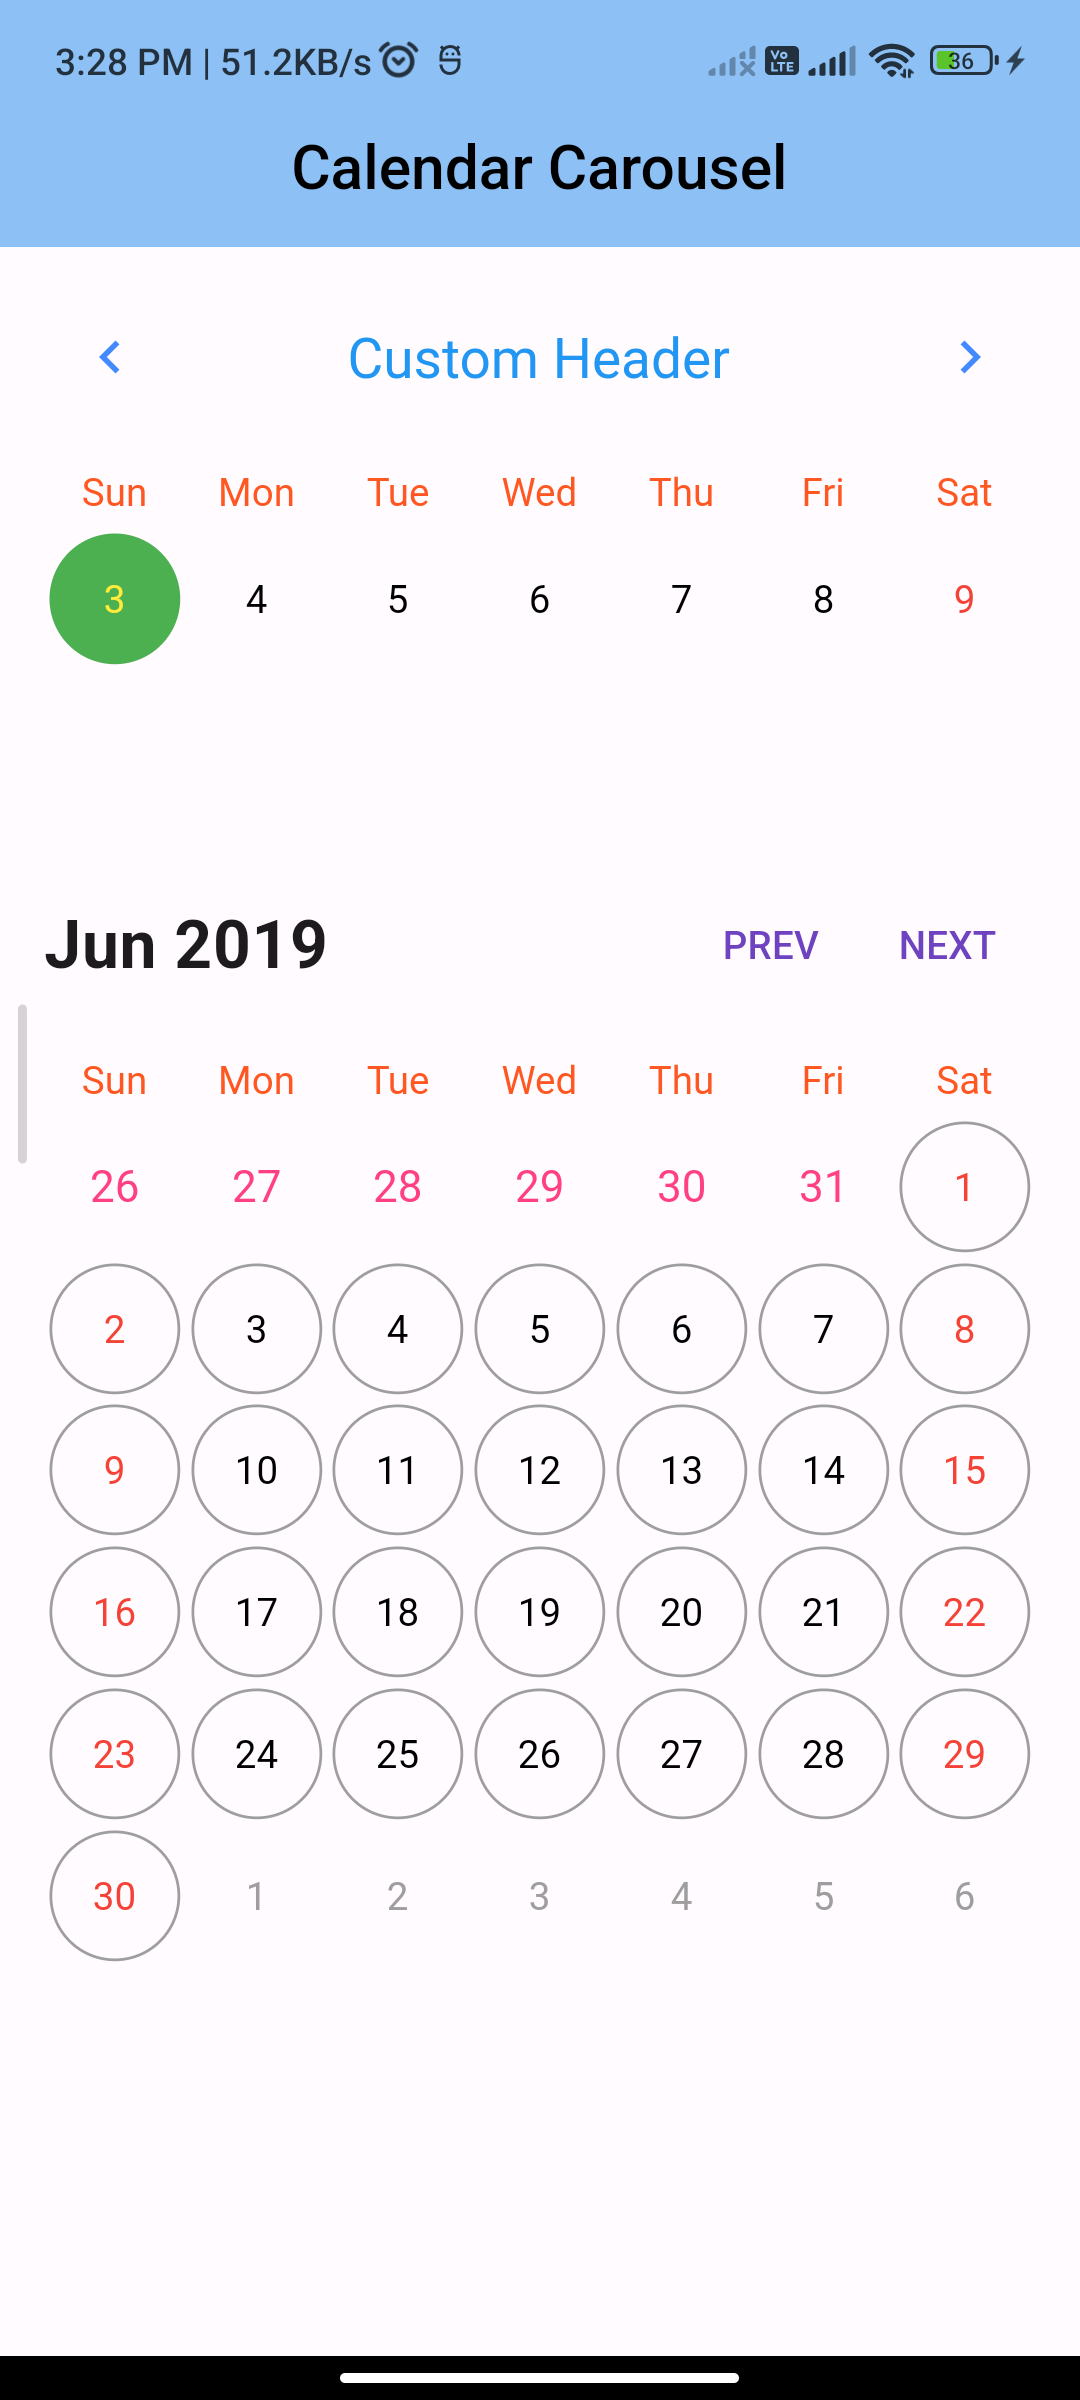
Introduction:
In Flutter, a calendar carousel is a useful widget for displaying and selecting dates. The flutter_calendar_carousel package provides a convenient way to implement a calendar carousel in your Flutter app. This tutorial will guide you through implementing a calendar carousel in Flutter using the flutter_calendar_carousel package.
Content:
Step 1. Add Dependencies:
Include the flutter_calendar_carousel package in your pubspec.yaml file. Open the file and add the following dependency:
dependencies:
flutter_calendar_carousel: ^1.6.2
Save the file and run flutter pub get to fetch the package.
Step 2. Import Packages:
Import the required packages in your Dart file:
import 'package:flutter/material.dart';
import 'package:flutter_calendar_carousel/flutter_calendar_carousel.dart' show CalendarCarousel;
import 'package:flutter_calendar_carousel/classes/event.dart';
import 'package:flutter_calendar_carousel/classes/event_list.dart';
Step 3. Create a Calendar Carousel Widget:
Create a CalendarCarousel widget to display the calendar carousel. Customize the appearance and behavior of the calendar carousel using various properties.
CalendarCarousel(
  onDayPressed: (DateTime date, List<Event> events) {
    // Handle day pressed event
  },
  weekendTextStyle: TextStyle(color: Colors.red),
  thisMonthDayBorderColor: Colors.grey,
  height: 420.0,
  selectedDateTime: DateTime.now(),
  daysHaveCircularBorder: true,
)
Step 4. Display the Calendar Carousel:
Add the CalendarCarousel widget to your app’s UI to display the calendar carousel.
@override
Widget build(BuildContext context) {
  return MaterialApp(
    title: 'Calendar Carousel Example',
    home: Scaffold(
      appBar: AppBar(
        title: Text('Calendar Carousel Example'),
      ),
      body: Center(
        child: CalendarCarousel(
          onDayPressed: (DateTime date, List<Event> events) {
            // Handle day pressed event
          },
          weekendTextStyle: TextStyle(color: Colors.red),
          thisMonthDayBorderColor: Colors.grey,
          height: 420.0,
          selectedDateTime: DateTime.now(),
          daysHaveCircularBorder: true,
        ),
      ),
    ),
  );
}
Sample Code:
// ignore_for_file: prefer_const_constructors, unnecessary_new, prefer_final_fields

import 'package:flutter/material.dart';
import 'package:flutter_calendar_carousel/classes/event.dart';

import 'package:flutter_calendar_carousel/flutter_calendar_carousel.dart' show CalendarCarousel, EventList;

import 'package:intl/intl.dart' show DateFormat;

class CalendarCarouselPge extends StatefulWidget {
  CalendarCarouselPge({
    Key? key,
  }) : super(key: key);

  @override
  _CalendarCarouselPgeState createState() => new _CalendarCarouselPgeState();
}

class _CalendarCarouselPgeState extends State<CalendarCarouselPge> {
  DateTime _currentDate = DateTime(2019, 2, 3);
  DateTime _currentDate2 = DateTime(2019, 2, 3);
  String _currentMonth = DateFormat.yMMM().format(DateTime(2019, 2, 3));
  DateTime _targetDateTime = DateTime(2019, 2, 3);
//  List<DateTime> _markedDate = [DateTime(2018, 9, 20), DateTime(2018, 10, 11)];
  static Widget _eventIcon = new Container(
    decoration: new BoxDecoration(
        color: Colors.white, borderRadius: BorderRadius.all(Radius.circular(1000)), border: Border.all(color: Colors.blue, width: 2.0)),
    child: new Icon(
      Icons.person,
      color: Colors.amber,
    ),
  );

  EventList<Event> _markedDateMap = new EventList<Event>(
    events: {
      new DateTime(2019, 2, 10): [
        new Event(
          date: new DateTime(2019, 2, 10),
          title: 'Event 1',
          icon: _eventIcon,
          dot: Container(
            margin: EdgeInsets.symmetric(horizontal: 1.0),
            color: Colors.red,
            height: 5.0,
            width: 5.0,
          ),
        ),
        new Event(
          date: new DateTime(2019, 2, 10),
          title: 'Event 2',
          icon: _eventIcon,
        ),
        new Event(
          date: new DateTime(2019, 2, 10),
          title: 'Event 3',
          icon: _eventIcon,
        ),
      ],
    },
  );

  @override
  void initState() {
    /// Add more events to _markedDateMap EventList
    _markedDateMap.add(
        new DateTime(2019, 2, 25),
        new Event(
          date: new DateTime(2019, 2, 25),
          title: 'Event 5',
          icon: _eventIcon,
        ));

    _markedDateMap.add(
        new DateTime(2019, 2, 10),
        new Event(
          date: new DateTime(2019, 2, 10),
          title: 'Event 4',
          icon: _eventIcon,
        ));

    _markedDateMap.addAll(new DateTime(2019, 2, 11), [
      new Event(
        date: new DateTime(2019, 2, 11),
        title: 'Event 1',
        icon: _eventIcon,
      ),
      new Event(
        date: new DateTime(2019, 2, 11),
        title: 'Event 2',
        icon: _eventIcon,
      ),
      new Event(
        date: new DateTime(2019, 2, 11),
        title: 'Event 3',
        icon: _eventIcon,
      ),
    ]);
    super.initState();
  }

  @override
  Widget build(BuildContext context) {
    /// Example with custom icon
    final _calendarCarousel = CalendarCarousel<Event>(
      onDayPressed: (date, events) {
        this.setState(() => _currentDate = date);
        events.forEach((event) => print(event.title));
      },
      weekendTextStyle: TextStyle(
        color: Colors.red,
      ),
      thisMonthDayBorderColor: Colors.grey,
//          weekDays: null, /// for pass null when you do not want to render weekDays
      headerText: 'Custom Header',
      weekFormat: true,
      markedDatesMap: _markedDateMap,
      height: 200.0,
      selectedDateTime: _currentDate2,
      showIconBehindDayText: true,
//          daysHaveCircularBorder: false, /// null for not rendering any border, true for circular border, false for rectangular border
      customGridViewPhysics: NeverScrollableScrollPhysics(),
      markedDateShowIcon: true,
      markedDateIconMaxShown: 2,
      selectedDayTextStyle: TextStyle(
        color: Colors.yellow,
      ),
      todayTextStyle: TextStyle(
        color: Colors.blue,
      ),
      markedDateIconBuilder: (event) {
        return event.icon ?? Icon(Icons.help_outline);
      },
      minSelectedDate: _currentDate.subtract(Duration(days: 360)),
      maxSelectedDate: _currentDate.add(Duration(days: 360)),
      todayButtonColor: Colors.transparent,
      todayBorderColor: Colors.green,
      markedDateMoreShowTotal: true, // null for not showing hidden events indicator
//          markedDateIconMargin: 9,
//          markedDateIconOffset: 3,
    );

    /// Example Calendar Carousel without header and custom prev & next button
    final _calendarCarouselNoHeader = CalendarCarousel<Event>(
      todayBorderColor: Colors.green,
      onDayPressed: (date, events) {
        this.setState(() => _currentDate2 = date);
        events.forEach((event) => print(event.title));
      },
      daysHaveCircularBorder: true,
      showOnlyCurrentMonthDate: false,
      weekendTextStyle: TextStyle(
        color: Colors.red,
      ),
      thisMonthDayBorderColor: Colors.grey,
      weekFormat: false,
//      firstDayOfWeek: 4,
      markedDatesMap: _markedDateMap,
      height: 420.0,
      selectedDateTime: _currentDate2,
      targetDateTime: _targetDateTime,
      customGridViewPhysics: NeverScrollableScrollPhysics(),
      markedDateCustomShapeBorder: CircleBorder(side: BorderSide(color: Colors.yellow)),
      markedDateCustomTextStyle: TextStyle(
        fontSize: 18,
        color: Colors.blue,
      ),
      showHeader: false,
      todayTextStyle: TextStyle(
        color: Colors.blue,
      ),
      // markedDateShowIcon: true,
      // markedDateIconMaxShown: 2,
      // markedDateIconBuilder: (event) {
      //   return event.icon;
      // },
      // markedDateMoreShowTotal:
      //     true,
      todayButtonColor: Colors.yellow,
      selectedDayTextStyle: TextStyle(
        color: Colors.yellow,
      ),
      minSelectedDate: _currentDate.subtract(Duration(days: 360)),
      maxSelectedDate: _currentDate.add(Duration(days: 360)),
      prevDaysTextStyle: TextStyle(
        fontSize: 16,
        color: Colors.pinkAccent,
      ),
      inactiveDaysTextStyle: TextStyle(
        color: Colors.tealAccent,
        fontSize: 16,
      ),
      onCalendarChanged: (DateTime date) {
        this.setState(() {
          _targetDateTime = date;
          _currentMonth = DateFormat.yMMM().format(_targetDateTime);
        });
      },
      onDayLongPressed: (DateTime date) {
        print('long pressed date $date');
      },
    );

    return new Scaffold(
        appBar: AppBar(
          centerTitle: true,
          elevation: 2,
          title: Text(
            "Calendar Carousel",
            style: TextStyle(fontSize: 22, color: Colors.black, fontWeight: FontWeight.w500),
          ),
          backgroundColor: Colors.blue[200],
        ),
        // appBar: new AppBar(
        //   title: new Text(widget.title),
        // ),
        body: SingleChildScrollView(
          child: Column(
            crossAxisAlignment: CrossAxisAlignment.start,
            mainAxisAlignment: MainAxisAlignment.start,
            children: <Widget>[
              //custom icon
              Container(
                margin: EdgeInsets.symmetric(horizontal: 16.0),
                child: _calendarCarousel,
              ), // This trailing comma makes auto-formatting nicer for build methods.
              //custom icon without header
              Container(
                margin: EdgeInsets.only(
                  top: 30.0,
                  bottom: 16.0,
                  left: 16.0,
                  right: 16.0,
                ),
                child: new Row(
                  children: <Widget>[
                    Expanded(
                        child: Text(
                      _currentMonth,
                      style: TextStyle(
                        fontWeight: FontWeight.bold,
                        fontSize: 24.0,
                      ),
                    )),
                    TextButton(
                      child: Text('PREV'),
                      onPressed: () {
                        setState(() {
                          _targetDateTime = DateTime(_targetDateTime.year, _targetDateTime.month - 1);
                          _currentMonth = DateFormat.yMMM().format(_targetDateTime);
                        });
                      },
                    ),
                    TextButton(
                      child: Text('NEXT'),
                      onPressed: () {
                        setState(() {
                          _targetDateTime = DateTime(_targetDateTime.year, _targetDateTime.month + 1);
                          _currentMonth = DateFormat.yMMM().format(_targetDateTime);
                        });
                      },
                    )
                  ],
                ),
              ),
              Container(
                margin: EdgeInsets.symmetric(horizontal: 16.0),
                child: _calendarCarouselNoHeader,
              ), //
            ],
          ),
        ));
  }
}
Output:

Conclusion:
By following these steps, you can easily implement a calendar carousel in Flutter using the flutter_calendar_carousel package. Use the calendar carousel to display and select dates in your Flutter app.


